Before proceeding with image signing , docker & cosign needs to
be installed on that machine
Please follow the steps mentioned below for installing cosign
Installing Cosign
NOTE: The commands below pin cosign to v2.0.0 as a working
example. Check the
latest release
and update both the download URL and the filename to match — they must stay in sync.
# binary
wget
"https://github.com/sigstore/cosign/releases/download/v2.0.0/cosign-linux-amd64"
mv cosign-linux-amd64 /usr/local/bin/cosign
chmod +x /usr/local/bin/cosign
# rpm
wget
"https://github.com/sigstore/cosign/releases/download/v2.0.0/cosign-2.0.0.x86_64.rpm"
rpm -ivh cosign-2.0.0.x86_64.rpm
# dpkg
wget
"https://github.com/sigstore/cosign/releases/download/v2.0.0/cosign_2.0.0_amd64.deb"
dpkg -i cosign_2.0.0_amd64.deb
Installing and setting up python and docker
- sudo apt-get install docker.io
- sudo apt-get install python-is-python3
- sudo apt install python3-pip
- sudo apt-get install python3-docker
- sudo apt-get -y install python3-openssl
- sudo apt-get install -y dbus-user-session
- sudo apt-get install -y docker-ce-rootless-extras
If docker-ce-rootless-extras gives error, follow the below
steps:
- sudo apt-get update
-
sudo apt-get install ca-certificates curl gnupg lsb-release
- sudo mkdir -p /etc/apt/keyrings
-
curl -fsSL https://download.docker.com/linux/ubuntu/gpg | sudo
gpg --dearmor -o /etc/apt/keyrings/docker.gpg
-
echo "deb [arch=$(dpkg --print-architecture)
signed-by=/etc/apt/keyrings/docker.gpg]
https://download.docker.com/linux/ubuntu $(lsb_release -cs)
stable" | sudo tee /etc/apt/sources.list.d/docker.list >
/dev/null
- sudo apt-get update
- sudo apt-get install docker-ce-rootless-extras
Now you would need to log in to your Docker Hub account by
running the below command
Setting up Container Signing
-
Download the Container Signing Tools from CodeSignSecure
portal.
- Go to folder SignImage
-
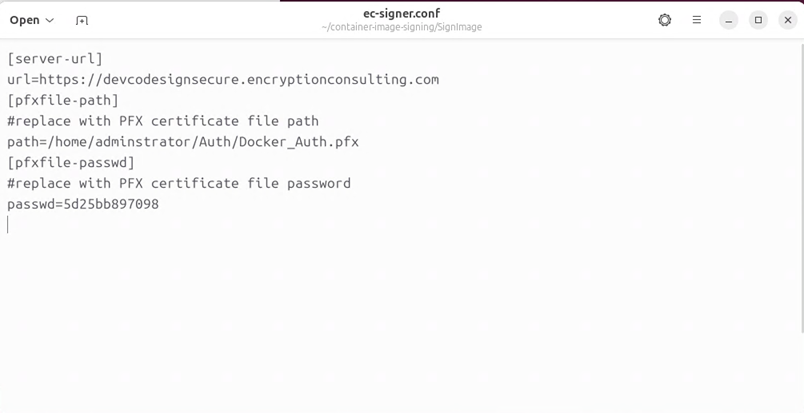
Open “ec-signer.conf” file and update the codesigning url,
path of your SSL Authentication certificate, and the
password of the certificate.
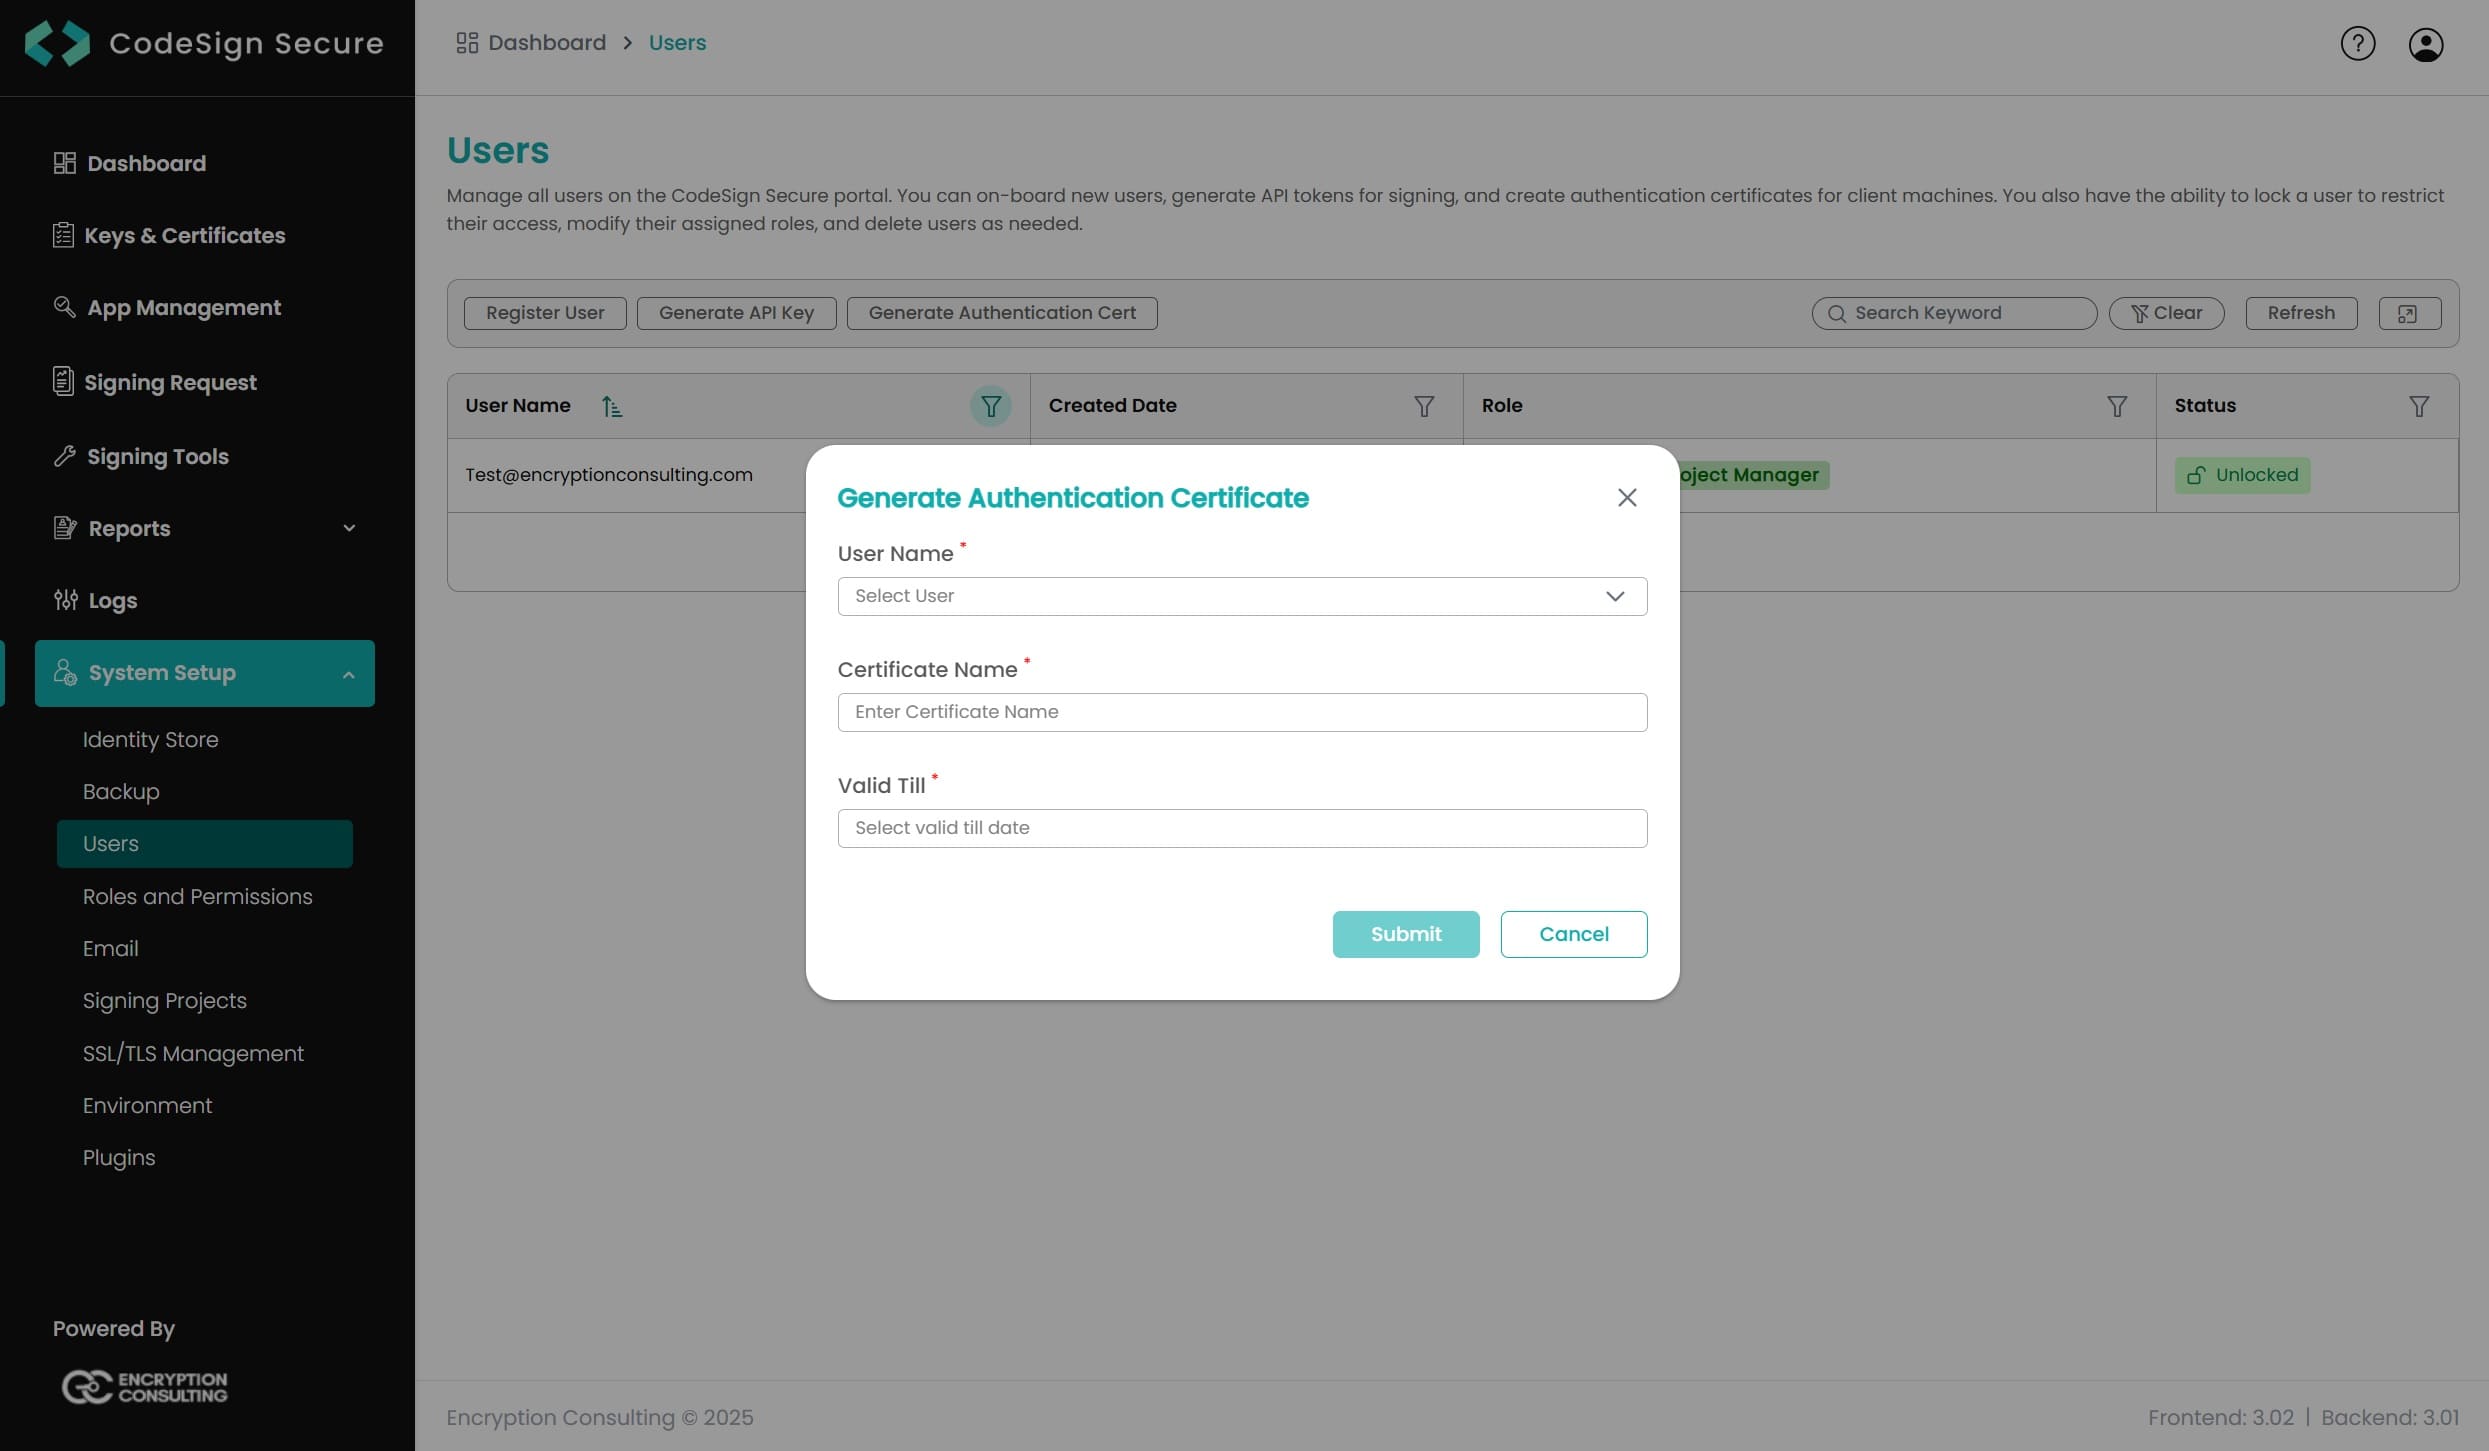
NOTE: The SSL Authentication Certificate
and password can be generated from CodeSignSecure portal.
- Open terminal
-
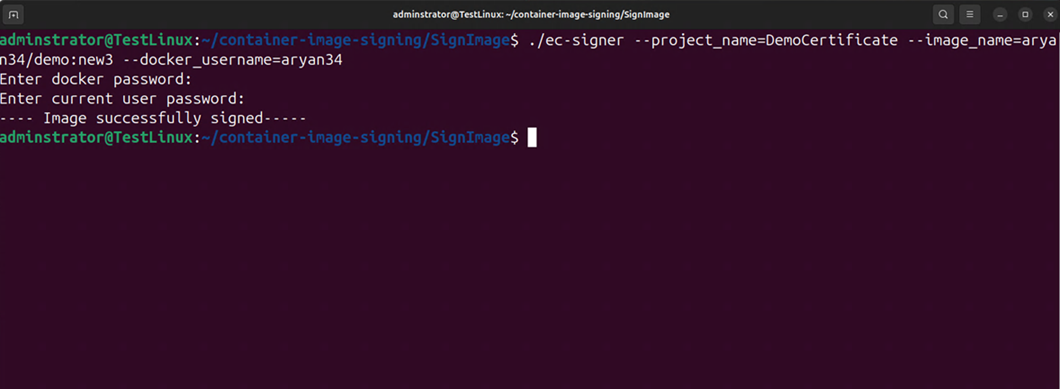
Execute
./ec-signer --project_name=<certificate name>
--image_name=<target container>
--docker_username=<your docker username>
-
You will be prompted to provide the docker hub password and
the root privileges to the current user
-
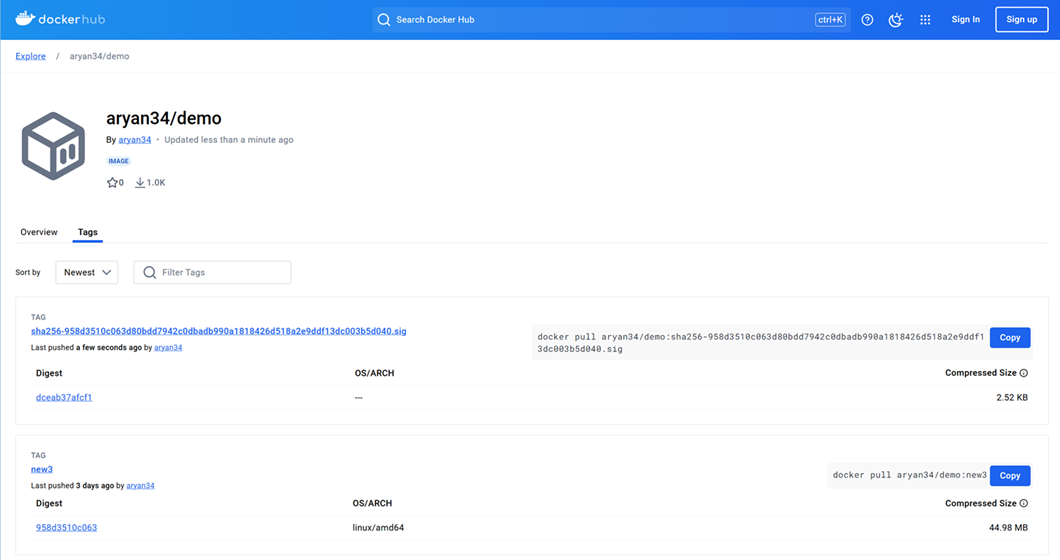
You will be able to see a new signature image on your docker
hub account.
Verifying Container Image
Verification of Container Images will allow you to deploy
only signed docker images and reject unsigned ones. To
verify container image signing, Kubernetes needs to be deployed.
Installing Kubernetes
Please follow the following command to install Kubernetes
curl -sfL https://get.k3s.io | sh -
Creating Kubernetes Services
Before we can verify an image in Kubernetes environment,
following services needs to deployed in the Kubernetes cluster
- Verify Image Service
- Image Validation Webhook Service
To create the Verify Image Service, follow the below steps:
- Go to the ../VerifyImage/image-verifier directory.
-
Create a docker image with name "verifyImage" using the
Dockerfile present in the folder
For example:
sudo docker build -t aryan34/demo:verifyImage .
where "aryan34" is the docker username and "demo" is the
docker hub repository name.
-
Now push this image to your docker hub account
For example:
sudo docker image push aryan34/demo:verifyImage
where "aryan34" is the docker username and "demo" is the
docker hub repository name.
-
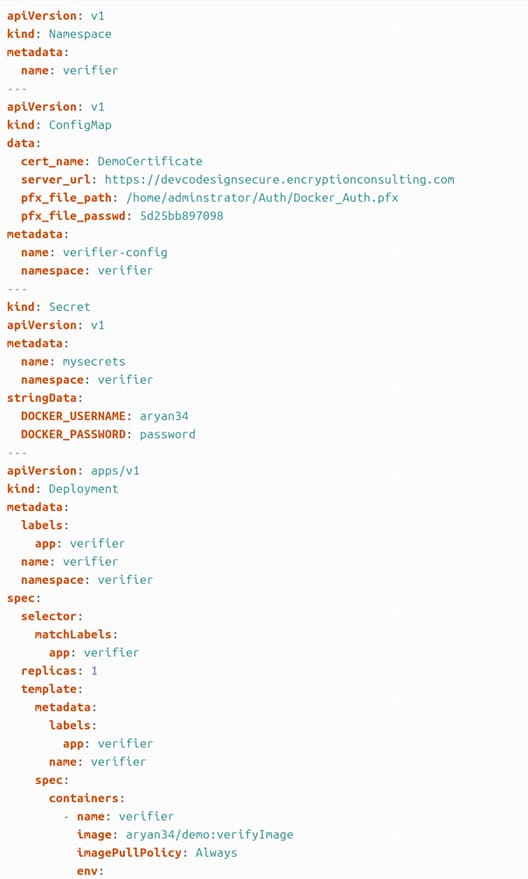
Now open the validator-deploy.yaml file and update the
following settings
- cert_name
- server_url
- pfx_file_path
- pfx_file_passwd
- DOCKER_USERNAME
- DOCKER_PASSWORD
-
image (NOTE: Keep the
image name as "verifyImage". Only change the docker
username and repository name.)
-
Deploy the Image Verifier Service
sudo kubectl apply -f validator-deploy.yaml
To create the Image Validation Service, follow the below steps:
- Go to the ../VerifyImage/validating-webhook directory.
-
Create a docker image with name "image-validation-webhook"
using the Dockerfile present in the folder
For example:
sudo docker build -t
aryan34/demo:image-validation-webhook .
where "aryan34" is the docker username and "demo" is the
docker hub repository name.
-
Now push this image to your docker hub account
For example:
sudo docker image push
aryan34/demo:image-validation-webhook
where "aryan34" is the docker username and "demo" is the
docker hub repository name.
-
Now deploy the webhook secrets and configuration yaml files.
sudo kubectl apply -f webhook-secret.yaml
sudo kubectl apply -f webhook-config.yaml
-
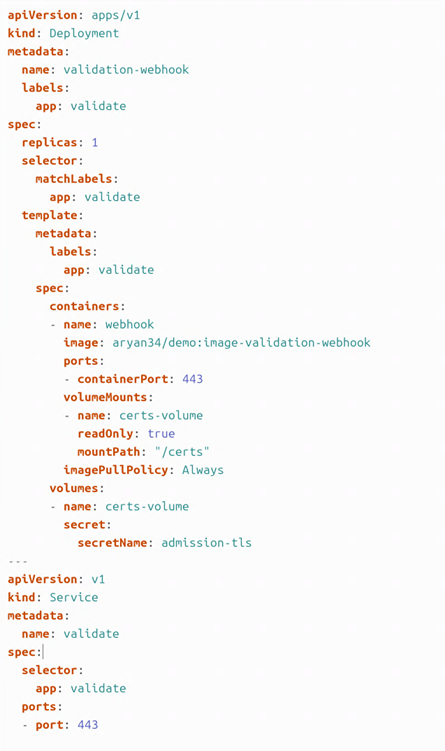
Now open the webhook-deploy.yaml file and update the following
settings
-
image (NOTE: Keep the image name as
"image-validation-webhook". Only change the docker
username and repository name.)
-
Deploy the Image Validation Webhook
sudo kubectl apply -f webhook-deploy.yaml
-
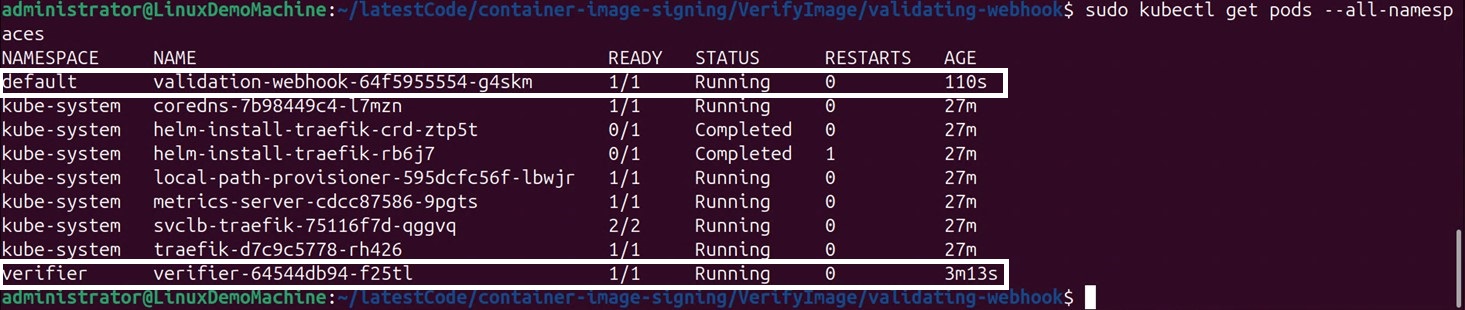
If the services are successfully deployed, when we execute
the following command –
sudo kubectl get pods --all-namespaces
We should get the following output -
Testing
If we try to deploy any container image which is not signed,
deployment will fail. We will be only able to deploy a signed
image due to our verifier and validation kubernetes services.
Deploying an Unsigned Image
We need to create a yaml file for the unsigned image
We have created a demo-deployment-unsigned.yaml file to deploy
the unsigned aryan34/demo:notSigned image.
Here is a sample yaml file. Remember to change the Deployed
service name (demo-deployment-unsigned), image name, and the
port number.
apiVersion: apps/v1
kind: Deployment
metadata:
name: demo-deployment-unsigned
labels:
app: demo
spec:
replicas: 1 #Number of desired replicas
selector:
matchLabels:
app: demo
template:
metadata:
labels:
app: demo
spec:
containers:
- name: demo
image: aryan34/demo:notSigned # unsigned demo image
ports:
- containerPort: 8997 # Port to expose
To deploy the unsigned image using kubernetes, run the below
command
sudo kubectl apply -f demo-deployment-unsigned.yaml

Deploying a Signed Image
Here is a sample yaml file. Remember to change the Deployed
service name (demo-deployment), image name, and the port number.
apiVersion: apps/v1
kind: Deployment
metadata:
name: demo-deployment
labels:
app: demo
spec:
replicas: 1 #Number of desired replicas
selector:
matchLabels:
app: demo
template:
metadata:
labels:
app: demo
spec:
containers:
- name: demo
image: aryan34/demo:new3 # signed demo image
ports:
- containerPort: 8999 # Port to expose
To deploy the signed image using kubernetes, run the below
command
sudo kubectl apply -f demo-deployment.yaml
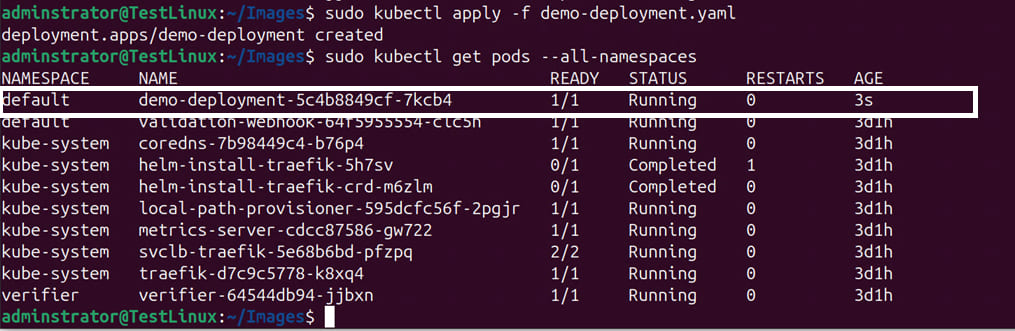
Now if you check all the pods, you will see a demo-deployment
service successfully running.