User Policy
The User Policy page lists all of the cryptographic policies created and maintained by users in your organization. From this single screen you can review existing policies, create new ones, inspect the algorithms each policy permits, and edit or remove policies as your standards evolve. It is reached from Discovery > Policy Management > User Policy in the left navigation menu.
Viewing User Policies
User policies are presented in a paginated table. A toolbar above the table provides the Add Policy action on the left, and a Search Keyword box, Clear, Refresh, and a full-screen toggle on the right.
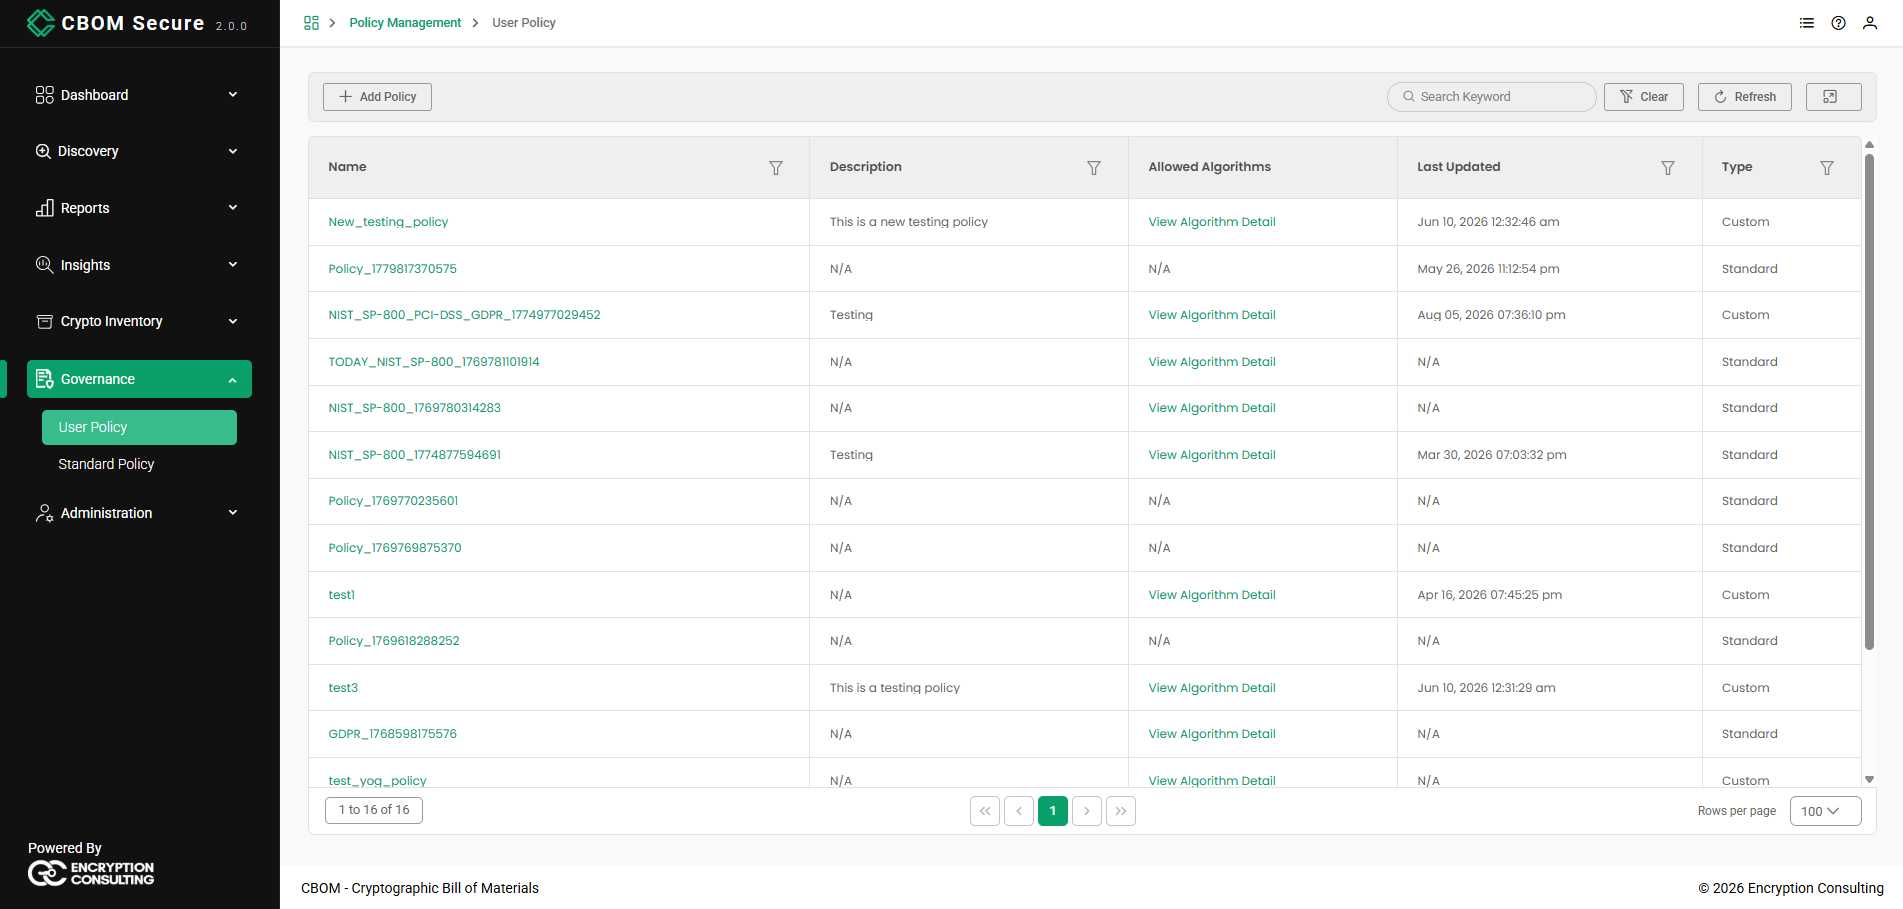
Each row in the table describes a single policy:
-
Name: The policy name. Policies created without a custom name are assigned an auto-generated name (for example, Policy_1779817370575).
-
Description: An optional description of the policy's purpose, or N/A if none was provided.
-
Allowed Algorithms: A View Algorithm Detail link that opens the full list of algorithms permitted by the policy, or N/A when no algorithms are associated.
-
Last Updated: The date and time the policy was last modified.
-
Type: Indicates how the policy was built — Standard for a compliance-derived policy or Custom for a manually defined one.
Use the Search Keyword box to filter across the table, or the column filter icons to narrow a single column. Name, Description and Type filter on their text, with Type offering a Custom / Standard dropdown, and Last Updated filters by date with Date is, Date is not, Date is before and Date is after. Refresh reloads the list with the latest data, and Clear resets any applied search or filters.
The footer below the table shows the record range on the left, the first, previous, numbered, next and last page links in the centre, and a Rows per page selector on the right offering 10, 20, 50 or 100 rows. Tables open at 20 rows unless an administrator has set a different size under UI Configuration > Table Defaults in System Configuration. When the list runs to more than five pages, a # (Jump to Page) button appears after the last-page link for typing a page number directly.
Adding a Policy
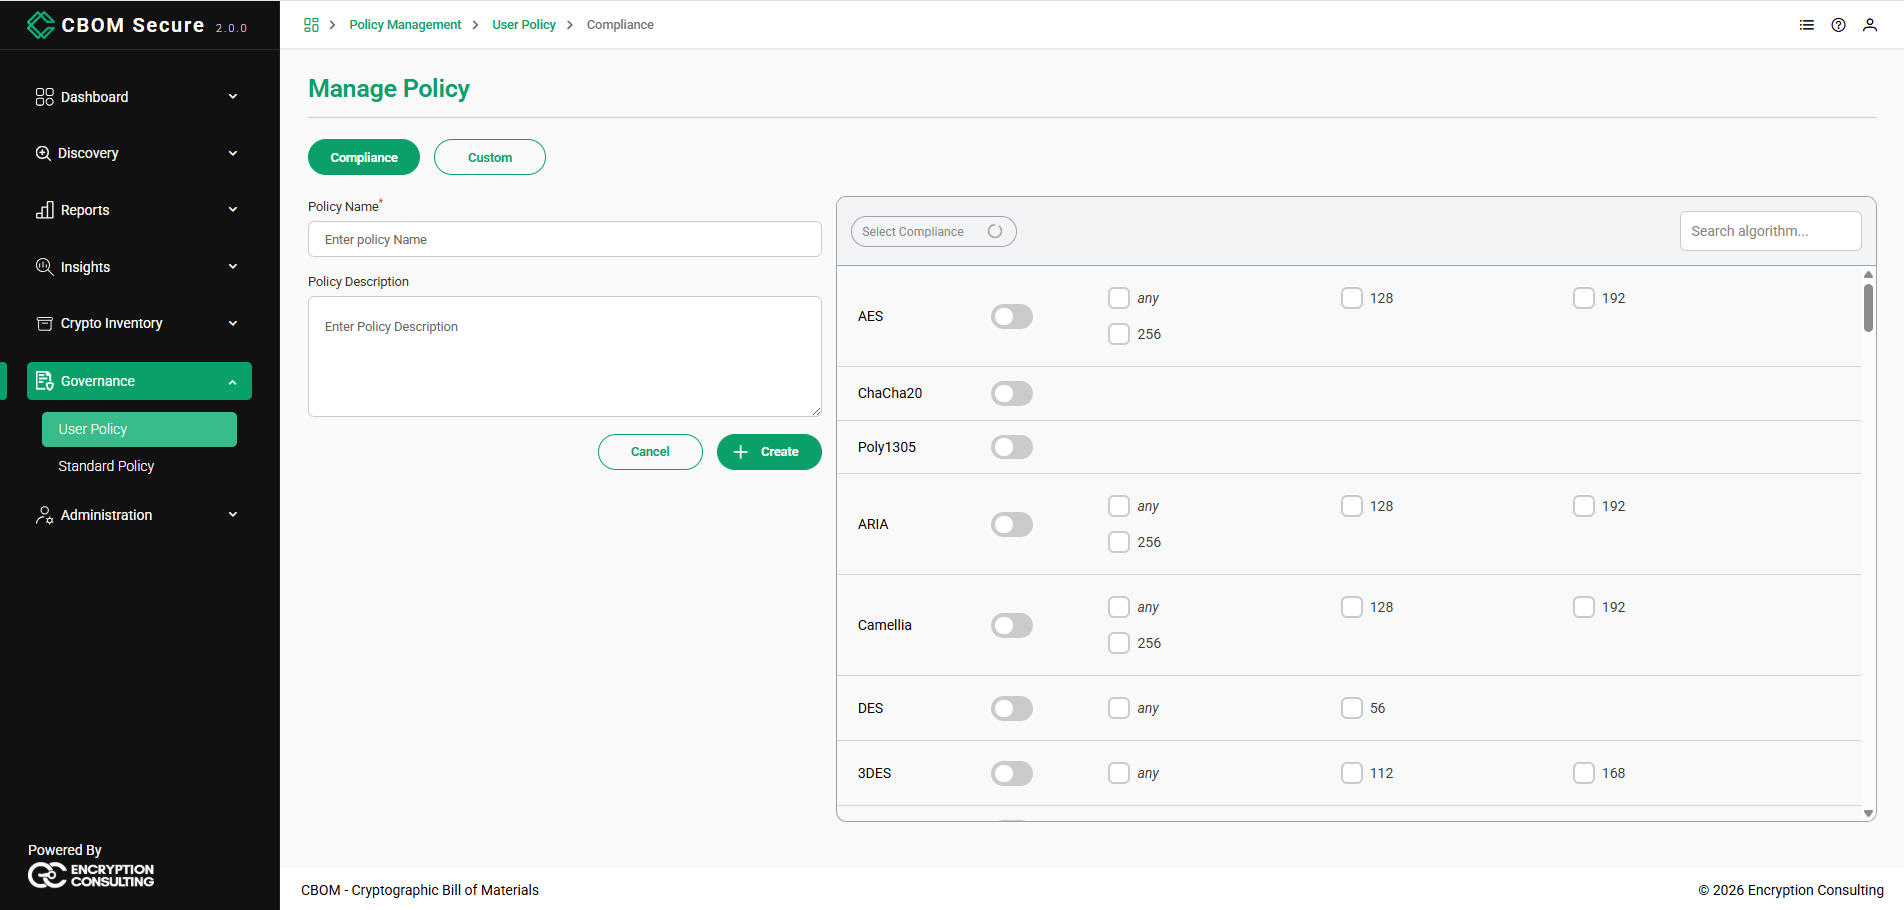
Click Add Policy to open the Manage Policy screen. At the top, a pair of Compliance and Custom buttons selects how the policy's allowed algorithms are defined; the selected mode is the filled button, and switching mode replaces the panel below. The screen opens on Compliance.
On the left you provide the Policy Name and an optional Policy Description (how the name field is handled depends on the selected mode, as described below). The right panel is where algorithms are selected, with a Search algorithm box to quickly locate a specific algorithm.
Compliance Policy
With Compliance selected, choose a standard from the Select Compliance dropdown (for example, NIST SP-800). CBOM Secure automatically enables the algorithms, key sizes, and parameters permitted by that standard, so you do not have to configure each one by hand.
The Policy Name starts empty. Once you pick a standard and its algorithm set has loaded, CBOM Secure fills the field in for you, naming the policy after the standards you selected followed by a timestamp — which is where list entries such as NIST_SP-800_1769780314283 and NIST_SP-800_PCI-DSS_GDPR_1774977029452 come from. Type your own name at any point and it will not be overwritten. A compliance-derived policy is recorded with the Standard type.
Custom Policy
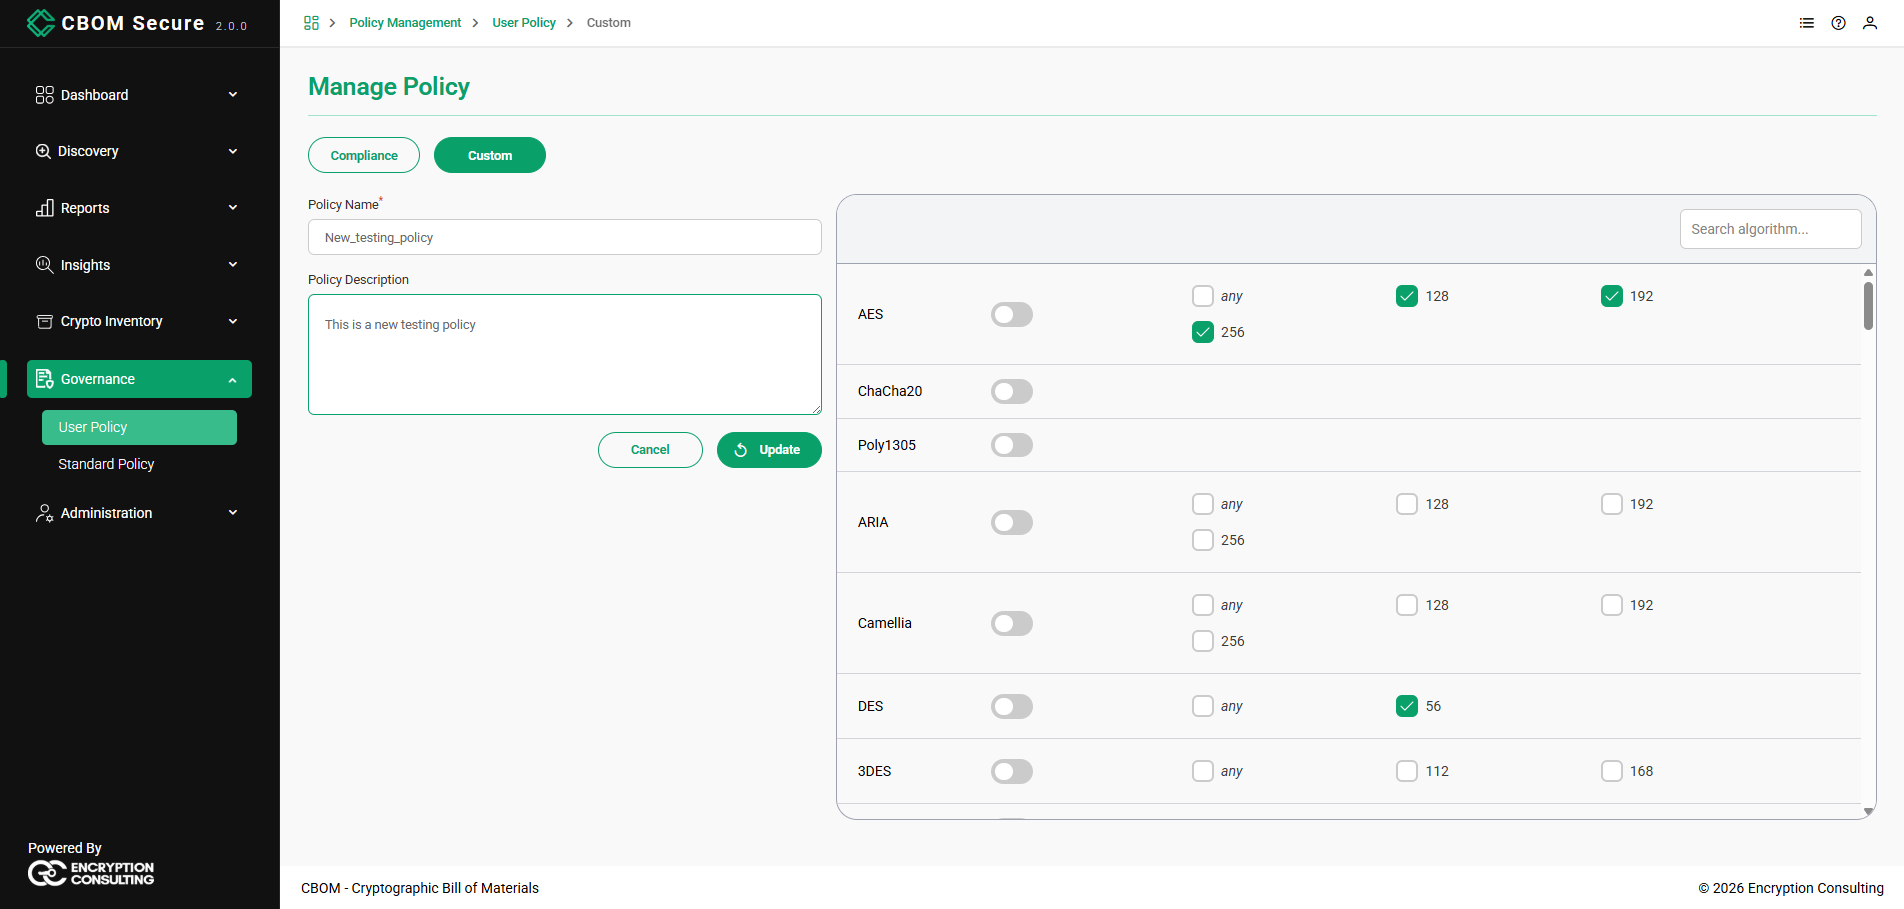
With Custom selected, you manually define what the policy allows. Unlike a compliance policy, no name is auto-generated in this mode — you must enter a Policy Name yourself before the policy can be created. Each algorithm has a master toggle to enable or disable it, and — where applicable — checkboxes for the permitted key sizes or parameters. For example, you can enable AES and allow only the 128, 192, or 256 bit sizes; enable DES with 56; or enable post-quantum and hash-based algorithms such as SLH-DSA, HQC/128, HQC/192, HQC/256, and LMS, HSS, XMSS and XMSSMT with their respective SHA and SHAKE variants. A manually defined policy is recorded with the Custom type.
When the policy is configured, click Create to save it, or Cancel to discard your changes and return to the list.
Viewing Allowed Algorithms
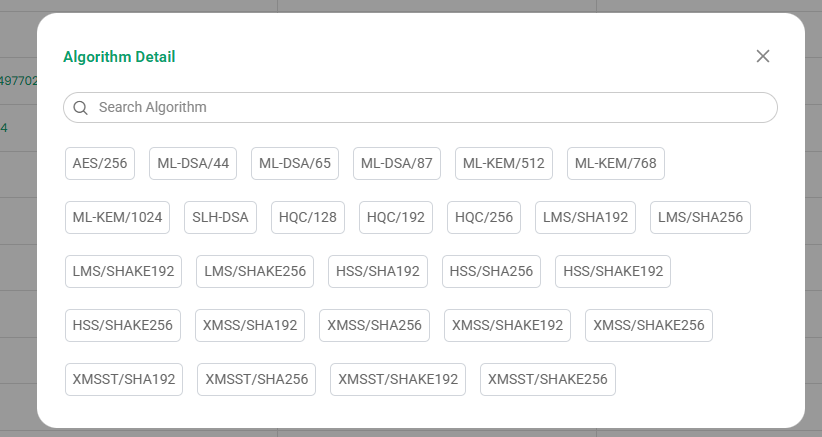
For any policy that has algorithms associated with it, click the View Algorithm Detail link in the Allowed Algorithms column. An Algorithm Detail dialog opens, listing every algorithm the policy permits as individual tags — for example AES/256, ML-DSA/44, ML-KEM/512, SLH-DSA, HQC/128 and LMS/SHA192. A Search Algorithm box at the top lets you find a specific algorithm within the list. This view is read-only; to change which algorithms a policy allows, edit the policy.
Editing and Deleting a Policy
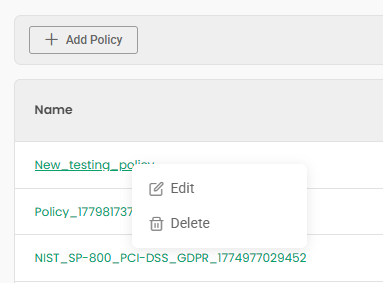
Right-click any policy row to open a context menu with Edit and Delete options.
-
Edit: Opens the Manage Policy screen pre-populated with the policy's current details. For a compliance policy, the associated standard (such as NIST SP-800) is shown in the Select Compliance field and its permitted algorithms appear enabled. Adjust the name, description, or algorithm selections as needed and click Update to save your changes.
-
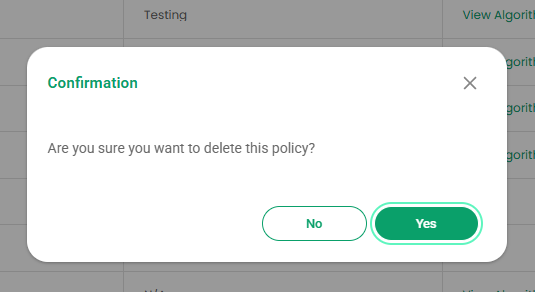
Delete: Removes the policy from the platform. A confirmation prompt is shown before the policy is permanently deleted. Deleting a policy that is in use can affect how cryptographic material is evaluated, so confirm it is no longer needed before removing it.
Editing reopens the same Manage Policy form, pre-populated and with an Update button in place of Create — the Custom Policy capture above is a policy being edited, which is why it reads Update. The breadcrumb gains the mode, for example Policy Management > User Policy > Custom.
Selecting Delete raises a Confirmation dialog — Are you sure you want to delete this policy? — with No and Yes. Nothing is removed until you answer Yes.