
User Management
The User Management page is the central place to manage the user accounts that can access CBOM Secure. It provides full create, read, update, and delete (CRUD) capabilities — allowing you to view all users, add new accounts, edit a user's details, reset passwords, and remove users. It is reached from Administration > User Management in the left navigation menu.
Who Can Use User Management
The User Management section is restricted to privileged users. Access is granted by the user:read permission, which is held by the admin and manager roles as shipped. Users whose roles do not carry it — user, auditor and viewer by default — do not see the Administration menu entry at all.
What you can do inside the page is controlled separately: user:create shows Add User, user:update shows Edit User and Reset Password, and user:delete shows Delete User. A role holding only user:read can view the list and open View Details, and nothing more. Role-to-permission mappings are maintained under Roles & Permissions.
Viewing Users
Existing users are presented in a paginated table. A page heading above the table shows the title, the number of accounts and how many of them hold admin rights (for example, 17 account • 9 with Admin rights), with the Add User button on its right.
The table's own toolbar carries the Search Keyword box and Clear on the left, and Refresh plus a full-screen toggle on the right. The search box and Clear appear only once the table has at least one row.
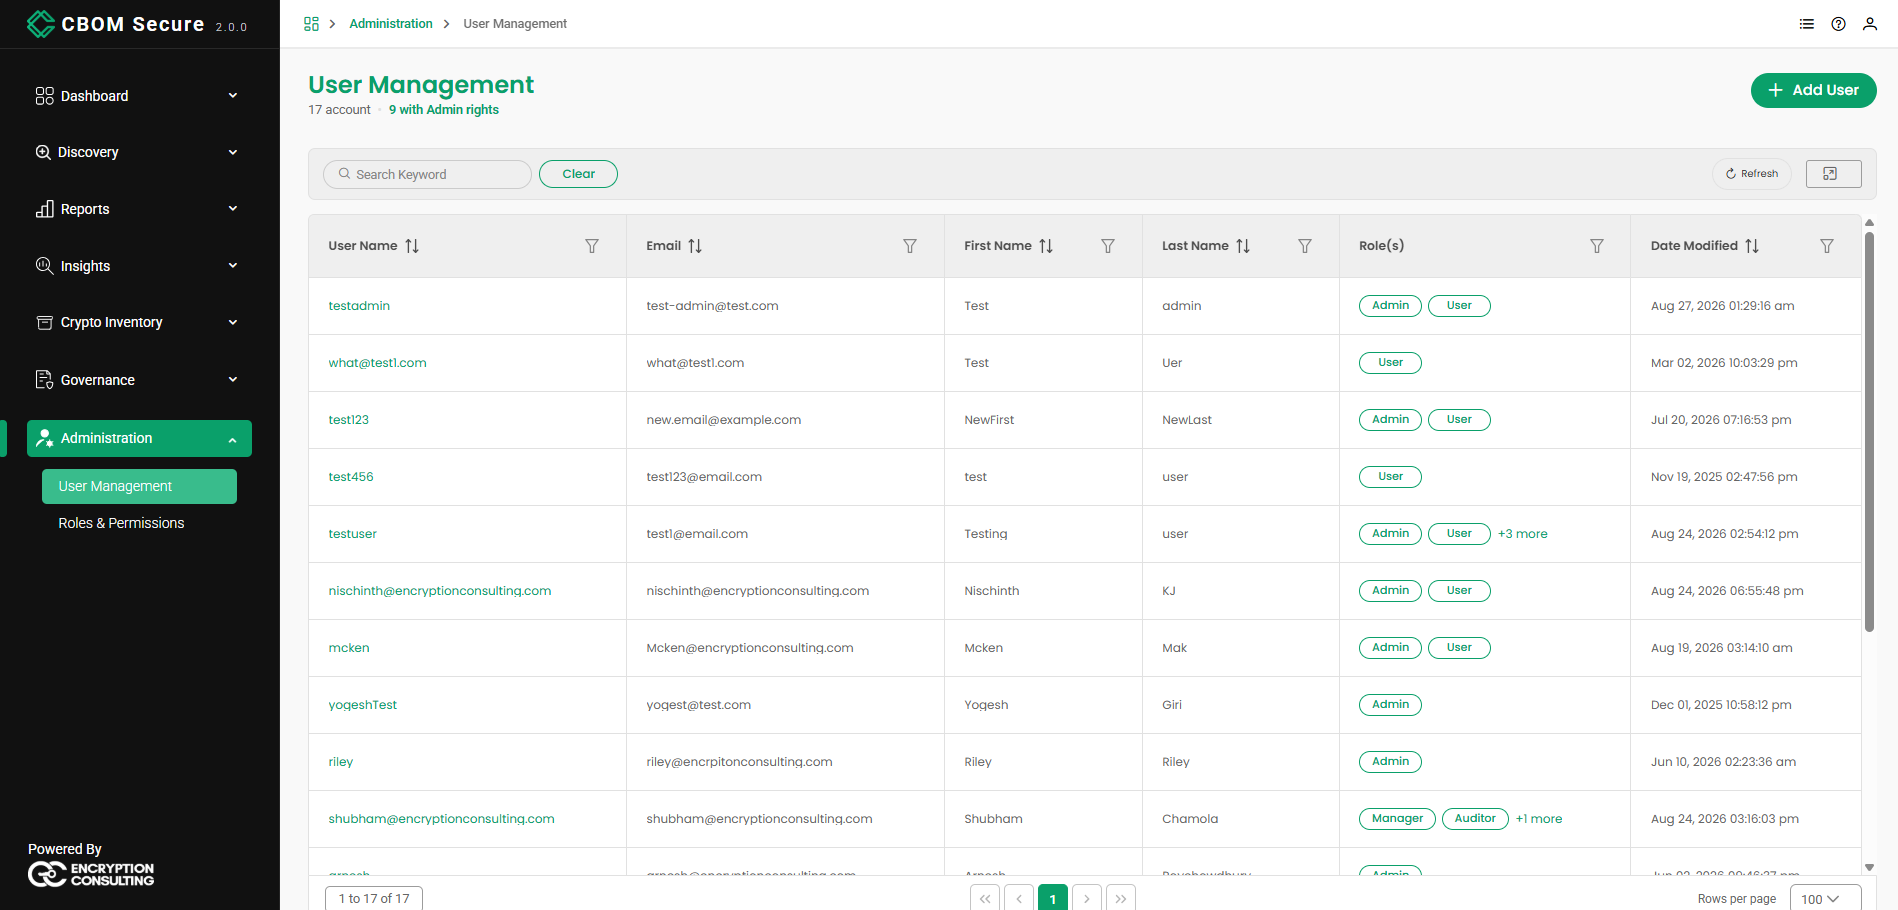
Each row in the table describes a single user account:
-
User Name: The user's login name. Click it to open the User Details panel.
-
Email: The email address associated with the account.
-
First Name / Last Name: The user's name.
-
Role(s): The roles assigned to the user, shown as pills, which determine what the user can access. At most two pills fit in the cell: Admin is always brought to the front when the user holds it, and any remaining roles collapse into a +N more link that opens them in a small overlay. So Manager Auditor +1 more is a user with three roles, not two.
-
Date Modified: When the account was last changed.
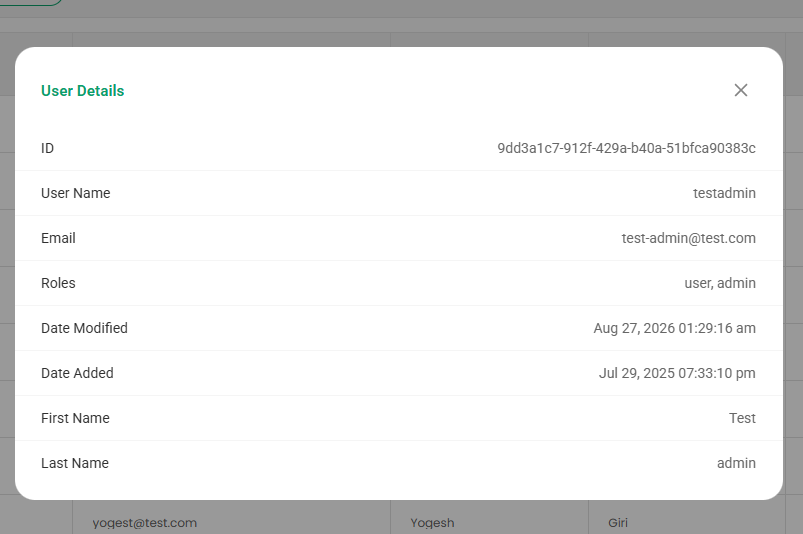
The user's ID and Date Added are not shown as columns — both appear in the User Details panel, which lists ID, User Name, Email, Roles, Date Modified, Date Added, First Name and Last Name. It is read-only; use Edit User to change anything.
Columns can be sorted using the arrows in each header and narrowed using the column filter icons; Role(s) filters against the list of roles defined on the platform. Refresh reloads the list, and Clear resets any applied search or filters.
Every table in the portal shares the same footer controls: the record range on the left (for example, 1 to 20 of 143), the first, previous, numbered, next and last page links in the centre, and a Rows per page selector on the right offering 10, 20, 50 or 100 rows. Tables open at 20 rows unless an administrator has set a different size under UI Configuration > Table Defaults in System Configuration. The footer stays in place even when a filter narrows the list to a single page.
Five numbered page links are shown at a time. When a table runs to more than five pages, a # (Jump to Page) button appears just after the last-page link; it opens a small box where you type a page number and click Go, with a hint below the field naming the rows that page holds.
Adding a User
Click Add User to open the Create User dialog and complete the user's details. Fields marked with a red asterisk are required.
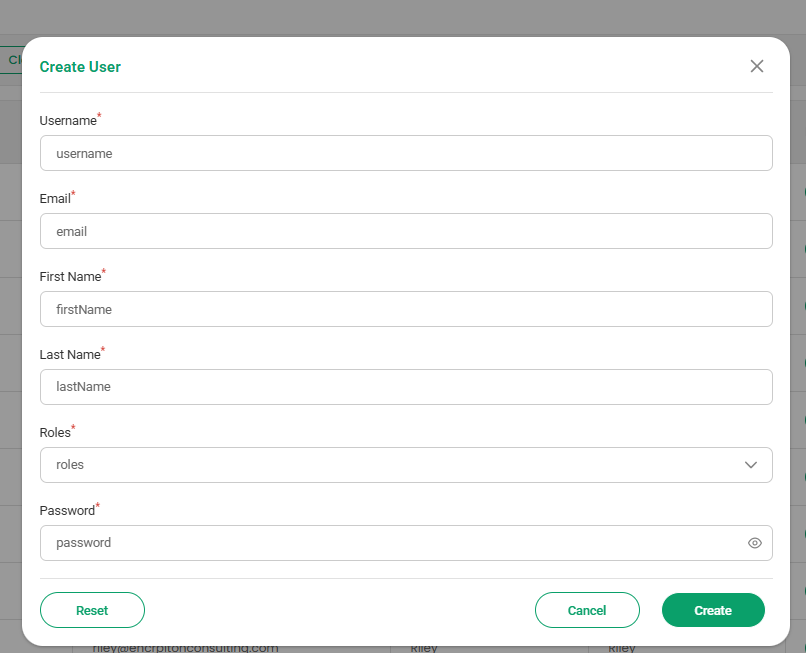
Username: The user's login name.
-
Email: The user's email address (required).
-
First Name / Last Name: The user's name (required).
-
Roles: One or more roles selected from the dropdown (required). The assigned roles determine the user's access within CBOM Secure.
-
Password: An initial password (required). Use the eye icon to show or hide the value as you type. It must be 8 to 32 characters and include at least one uppercase letter, one lowercase letter, one number and one special character; anything shorter or simpler is rejected with that message before the user is created.
Click Create to add the user, Reset to clear the form, or Cancel to close the dialog without saving.
Managing a User
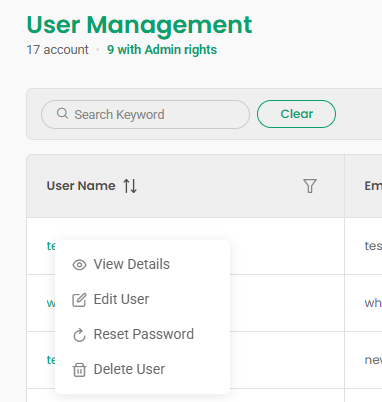
Right-click any user row to open a context menu with View Details, Edit User, Reset Password and Delete User options. Entries you lack permission for are hidden, so a read-only role sees only View Details.
Edit User
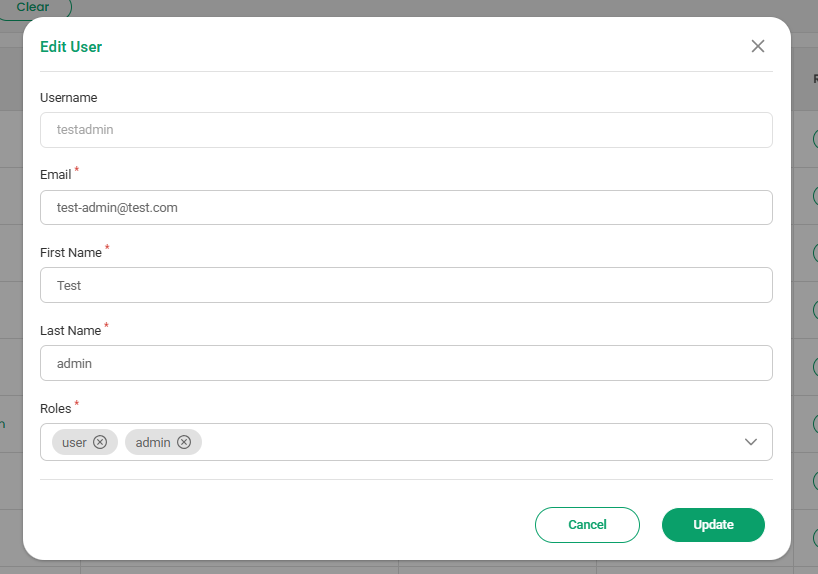
Opens the Edit User dialog. Username is shown but cannot be changed — it is the account's identity — while Email, First Name, Last Name and Roles are all editable and all required.
Roles is a searchable multi-select whose chosen roles appear as removable chips. Its options are read from the platform's own role definitions, so the list always matches what Roles & Permissions defines — admin, manager, user, auditor and viewer as shipped. A user can hold more than one role at a time, and the effective permissions are the union of every role held. Click Update to save or Cancel to discard.
A role change takes effect immediately: it is pushed onto the user's live session rather than waiting for their next sign-in.
Reset Password
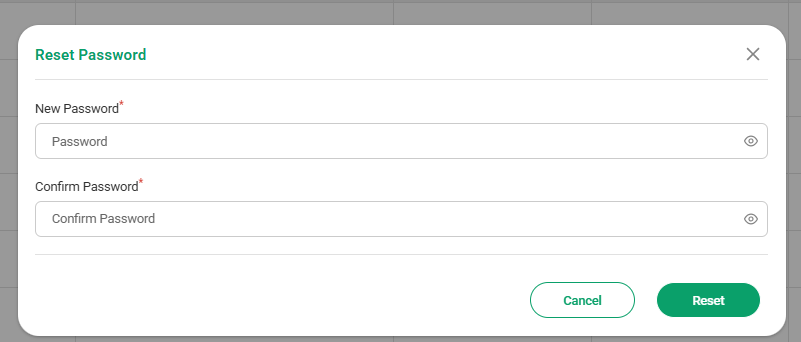
Opens the Reset Password dialog. It takes the password twice — New Password and Confirm Password, both required — and the two must match. Each field has an eye icon to show or hide what you typed. The same complexity rule as Add User applies: 8 to 32 characters with at least one uppercase letter, one lowercase letter, one number and one special character.
Click Reset to apply the new password, or Cancel to close without changing it.
Delete User
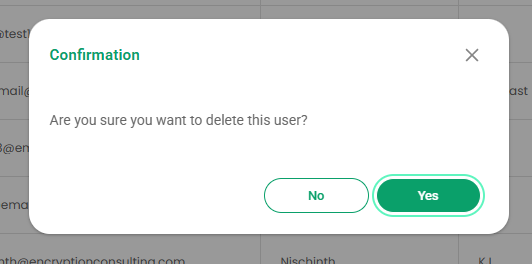
Removes the user account from the platform. A confirmation prompt (Are you sure you want to delete this user?) is shown before the account is permanently deleted. Deleting a user also revokes any session they currently hold, so an already-open browser tab cannot keep working after the account is gone.
Account lifecycle
The page above describes the screen. This section describes the operations around it — onboarding, federation, service accounts and offboarding — which is where the mistakes are made.
Where an account actually lives
Every user exists in two places: the identity provider holds the credential and authenticates the person, and the platform holds the roles and the record the audit trail attributes actions to. Creating a user from this page creates both.
That split explains most of the surprising behaviour here:
| If you | Then |
|---|---|
| Delete a user in the platform only | They can still authenticate, and signing in may recreate a usable account |
| Delete a user in the identity provider only | Their live session continues until it expires |
| Change a password in the platform | You are changing it in the identity provider — there is nowhere else for it to live |
| Change roles | You are changing the platform record; the identity provider is not involved |
Onboarding
Decide the role first. Roles grant permissions, and a role granted for convenience is rarely taken back. See Roles and Permissions for what each one carries.
Create the account from this page, with a real email address — it is what notifications are delivered to.
Assign the narrowest role that works. Most people need to read the inventory and nothing more.
Set a temporary password and require a change at first sign-in, where the identity provider is configured for it.
Confirm they can sign in before considering the account delivered.
For more than a handful of accounts at once, use the bulk creation path rather than repeating the form.
Onboarding under federation
Where the platform is federated to a corporate identity provider, accounts are generally not created here. The user authenticates against corporate identity and a platform record is created on first sign-in, with roles derived from the group claim in the token.
That changes the administrative task from creating accounts to maintaining the group-to-role mapping. Add someone to the right corporate group and their platform access follows; remove them and it goes.
Two things to get right before enabling federation:
Decide the group-to-role mapping in advance, and keep it narrow. A mapping that grants administrator from a broad group is how a directory group becomes a privilege escalation path.
Keep at least one local administrative account. A misconfigured or unavailable identity provider must not be able to lock every administrator out. Treat it as a deliberate break-glass account with a strong password in a credential store, and check it still works after any change to the federation.
Service accounts for integrations
An automated caller — a CI pipeline, a reporting job, a SIEM connector — should have its own account, not a person's.
| Rule | Why |
|---|---|
| One account per integration | A shared account makes the audit trail useless; every action reads as the same actor |
| The narrowest role that works | An exporter does not need a role that can deploy |
| A local account, not a federated one | A federated service account disappears when the directory is reorganised |
| Named for its purpose | svc-siem-export tells you what to do when it starts failing |
| Password in a credential store | Not in the pipeline definition |
Service accounts authenticate the same way people do and get the same short-lived session, so an integration should renew its session rather than re-authenticating in a loop. See API Authentication.
Reviewing access
Worth doing on a schedule, because the drift is always in the same direction.
| Check | Looking for |
|---|---|
| Accounts that have not signed in recently | Leavers who were never offboarded |
| Accounts holding administrator | Should be a short list you can name |
| Service accounts | Still in use, still needed, still narrowly scoped |
| Role assignments against the current team | People who changed job and kept the old access |
| Local accounts after federation | Should be the break-glass account and nothing else |
The audit trail answers most of these directly — it records who did what, with the roles they held at the time.
Offboarding
Do both halves, in this order:
Delete the user in the platform. This revokes their live sessions immediately — they are signed out, not merely prevented from signing in again.
Disable or delete them at the identity provider, so they cannot authenticate and have a new record created.
Doing only the first leaves an account that can sign back in. Doing only the second leaves a live session running until it expires, which can be a long time.
Under federation, removing someone from the mapped corporate group is usually sufficient for step 2 — but their live session still runs until it expires, so delete the platform user as well if the departure is immediate.
Deleting a user does not remove them from the audit trail , and should not. Their past actions remain attributed, with the roles they held at the time. That is the point of an audit trail: it records what happened, not what the current account list says.
A user has lost access
Work down this list; the causes are in roughly this order of frequency.
| Symptom | Cause |
|---|---|
| Sign-in fails for one person | Their identity provider account — locked, expired password, or removed from the mapped group |
| Sign-in fails for everyone | The identity provider, or an expired federation client secret |
| Signs in, sees nothing | No role, or a role with no read permissions |
| Signs in, some screens missing | The role lacks the permissions those screens need — expected, if intended |
| Signed out unpredictably | On a multi-node deployment, a load balancer without session affinity; see High Availability Runbooks |
| Was fine yesterday | Check the audit trail for a role or permission change |
A changed role does not take effect
Role changes are pushed onto the live session rather than waiting for the next sign-in, and the authorisation decision cache is short-lived — so allow up to a minute. If it has not taken effect after that, the change did not save; check the audit trail for the record of it.