
Dashboard Interface
The CBOM Secure dashboard interface is the central hub for all portal activities. It provides a comprehensive view of your data through fully customizable widgets, charts, and key performance indicators. Every visual element you see is a widget that can be customized for size, position, and appearance. The interface is designed for intuitive navigation and efficient data access.
Interface Layout
The dashboard consists of several key components that work together to provide a seamless user experience:
Navigation Bar
The bar across the top of every page shows a breadcrumb trail on the left: a dashboard icon that returns you to the dashboard, followed by one entry per level of the page you are on — for example, Discovery > Host. Every entry except the last is clickable, so the trail doubles as a way back up. On a narrow screen a menu button appears to its left for opening the navigation sidebar.
Three controls sit at the right-hand end of the bar:
-
Dashboard submenus (list icon): Opens Add Submenus to Dashboard Menu, where you choose which of your templates appear as entries under Dashboard in the navigation menu, and what each is called there.
-
Help (question-mark icon): Opens this documentation in a new tab.
-
User menu (profile icon): Shows your name, email and assigned roles, then UI Preferences, System Configuration (with the config:read permission), Reset Password, Support, API Docs (the Swagger reference) and Logout.
Left Sidebar
The left sidebar is the portal's navigation menu. Its top-level groups are:
-
Dashboard: Home, followed by one entry for each template you have added through the dashboard-submenus control in the top bar.
-
Discovery: Host, Template, a Tasks submenu (Networked Deployments, Cloud Deployments, Off-Grid Deployments) and a Settings submenu (Tags, Integrations, Cloud Servers, CycloneDX Export).
-
Reports: Summary Report and PQC Report.
-
Insights: AI Services and Source Code Visualizer.
-
Crypto Inventory: Key, Certificate, CipherSuites and Analysis.
-
Governance: User Policy and Standard Policy.
-
Administration: User Management and Roles & Permissions.
Menu entries are permission-driven: an entry you have no permission for is hidden, and a whole group disappears when none of its entries survive. Crypto Inventory and Reports are built from the layouts configured on the server, so their contents may differ in your deployment.
Layouts and templates are not selected here — that dropdown lives in the dashboard toolbar, described next.
Action Buttons
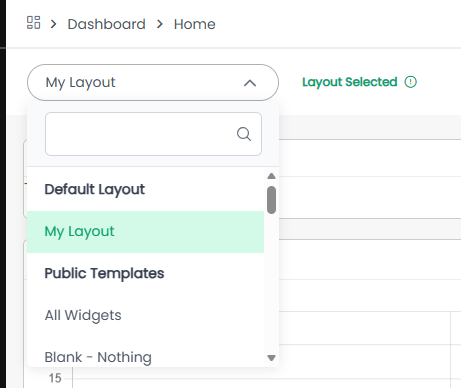
A toolbar sits above the widget canvas. On its left is the layout and template dropdown, whose entries are grouped:
-
Default Layout: Holds a single entry, My Layout — your own saved arrangement, or the starting layout for your roles if you have not saved one yet.
-
Public Templates: Templates shared with every user of the platform.
-
Private Templates: Templates you created and kept to yourself. Other users do not see them.
A group appears only when it has something in it, and the dropdown is searchable. Beside it, a Layout Selected or Template Selected badge tells you which of the two you are viewing; hovering it shows when that layout or template was last modified.
On the right of the toolbar are three actions:
-
Refresh: Reloads every widget on the current layout or template with the latest data.
-
Update: Opens a menu of save actions rather than saving directly. See Dashboard Operations for what each entry does.
-
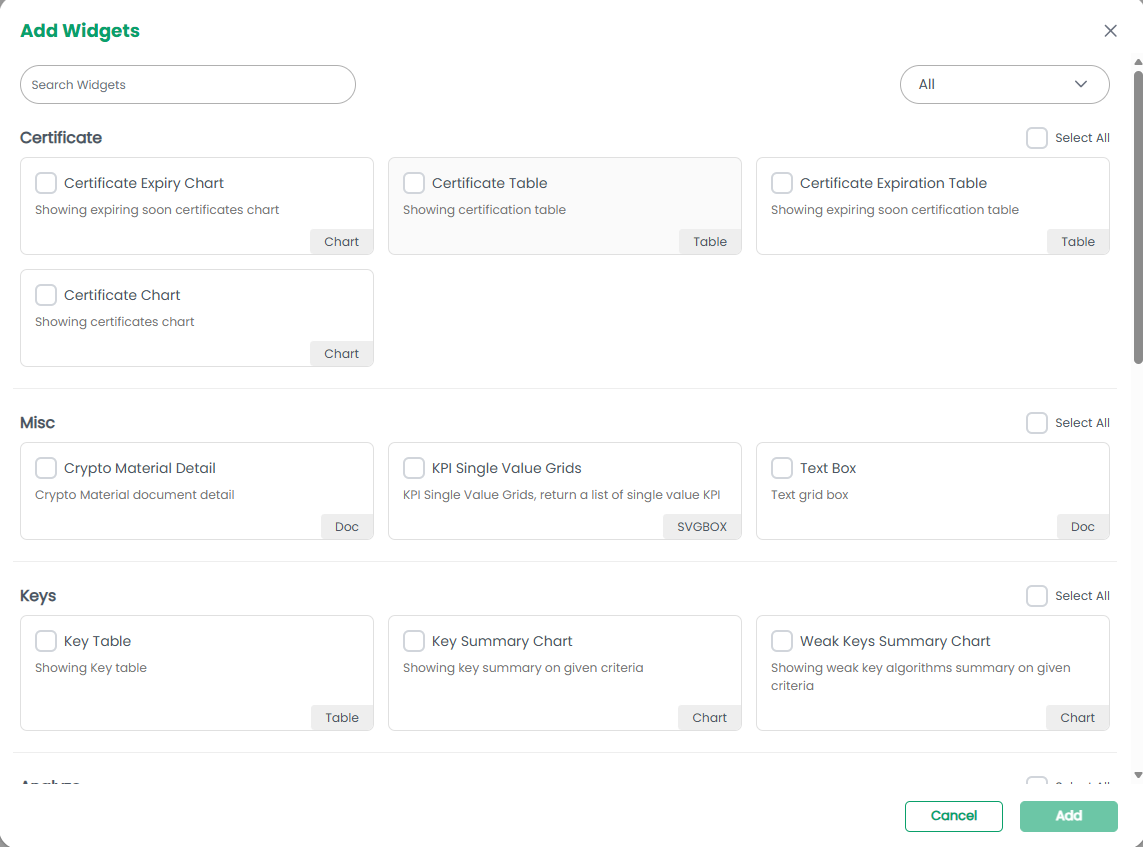
Add Widgets: Opens the widget library to add new components to your dashboard.
All three are hidden while you are viewing one of the read-only layouts reached straight from the navigation menu, since those are not yours to rearrange.

Main Content Area
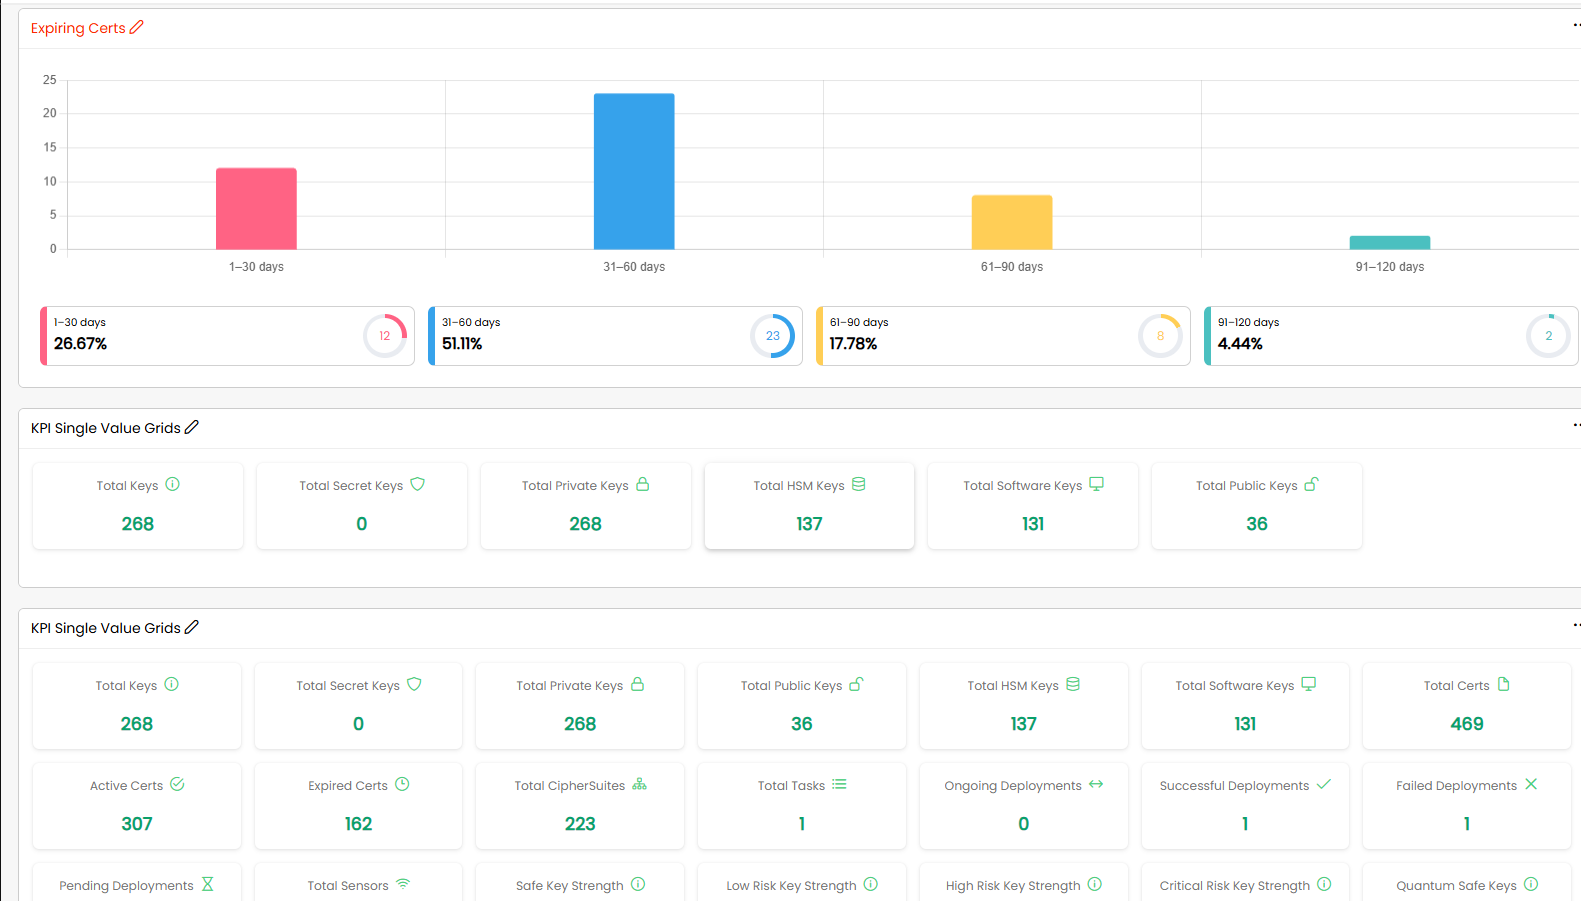
The central portion of the dashboard displays your configured widgets, charts, and data visualizations. This area is fully customizable, and every element can be individually adjusted. Widgets can be resized, repositioned, and configured to display specific data sets with customized appearance settings.
Understanding Widgets
Widgets are the fundamental building blocks of your dashboard. Each widget is a self-contained component that displays specific information or functionality. Every graph, chart, KPI display, and visual element you see in CBOM Secure is a customizable widget. The portal offers a range of widget types to support diverse data visualization and monitoring needs.
Widget Types
Common widget types include:
-
Chart Widgets: Display data using bar charts, line graphs, or other visualization methods. The example shows a bar chart displaying time-based data across different periods (1-30 days, 31-60 days, 61-90 days, 91-120 days).
-
Percentage Indicators: Circular or gauge-style widgets showing percentage values for specific metrics. The interface displays multiple percentage indicators for different time periods, with values such as 26.67%, 51.11%, 17.78%, and 4.44%.
-
KPI Single Value Grids: Display key performance indicators as single numeric values in a grid format. Examples include Total Keys (268), Total Secret Keys (0), Total Private Keys (268), Total HSM Keys (137), Total Software Keys (131), and Total Public Keys (36).
-
Status Grids: Show operational metrics such as Active Certs (307), Expired Certs (162), Total CipherSuites (223), deployment statistics, and key strength indicators.
Customizing Individual Widgets
Every widget in CBOM Secure can be fully customized to meet your specific needs. You have complete control over the size, dimensions, position, and visual appearance of each widget.
Resizing Widgets
To change the size and dimensions of a widget:
Click on the widget to select it
-
Access the widget settings or configuration menu
-
Adjust the width parameter to set the desired widget width
-
Adjust the height parameter to set the desired widget height
-
Alternatively, use drag handles on widget borders to resize visually
-
Apply or save the changes
Repositioning Widgets
To move a widget to a different location on the dashboard:
-
Click and hold on the widget header or designated drag area
-
Drag the widget to the desired position
-
Release to place the widget in the new location
-
Click Update to save the new layout arrangement
Customizing Widget Appearance
To modify the visual appearance and styling of a widget:
-
Select the widget you want to customize
-
Open the widget configuration or display settings
-
Modify color schemes, fonts, borders, and background styles
-
Adjust chart types, graph styles, or visualization formats
-
Configure display options such as legends, labels, and titles
-
Preview the changes and apply when satisfied
Widget Configuration Options
Each widget offers a comprehensive set of customizable parameters:
-
Size and Dimensions: Control widget width and height in pixels or grid units
-
Display Settings: Control the visual appearance, including colors, fonts, borders, and styling
-
Data Parameters: Define which data sources and metrics to display
-
Refresh Intervals: Set automatic update frequencies for real-time data
-
Filtering Options: Apply filters to display specific subsets of data
-
Threshold Alerts: Configure visual indicators when values exceed defined limits
Working with Templates
Templates are pre-configured collections of widgets arranged in a specific layout with predefined sizes and positions. They serve as starting points for dashboard creation or as standardized views that can be shared across your organization. Remember that all widgets in templates can still be customized individually after the template is applied.
Template Types
-
Public Templates: Templates created and shared by administrators or other users for general use. They are accessible to all portal users and provide standardized views for common use cases. Public templates are read-only to prevent accidental modifications, but can be copied to create personalized versions.
-
Private Templates: Custom templates created by individual users for their specific needs. Private templates can be modified at any time and are only visible to the creator unless explicitly shared.
Creating Templates
To create a new template:
-
Start with an existing template or select Blank - Nothing for a clean slate
-
Add widgets using the Add Widgets button
-
Resize each widget to your desired dimensions
-
Position widgets in your preferred arrangement
-
Customize the appearance and configuration of each widget
-
Click Update to save your changes
-
Optionally, share the template by marking it as public
Layouts and Customization
Layouts represent your personalized dashboard configuration. While templates serve as blueprints, layouts are the actual working environments where you interact with your data. Each layout can contain multiple widgets, all customized to your exact specifications.
Default Layout for First Login
When accessing CBOM Secure for the first time, you will be presented with the Default Layout. This layout is designed to provide a comprehensive overview of the most commonly used features and metrics. It includes:
-
A selection of essential widgets displaying key performance indicators
-
Sample charts and visualizations to demonstrate data presentation capabilities
-
A balanced arrangement optimized for general use
-
Pre-configured widget sizes and positions
The Default Layout serves as an excellent starting point. You can modify individual widgets or the entire layout to create My Layout, or start from scratch with the Blank - Nothing option.
My Layout
My Layout is your personalized dashboard configuration. It automatically saves your customizations, including all widget sizes, positions, and appearance settings, ensuring that your preferred view is available each time you log in. Changes made to My Layout do not affect other users or the Default Layout.
Template to Layout Conversion
When you apply a template to your layout, certain behavioral considerations apply:
-
Read-Only Templates: Public templates are loaded read-only. You can view and use them, but modifications are not permitted. To customize a public template, you must first copy it to create a personal version.
-
Layout Independence: Once a template is applied to your layout, the layout becomes independent. You can freely customize all widgets. Changes to the original template will not affect your layout, and vice versa.
-
Full Customization: After applying a template to your layout, you can freely add, remove, resize, reposition, or modify the appearance of any widget without affecting the original template.
User Customization Options
CBOM Secure offers extensive customization capabilities to tailor the interface to your specific workflow:
-
Submenu Customization: The left sidebar submenu structure can be customized to include your most frequently used templates and layouts. You can reorder items, create folders for organization, and hide elements that are not relevant to your work.
-
Widget Arrangement: Widgets can be repositioned using drag-and-drop functionality. Arrange them to optimize your workflow and place the most important information in prominent locations. Each widget can be sized and positioned independently.
-
Display Preferences: Customize visual elements for each widget individually, including color schemes, fonts, borders, and background styles. These preferences ensure that the dashboard aligns with your personal viewing preferences and organizational branding guidelines.