
CertSecure Documentation
  • Overview
    • About CertSecure Manager
    • Documentation Guide
  • Reference Guide
    • Header Bar
      • CertSecure Documentation
      • Swagger API
      • Profile Section
      • Search
    • Dashboard
      • Key Performance Indicators
      • Expiring Certificates
      • CA metrics
      • Key Strength
      • Signing Algorithm
      • Certificate Risk Report Profile
      • PKI Posture Management
      • NDES Health Information
    • AI Assistant
      • Chat
      • Configuration
      • Usage Report
    • Inventory
      • Overview
        • Overall
        • CertSecure
      • Template Management
        • Switch Templates
        • Exclusion List
        • Alert Templates
        • Certificate Templates
      • Template Categories
    • Discovery
      • Inventory
      • Scan Config
      • Cloud Config
      • Vault Config
      • Discovery Analytics
      • Scan Details
      • Discovery Ingestion
    • Reports
    • Utilities
      • ACME
      • Tasks
      • Integrations
        • Renewal Manager
        • Load Balancers
        • Discovery Agents
        • CLI Tool
        • Key Management
        • SEIM Tools
        • DevOps Tools
        • Ansible Automation Platform
      • NDES
      • Azure Key Vault
      • API Tokens
    • Enrollment
      • Certificate Request
      • Generate CSR
      • Enroll CSR
      • Generate Certificate
      • Import Certificate
      • Bulk Certificate Generation
      • Manage Policies
      • Organization Details
    • Administration
      • Users
      • Roles and permission
      • Certificate Authorities
      • Departments
    • Miscellaneous
      • Logging
      • Service Setup
        • Zoom
        • Zendesk
      • Settings
        • Configure Realms
        • Schedule Alerts
        • Metrics
        • Web Branding
        • About License
  • Setup & Architecture
    • Identity and Access Control
    • Architecture
    • Installation
      • Pre-requisites
      • Windows
      • Linux
      • Docker
    • Upgrade
      • Windows
      • Docker
  • Release Notes
    • Releases for 2026
      • v3.4.0
      • v3.3.1
      • v3.3.0
    • Releases for 2025
      • v3.2.0
      • v3.1.0
    • Releases for 2024
      • v3.0.0
  • Workflow
    • Approval Workflow
  • API Reference
    • Getting Started
    • Authorizing Requests
    • Securing API Access
    • Request and Response Conventions
    • Endpoint Reference
      • Health
      • API Token Management
      • CA Management
      • Templates
      • Certificate Enrollment
      • Inventory
      • Certificate Discovery
      • Tasks
      • Watcher Groups
      • Alerts
      • Reports
      • Logs
      • Monitoring
      • Scheduling
      • SMTP
      • ACME
      • Azure Key Vault
      • Google Cloud (GCP)
      • HashiCorp Vault
      • EJBCA
      • ServiceNow
  • Integration Guide
    • Renewal Manager
      • Workflow
      • Setup
      • Troubleshooting
      • IIS
      • Apache
      • Tomcat
      • Nginx
      • MSSQL
      • MongoDB
      • Oracle
      • Cloudflare
      • AudioCodes
      • Cisco ISE
      • Palo Alto PAN-OS
      • Cisco ACI
    • Load Balancer
      • F5
        • Workflow
        • Setup
        • Onboarding
        • UI Guide
        • Troubleshooting
      • NetScaler
        • Workflow
        • Setup
        • UI Guide
        • Troubleshooting
    • Certificate Authorities
      • ACME CAs
      • AWS
      • DigiCert Connector
      • EJBCA
      • GlobalSign
      • GoDaddy
      • HashiCorp Vault PKI
      • Microsoft AD CS
      • Sectigo
      • Sectigo-PS
    • Ansible Automation Platform
    • Azure Key Vault
  • Discovery Agent Setup Guide

Sectigo-PS

Sectigo-PS connects CertSecure Manager to Sectigo Partner Services (PS), the Sectigo partner and reseller API. It is a separate connector from Sectigo Certificate Manager (see Sectigo) and authenticates with a Sectigo PS login name and password. The connector is agentless and is configured from the Sectigo-PS tile under Administration > Certificate Authorities > Agentless CAs.

Through Sectigo-PS you can order DV, OV and EV certificates. For OV and EV certificates, the organization can be pre-validated once with Sectigo; certificates that reference the pre-validation order are then issued without a new organization review.

Note: Sectigo and Sectigo-PS use a single license entry. A license that includes Sectigo covers both connectors.
Prerequisites
  • Your CertSecure Manager account has the Manage Certification Authorities permission.
  • A Sectigo Partner Services account with API access: its login name and login password, and the sub account ID if you use one.
  • Outbound HTTPS from the CertSecure Manager backend to the Sectigo PS API, by default https://secure.trust-provider.com/products.
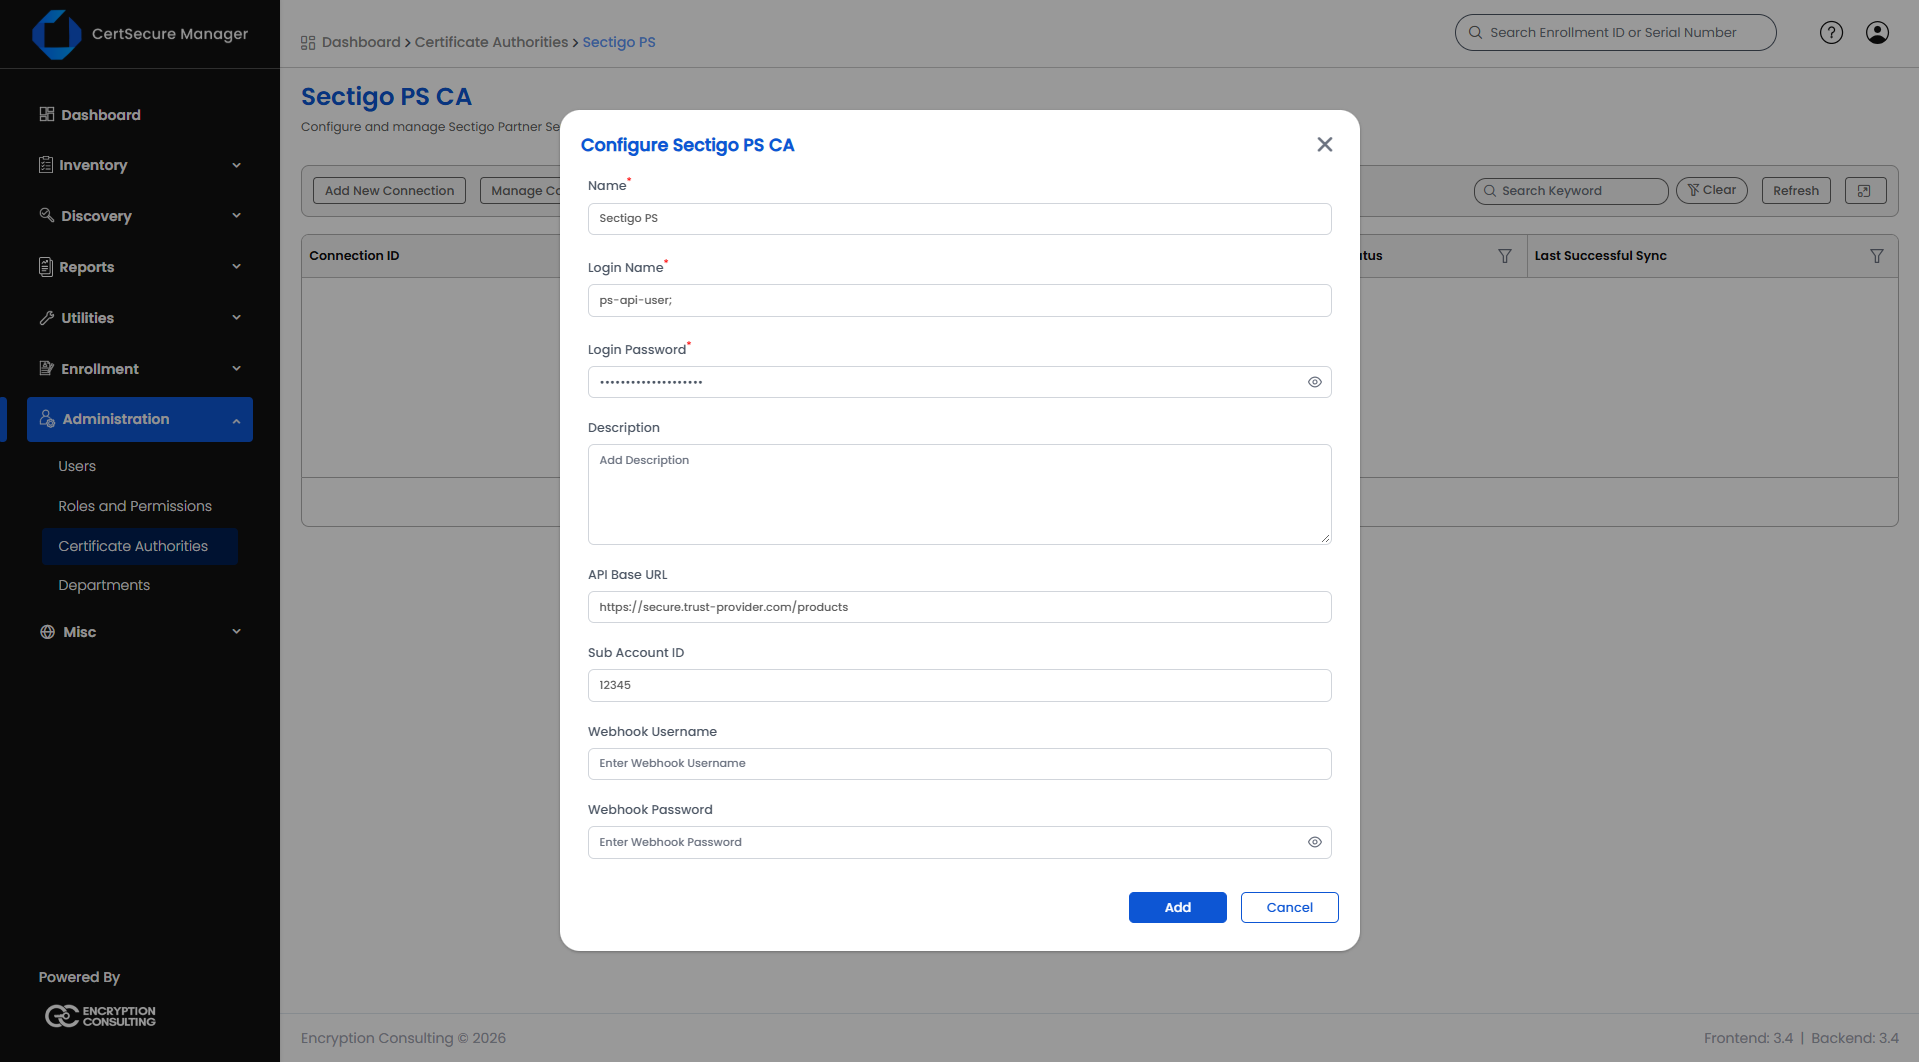
Adding a Sectigo-PS CA
  1. Go to Administration > Certificate Authorities and select Configure on the Sectigo-PS tile. The Sectigo PS CA page opens.
  2. Select Add New Connection. The Configure Sectigo PS CA dialog opens.
  3. Fill in the fields below and select Add.
Sectigo-PS - Configure Sectigo PS CA
Field Applies to What it means
Name Required A name for the CA in CertSecure Manager. Up to 50 characters.
Login Name Required The Sectigo PS login name. Up to 50 characters.
Login Password Required The Sectigo PS login password. Up to 50 characters.
Description Optional A note about the connection.
API Base URL Optional The Sectigo PS API address. Pre-filled with https://secure.trust-provider.com/products. Up to 150 characters.
Sub Account ID Optional The Sectigo PS sub account to order under.
Webhook Username Optional The user name Sectigo uses for webhook calls to CertSecure Manager.
Webhook Password Optional The password for the webhook user name.
Note: Unlike the Sectigo (SCM) connector, the Sectigo-PS dialog has no default certificate template and no credential test. Certificate settings, such as the product and the pre-validation order number, are made in Certificate Templates.
Sectigo-PS Connections

The Sectigo PS CA page lists the connections with their Connection ID, Certification Authority, Login Name, Sync, Status (Enabled, Disabled or Decommissioned) and Last Successful Sync. Select a row to open its Connection Details. The right-click menu offers:

  • View Details – shows the stored settings of the connection. Passwords are never displayed.
  • Decommission – decommissions the connection after a confirmation. This cannot be undone, and can take up to 15 minutes.

A connection cannot be edited from this page. To change its credentials or settings, edit its config as described below.

Configs

Select Manage Configs on the Sectigo PS CA page to open Sectigo PS Configs, which lists the Name, Login Name, API Base URL and Sub Account ID of each config. The right-click menu of a config offers View Details, Edit Config, OV/EV Pre-Validation Signup, Track Pre-Validation Orders, View DCV Records and Delete Config.

Edit Config opens the Edit Config dialog:

Field Applies to What it means
Name, Login Name Required Up to 50 characters each.
Login Password Optional Leave blank to keep the current password.
Sub Account ID Optional The Sectigo PS sub account.
Low Balance Threshold Optional A number. The account balance below which CertSecure Manager treats the balance as low.
API Base URL Optional The Sectigo PS API address.
Webhook Username, Webhook Password Optional Leave the password blank to keep the current one.
Description Optional Up to 150 characters.

Select Submit to save. Config Details shows whether a login password and webhook credentials are set, without showing them.

OV/EV Pre-Validation

A pre-validation order has Sectigo validate your organization once. The review can take days. When the order is active, certificate templates can reference it so that OV and EV certificates are issued straight away.

  1. On Sectigo PS Configs, right-click the config and select OV/EV Pre-Validation Signup.
  2. Select the Validation Level: OV or EV.
  3. Enter the organization: Organization Name, Street Address, City, State / Province (optional), Postal Code and Country Code (ISO 3166 alpha-2, two letters).
  4. Enter the applicant representative: Applicant Rep First Name, Applicant Rep Last Name, Applicant Rep Email and, optionally, Applicant Rep Phone.
  5. Enter the Validity (days). The default is 365.
  6. For EV, also complete EV Jurisdiction & Signer: the Jurisdiction Country is required, and the jurisdiction state and locality and the signer's name, email, phone and title are optional.
  7. Select Submit. The result shows the Order Number, the Total Cost and the Expected Delivery Time (minutes). Select Close.

To follow the order, right-click the config and select Track Pre-Validation Orders. The list shows the Order Number, Level, Organization, Status, Submitted and Last Checked of each order; expand a row for what happens next and how long the order is valid. Pending orders are checked again when the list opens, and Refresh checks all of them. The right-click menu of an order offers:

  • Refresh Status – checks the order with Sectigo.
  • Resend Validation E-mails – asks Sectigo to send the validation e-mails again. Offered only while the order is in progress.
  • Copy Order Number – copies the order number.

When the order is Active, enter its order number in the Prevalidation Order Number field of a Sectigo-PS certificate template in Certificate Templates. Alternatively, tick Ask at enrollment so that the requester supplies the number when requesting a certificate.

DCV Records

Right-click a config and select View DCV Records to see one row per order placed through the config, with its Order Number, DCV Method, Domain(s) and Placed On date. Records are kept for 60 days. The right-click menu of a record offers:

  • View Instructions – shows the challenge value or values to publish for each domain of the order. Selecting the row does the same.
  • Change DCV Method – switches an order that is still waiting for validation to another DCV method.
On this Page:
Support Privacy Policy Terms of Service

Copyright 2026 Encryption Consulting LLC. All rights reserved.