
CertSecure Documentation
  • Overview
    • About CertSecure Manager
    • Documentation Guide
  • Reference Guide
    • Header Bar
      • CertSecure Documentation
      • Swagger API
      • Profile Section
      • Search
    • Dashboard
      • Key Performance Indicators
      • Expiring Certificates
      • CA metrics
      • Key Strength
      • Signing Algorithm
      • Certificate Risk Report Profile
      • PKI Posture Management
      • NDES Health Information
    • AI Assistant
      • Chat
      • Configuration
      • Usage Report
    • Inventory
      • Overview
        • Overall
        • CertSecure
      • Template Management
        • Switch Templates
        • Exclusion List
        • Alert Templates
        • Certificate Templates
      • Template Categories
    • Discovery
      • Inventory
      • Scan Config
      • Cloud Config
      • Vault Config
      • Discovery Analytics
      • Scan Details
      • Discovery Ingestion
    • Reports
    • Utilities
      • ACME
      • Tasks
      • Integrations
        • Renewal Manager
        • Load Balancers
        • Discovery Agents
        • CLI Tool
        • Key Management
        • SEIM Tools
        • DevOps Tools
        • Ansible Automation Platform
      • NDES
      • Azure Key Vault
      • API Tokens
    • Enrollment
      • Certificate Request
      • Generate CSR
      • Enroll CSR
      • Generate Certificate
      • Import Certificate
      • Bulk Certificate Generation
      • Manage Policies
      • Organization Details
    • Administration
      • Users
      • Roles and permission
      • Certificate Authorities
      • Departments
    • Miscellaneous
      • Logging
      • Service Setup
        • Zoom
        • Zendesk
      • Settings
        • Configure Realms
        • Schedule Alerts
        • Metrics
        • Web Branding
        • About License
  • Setup & Architecture
    • Identity and Access Control
    • Architecture
    • Installation
      • Pre-requisites
      • Windows
      • Linux
      • Docker
    • Upgrade
      • Windows
      • Docker
  • Release Notes
    • Releases for 2026
      • v3.4.0
      • v3.3.1
      • v3.3.0
    • Releases for 2025
      • v3.2.0
      • v3.1.0
    • Releases for 2024
      • v3.0.0
  • Workflow
    • Approval Workflow
  • API Reference
    • Getting Started
    • Authorizing Requests
    • Securing API Access
    • Request and Response Conventions
    • Endpoint Reference
      • Health
      • API Token Management
      • CA Management
      • Templates
      • Certificate Enrollment
      • Inventory
      • Certificate Discovery
      • Tasks
      • Watcher Groups
      • Alerts
      • Reports
      • Logs
      • Monitoring
      • Scheduling
      • SMTP
      • ACME
      • Azure Key Vault
      • Google Cloud (GCP)
      • HashiCorp Vault
      • EJBCA
      • ServiceNow
  • Integration Guide
    • Renewal Manager
      • Workflow
      • Setup
      • Troubleshooting
      • IIS
      • Apache
      • Tomcat
      • Nginx
      • MSSQL
      • MongoDB
      • Oracle
      • Cloudflare
      • AudioCodes
      • Cisco ISE
      • Palo Alto PAN-OS
      • Cisco ACI
    • Load Balancer
      • F5
        • Workflow
        • Setup
        • Onboarding
        • UI Guide
        • Troubleshooting
      • NetScaler
        • Workflow
        • Setup
        • UI Guide
        • Troubleshooting
    • Certificate Authorities
      • ACME CAs
      • AWS
      • DigiCert Connector
      • EJBCA
      • GlobalSign
      • GoDaddy
      • HashiCorp Vault PKI
      • Microsoft AD CS
      • Sectigo
      • Sectigo-PS
    • Ansible Automation Platform
    • Azure Key Vault
  • Discovery Agent Setup Guide

Windows

Use the same installer, CertSecure Manager Installer 3.3, to upgrade a server that already runs CertSecure Manager. The installer detects the existing installation and switches to upgrade mode. Your configuration, TLS certificate, Keycloak realm, users and secrets, and MongoDB data are kept.

An upgrade has four stages:

  1. What an Upgrade Changes: see what is replaced and what is kept.
  2. Before You Upgrade: plan a maintenance window and back up MongoDB, Keycloak and the configuration.
  3. Run the Upgrade: complete the wizard in upgrade mode (about 10 minutes).
  4. After the Upgrade: check the services and your data, then remove the backup folders.

If something goes wrong, the installer rolls back automatically. See If the Upgrade Fails.

What an Upgrade Changes

Table 1: What an Upgrade Changes

Item During an upgrade
CertSecure application (backend and frontend) Replaced with the new version. The previous folder is kept as Backend (BACKUP)<date time>.
conf.ini, Backend\conf\ (including server.yaml and the certificate files), frontend config.js Carried forward from the previous installation. The new release's default copies are kept next to them as .fresh.<timestamp> for reference.
Host names, backend port, Keycloak URL and realm Kept from the previous configuration. Values typed on the Configure Server Settings page are used only where the previous configuration has none.
Keycloak (installation, realm, users, client secret, service-account password) Reused as is. No secrets are regenerated, so existing integrations keep working.
Nginx Re-extracted from the new media. The previous copy is kept as Nginx.bak.<timestamp>.
Python environment (venv) Rebuilt for the new application version.
MongoDB, OpenSSL, Java, Python Not changed if already present. MongoDB data is untouched.
Windows services, firewall rule, scheduled task Updated in place. Names do not change.
Before You Upgrade
  1. Schedule a maintenance window. CertSecure Manager is unavailable while the services are stopped. On the test server the upgrade took about 10 minutes.
  2. Back up the following. The installer keeps folder backups, but it does not back up the databases.

    1. MongoDB data: run mongodump, or stop the MongoDB service and copy C:\Program Files\MongoDB\data.
    2. Keycloak data: stop EC_CSM_KC and copy C:\Program Files (x86)\CertSecure\CertSecure Manager\Keycloak\data. Keycloak stores its users and realm settings here.
    3. Configuration: copy C:\Program Files (x86)\CertSecure\CertSecure Manager\Backend\conf and Backend\conf.ini.
  3. Start any services you stopped for the backup.
  4. Copy the new ISO to the server and mount it, as described in Prepare the Installation Media.
Run the Upgrade
Step 1: Start the Installer

Start CertSecure Manager Installer 3.3 from the new media and complete the Welcome and License Agreement pages, as in Run the Installation Wizard (steps 1 to 3).

Step 2: Confirm the Upgrade

When the Choose Installation Options page opens, the Existing Installation Found dialog shows the path of the current installation. Click Yes to upgrade.
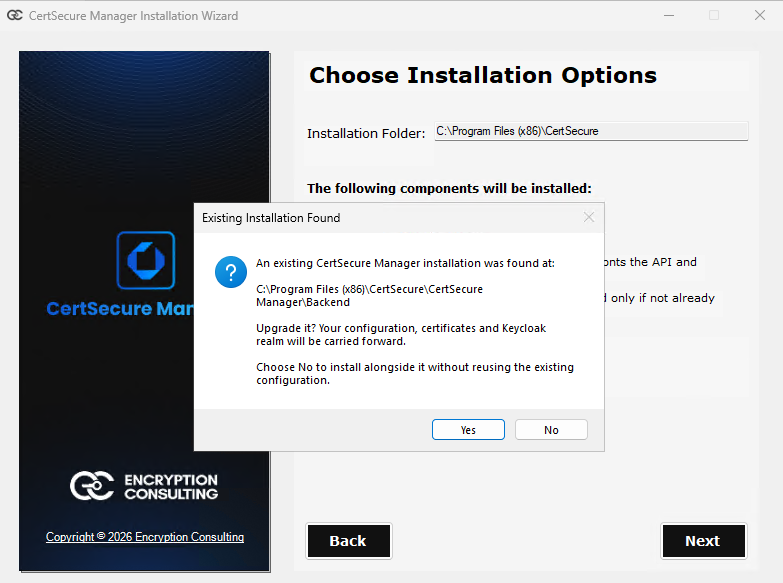
Existing Installation Found dialog

Important: Click Yes. Clicking No does not upgrade the application: the existing application files are left in place and the previous configuration is not reused.

Step 3: Check Upgrade Mode

The page now shows Upgrade mode: the existing configuration, certificates and Keycloak realm will be carried forward. Click Next.
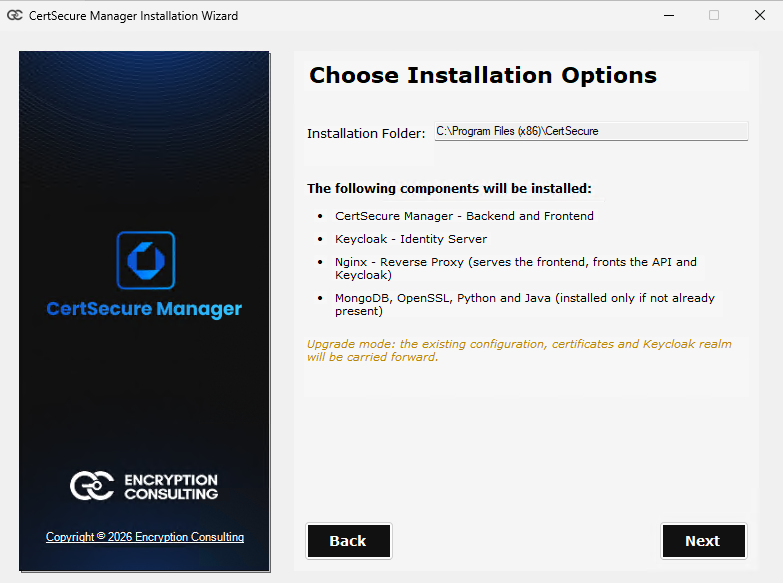
Choose Installation Options in upgrade mode
Step 4: Confirm the Path

In the Confirmation dialog, check that it says Upgrade CertSecure Manager at the following path? and click Yes.
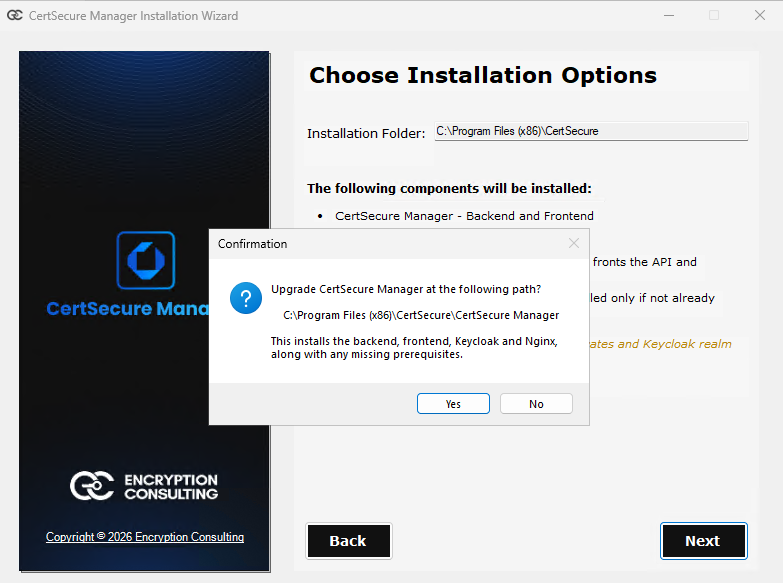
Confirming the upgrade
Step 5: Configure Server Settings

On Configure Server Settings, the MongoDB connection string and the frontend and backend URLs are filled in from the existing configuration. Click Next.
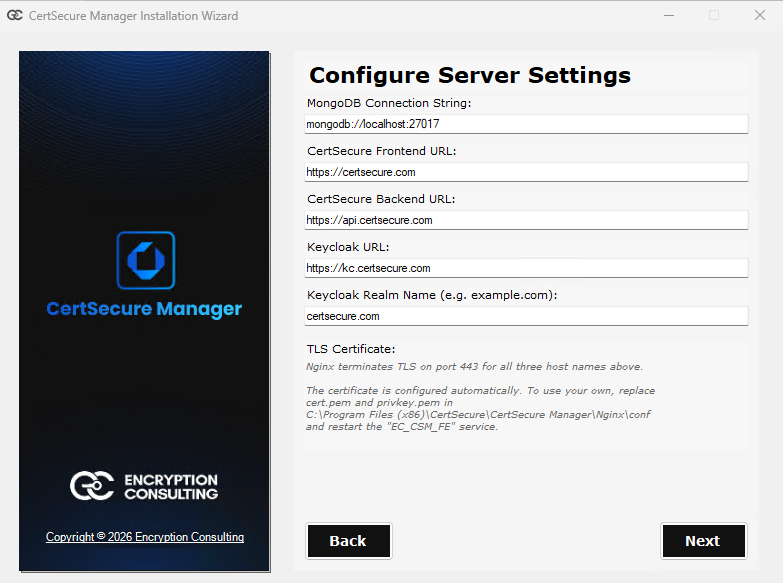
Configure Server Settings during an upgrade

Note: The Keycloak URL and Keycloak Realm Name fields may show suggested values that differ from your existing Keycloak. In the screenshot above they show https://kc.certsecure.com and certsecure.com, while the existing installation uses auth.certsecure.com. During an upgrade these suggestions are ignored. The installer keeps the Keycloak URL, realm and secrets from the existing configuration. Leave the suggested values as they are; they only need to pass validation.

Important: You cannot change host names or the Keycloak realm through an upgrade, because the existing configuration takes precedence. To change them, edit the configuration after the upgrade or contact Encryption Consulting support.

Step 6: Install

On the Installing CertSecure Manager page, click Start and wait for the upgrade to finish. Do not close the wizard while it runs.

Besides the normal installation stages (see Step 6: Install in the installation guide), the log shows these upgrade-specific messages:

Table 2: Upgrade Log Messages

Log message Meaning
Stopping the existing CertSecure services before upgrading... The running services are stopped. Downtime starts here.
Previous install backed up to ...\Backend (BACKUP)<date time> The old application folder is kept as a backup.
CertSecure application upgraded. The new application files are in place.
conf.ini replaced from the previous install. / conf\ contents replaced from the previous install. Your configuration was carried forward.
Derived: frontend=... backend=... port=... / Derived: keycloak=... realm=... The settings that will be used, read from the existing configuration.
Keycloak is already installed on this machine - it will be preserved. Keycloak is reused, not reinstalled.
Existing Nginx install detected. Backing up to ... Nginx is replaced, and the previous copy is kept.
Keycloak health endpoint OK. / ===== Keycloak Reused ===== The existing Keycloak started and is healthy.
server.yaml .server block refreshed (existing realm and secrets preserved). Only the server settings were updated. Keycloak credentials are unchanged.
===== All services started successfully ===== All four services are running on the new version.
Step 7: Finish

When CertSecure Manager was successfully installed! appears, click OK, then Next.
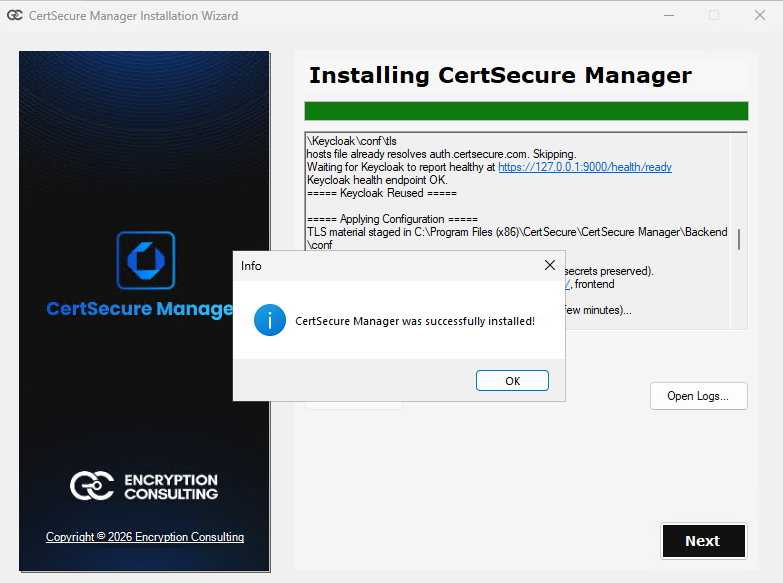
Upgrade finished successfully

On the Installation Completed Successfully page, click Finish, then eject the mounted ISO.

After the Upgrade
  1. Check that all four services are running, as described in Verify the Services.
  2. Open the frontend URL, sign in, and check that your existing users, certificates and settings are present.
  3. Keycloak credentials are not changed by an upgrade. The keycloak-credentials.txt file and passwords from the original installation are still valid.
  4. Optionally, compare the .fresh.<timestamp> copies in the Backend folder (for example conf.ini.fresh.<timestamp> and conf.fresh.<timestamp>\) with your configuration. They show any new settings the release introduces.
  5. When you are satisfied the upgrade works, delete the backup folders Backend (BACKUP)<date time> and Nginx.bak.<timestamp> from the installation folder. They contain copies of your certificate, private key and credentials, so do not leave them on the server longer than needed.
If the Upgrade Fails

If an upgrade fails, the installer rolls back automatically. The log shows ===== Rolling back =====. The installer then:

  • Stops the CertSecure services.
  • Renames the failed folders to <folder>.failed.<timestamp>.
  • Moves the previous Backend, Keycloak and Nginx folders back into place.
  • Logs Rollback finished. The previous installation has been restored.

The Installation Failed page appears. Click Close, then:

  1. Start the services again. The rollback restores the files but does not restart the services:

    Start-Service MongoDB, EC_CSM_KC, EC_CSM_FE, EC_CSM_BE
  2. Check that the previous version works (see Verify the Services).
  3. Review the installer log (C:\Users\Public\Documents\CertSecureLogs\<date-time>\InstallationLog.log) to find the cause, fix it, and run the upgrade again.

Warning: If the log shows Rollback did not complete, the previous installation is still in the backup folders next to the installation folder. Do not delete them. Restore them manually or contact Encryption Consulting support.

MongoDB, OpenSSL, Python and Java are not affected by a rollback.

On this Page:
Support Privacy Policy Terms of Service

Copyright 2026 Encryption Consulting LLC. All rights reserved.