CertSecure Documentation
  • Overview
    • About CertSecure Manager
    • Documentation Guide
  • Reference Guide
    • Header Bar
      • CertSecure Documentation
      • Swagger API
      • Profile Section
      • Search
    • Dashboard
      • Key Performance Indicators
      • Expiring Certificates
      • CA metrics
      • Key Strength
      • Signing Algorithm
      • Certificate Risk Report Profile
      • PKI Posture Management
      • NDES Health Information
    • AI Assistant
      • Chat
      • Configuration
      • Usage Report
    • Inventory
      • Overview
        • Overall
        • CertSecure
      • Template Management
        • Switch Templates
        • Exclusion List
        • Alert Templates
        • Certificate Templates
      • Template Categories
    • Discovery
      • Inventory
      • Scan Config
      • Cloud Config
      • Vault Config
      • Discovery Analytics
      • Scan Details
      • Discovery Ingestion
    • Reports
    • Utilities
      • ACME
      • Tasks
      • Integrations
        • Renewal Manager
        • Load Balancers
        • Discovery Agents
        • CLI Tool
        • Key Management
        • SEIM Tools
        • DevOps Tools
        • Ansible Automation Platform
      • NDES
      • Azure Key Vault
      • API Tokens
    • Enrollment
      • Certificate Request
      • Generate CSR
      • Enroll CSR
      • Generate Certificate
      • Import Certificate
      • Bulk Certificate Generation
      • Manage Policies
      • Organization Details
    • Administration
      • Users
      • Roles and permission
      • Certificate Authorities
      • Departments
    • Miscellaneous
      • Logging
      • Service Setup
        • Zoom
        • Zendesk
      • Settings
        • Configure Realms
        • Schedule Alerts
        • Metrics
        • Web Branding
        • About License
  • Setup & Architecture
    • Identity and Access Control
    • Architecture
    • Installation
      • Pre-requisites
      • Windows
      • Linux
      • Docker
    • Upgrade
      • Windows
      • Docker
  • Release Notes
    • Releases for 2026
      • v3.4.0
      • v3.3.1
      • v3.3.0
    • Releases for 2025
      • v3.2.0
      • v3.1.0
    • Releases for 2024
      • v3.0.0
  • Workflow
    • Approval Workflow
  • API Reference
    • Getting Started
    • Authorizing Requests
    • Securing API Access
    • Request and Response Conventions
    • Endpoint Reference
      • Health
      • API Token Management
      • CA Management
      • Templates
      • Certificate Enrollment
      • Inventory
      • Certificate Discovery
      • Tasks
      • Watcher Groups
      • Alerts
      • Reports
      • Logs
      • Monitoring
      • Scheduling
      • SMTP
      • ACME
      • Azure Key Vault
      • Google Cloud (GCP)
      • HashiCorp Vault
      • EJBCA
      • ServiceNow
  • Integration Guide
    • Renewal Manager
      • Workflow
      • Setup
      • Troubleshooting
      • IIS
      • Apache
      • Tomcat
      • Nginx
      • MSSQL
      • MongoDB
      • Oracle
      • Cloudflare
      • AudioCodes
      • Cisco ISE
      • Palo Alto PAN-OS
      • Cisco ACI
    • Load Balancer
      • F5
        • Workflow
        • Setup
        • Onboarding
        • UI Guide
        • Troubleshooting
      • NetScaler
        • Workflow
        • Setup
        • UI Guide
        • Troubleshooting
    • Certificate Authorities
      • ACME CAs
      • AWS
      • DigiCert Connector
      • EJBCA
      • GlobalSign
      • GoDaddy
      • HashiCorp Vault PKI
      • Microsoft AD CS
      • Sectigo
      • Sectigo-PS
    • Ansible Automation Platform
    • Azure Key Vault
  • Discovery Agent Setup Guide

Cisco ACI

Renews the certificate that serves the web interface and API of a Cisco ACI APIC cluster (the APIC web server certificate).

  • Supported target(s): Cisco ACI APIC clusters. One server in CertSecure Manager is one APIC cluster, and one endpoint is the key ring that backs the APIC web certificate.
  • Operating system: not applicable. The Renewal Manager Agent uses the APIC REST API, so no operating system is selected and the server is registered with the operating system api.
  • Private key: the certificate request is generated on the APIC itself, so the private key never leaves the controller.
  • Agent: Cisco ACI is managed by the Renewal Manager Agent that is already registered with CertSecure Manager. The Cisco ACI tile has no download of its own. To install and register the agent, see Renewal Manager Setup.
Before You Start
  • The Renewal Manager Agent must be Online and able to reach the APIC cluster address over HTTPS.
  • An APIC account for the agent to sign in with: a local account, or an account that signs in through remote authentication (TACACS+, RADIUS, or LDAP) together with the name of its login domain.
  • The DNS name and IP address of every APIC controller, plus the cluster IP address and any shared name that users browse to. All of them go on the new certificate, and at least one DNS name or IP address is required.
  • A Certificate Authority and a template in CertSecure Manager to issue the renewed certificate, and an owner for the server.
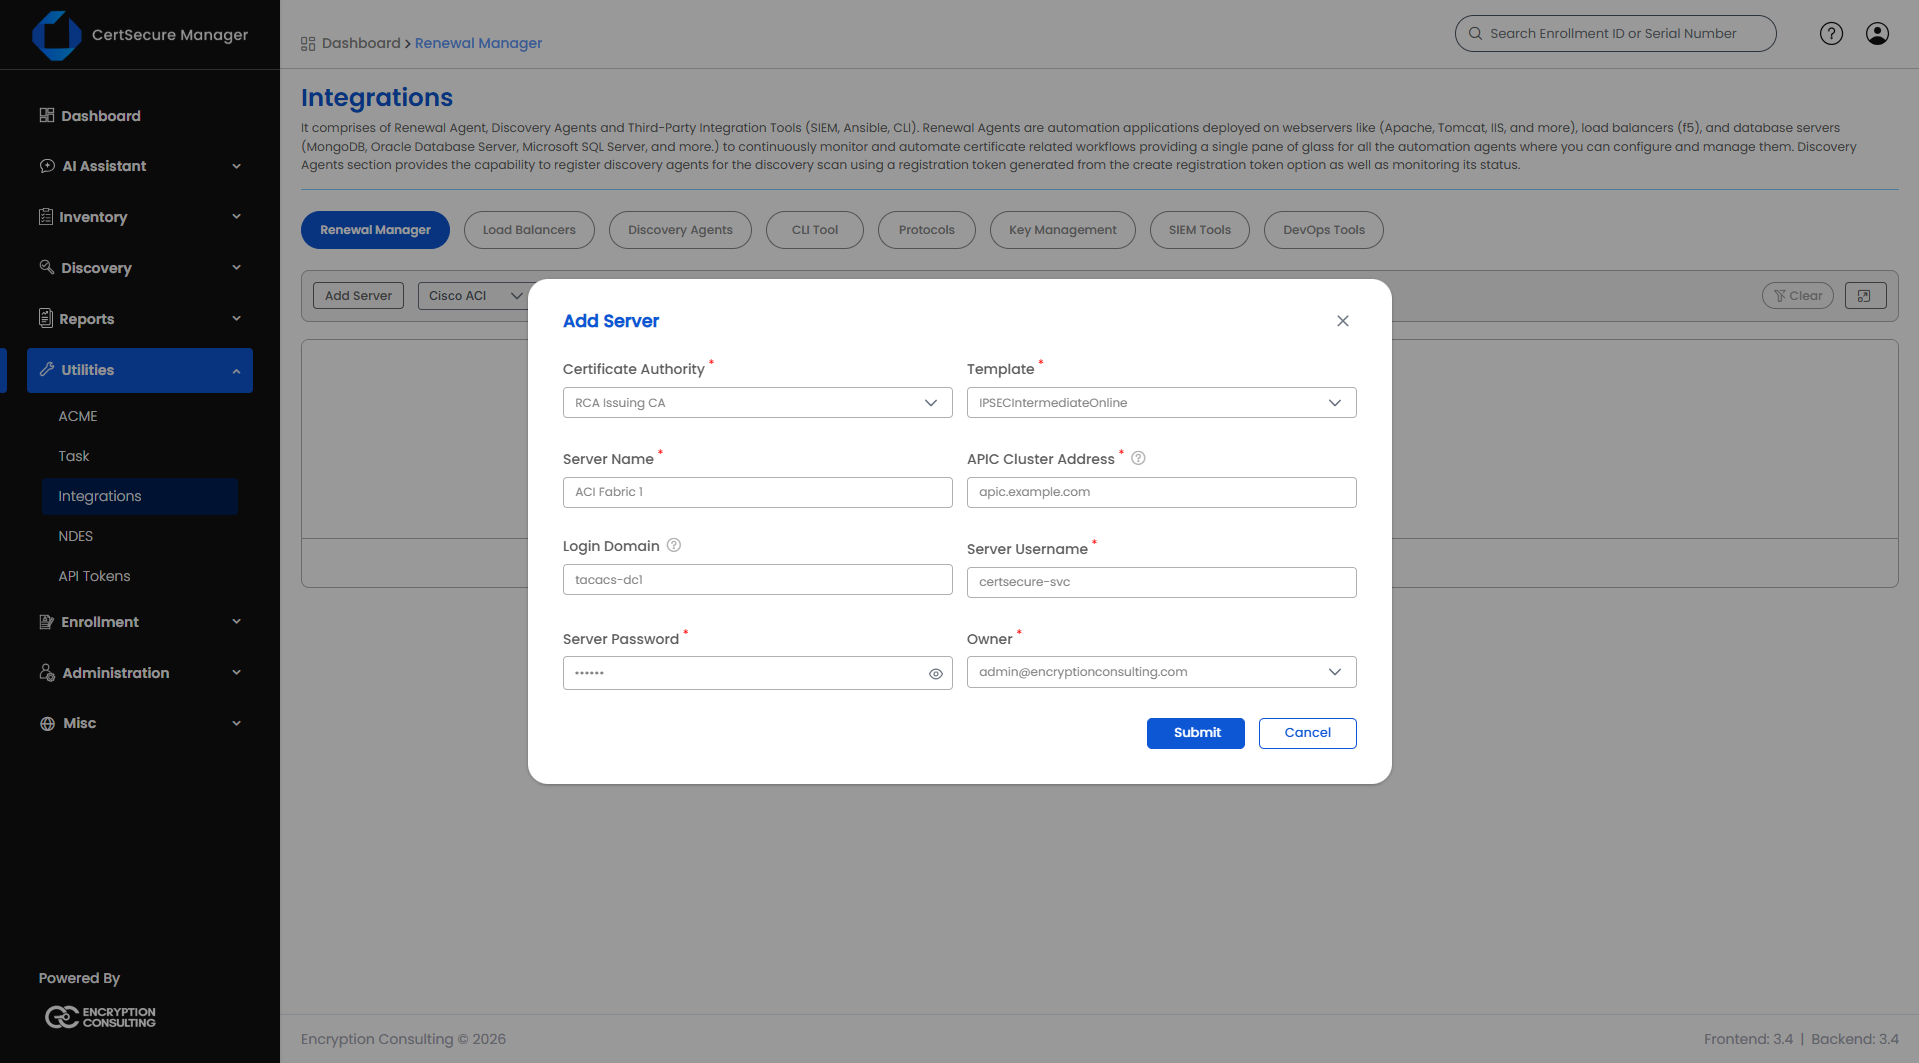
Adding a Cisco ACI Server
  1. On the Renewal Manager tab, click Add Server (or click the Cisco ACI tile in the connector grid).
  2. Select Cisco ACI as the Server Type and fill in the fields below.
  3. Click Submit.
Cisco ACI - Add Server
Field Applies to What it means
Server Type Required Select Cisco ACI.
Certificate Authority Required The CA that will issue renewed certificates for this APIC cluster.
Template Required The certificate template/profile to request from the selected CA. Options depend on the CA chosen.
Server Name Required, Add only A unique display name for this server. Cannot be changed later. Maximum 50 characters.
APIC Cluster Address Required, Add only The address of the cluster: a controller VIP or one APIC. Enter a hostname or IP address, with no scheme, port, or path. Cannot be changed after the server is created.
Server Username Required The APIC account the agent signs in with.
Server Password Required on Add The password for Server Username. Stored encrypted. On Edit, leave blank to keep the existing password.
Login Domain Optional Only for remote-AAA users (TACACS+, RADIUS, LDAP). Leave blank for a local APIC account. 1 to 64 characters: letters, digits, "_", "." or "-". Can be changed on Edit.
Owner Required The person responsible for this server. Autocompletes as you type an organization user's name or email.
Organization ID Only when CA = DigiCert The DigiCert organization ID to request the certificate under.
Order Validity Only when CA = DigiCert How many days the requested certificate should be valid for.
Note: The Operating System field is not shown for Cisco ACI.
Note: The Certificate Authority, Template, and Owner are set once on the server and are used for every endpoint registered under it. Endpoints do not carry their own.
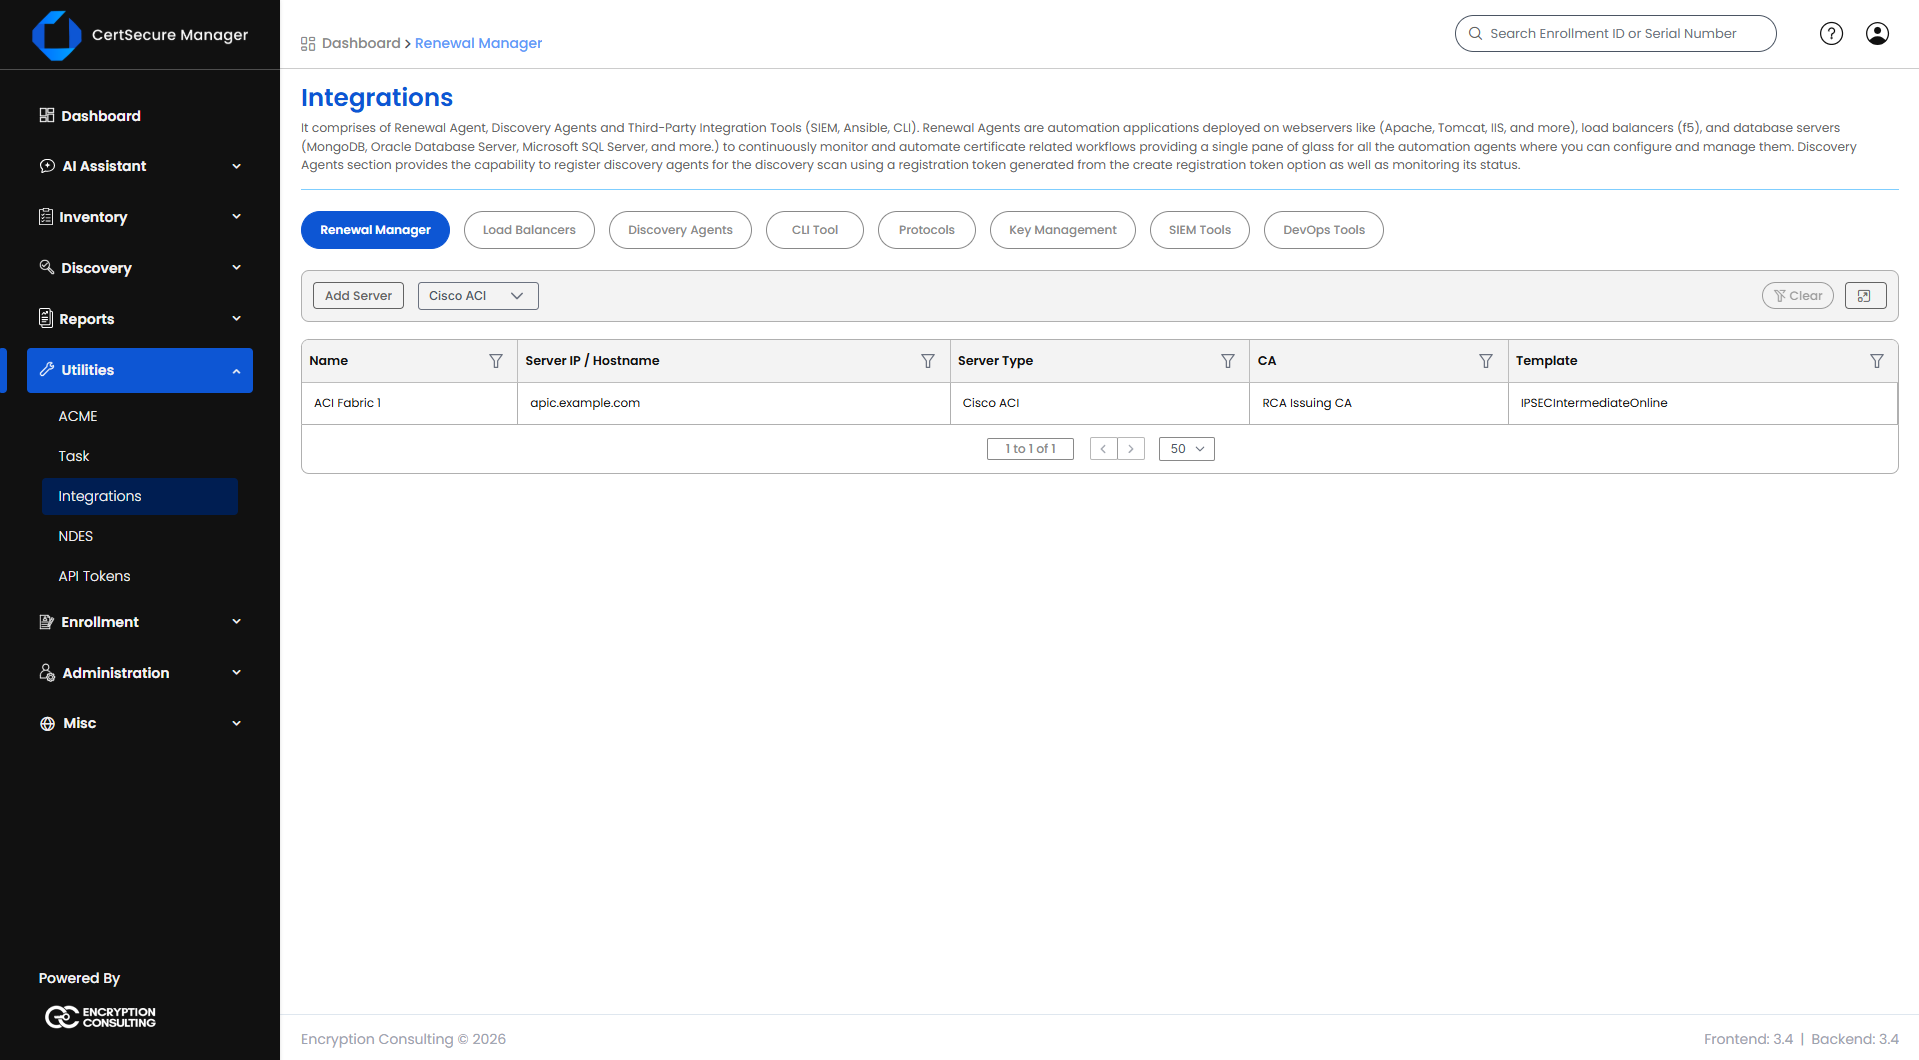
Cisco ACI Server List Actions
Cisco ACI - Server List

Right-click a server row (or open its actions menu) to see:

  • View Details – opens a read-only summary of the server's configuration.
  • Edit Details – reopens the Add Server form pre-filled, so you can update the credentials, Login Domain, CA, template, or owner.
  • Manage Endpoints – opens the endpoint list for this server.
  • View Tasks – opens the task history for this server.
  • Delete – deletes the server after a confirmation prompt. Deleting a server also removes every endpoint added under it.
How the Key Rings Work

For each endpoint the agent manages two key rings on the APIC, named after the Key Ring Prefix you choose: the prefix followed by -a, and the prefix followed by -b. At any time one of them serves the web certificate. A renewal writes the new certificate into the other one and then switches Management Access to it, so the certificate in use is never overwritten. The CA chain for the new certificate is taken from the certificate bundle the CA returns, and the agent creates the trustpoint objects it needs under the Trustpoint Prefix.
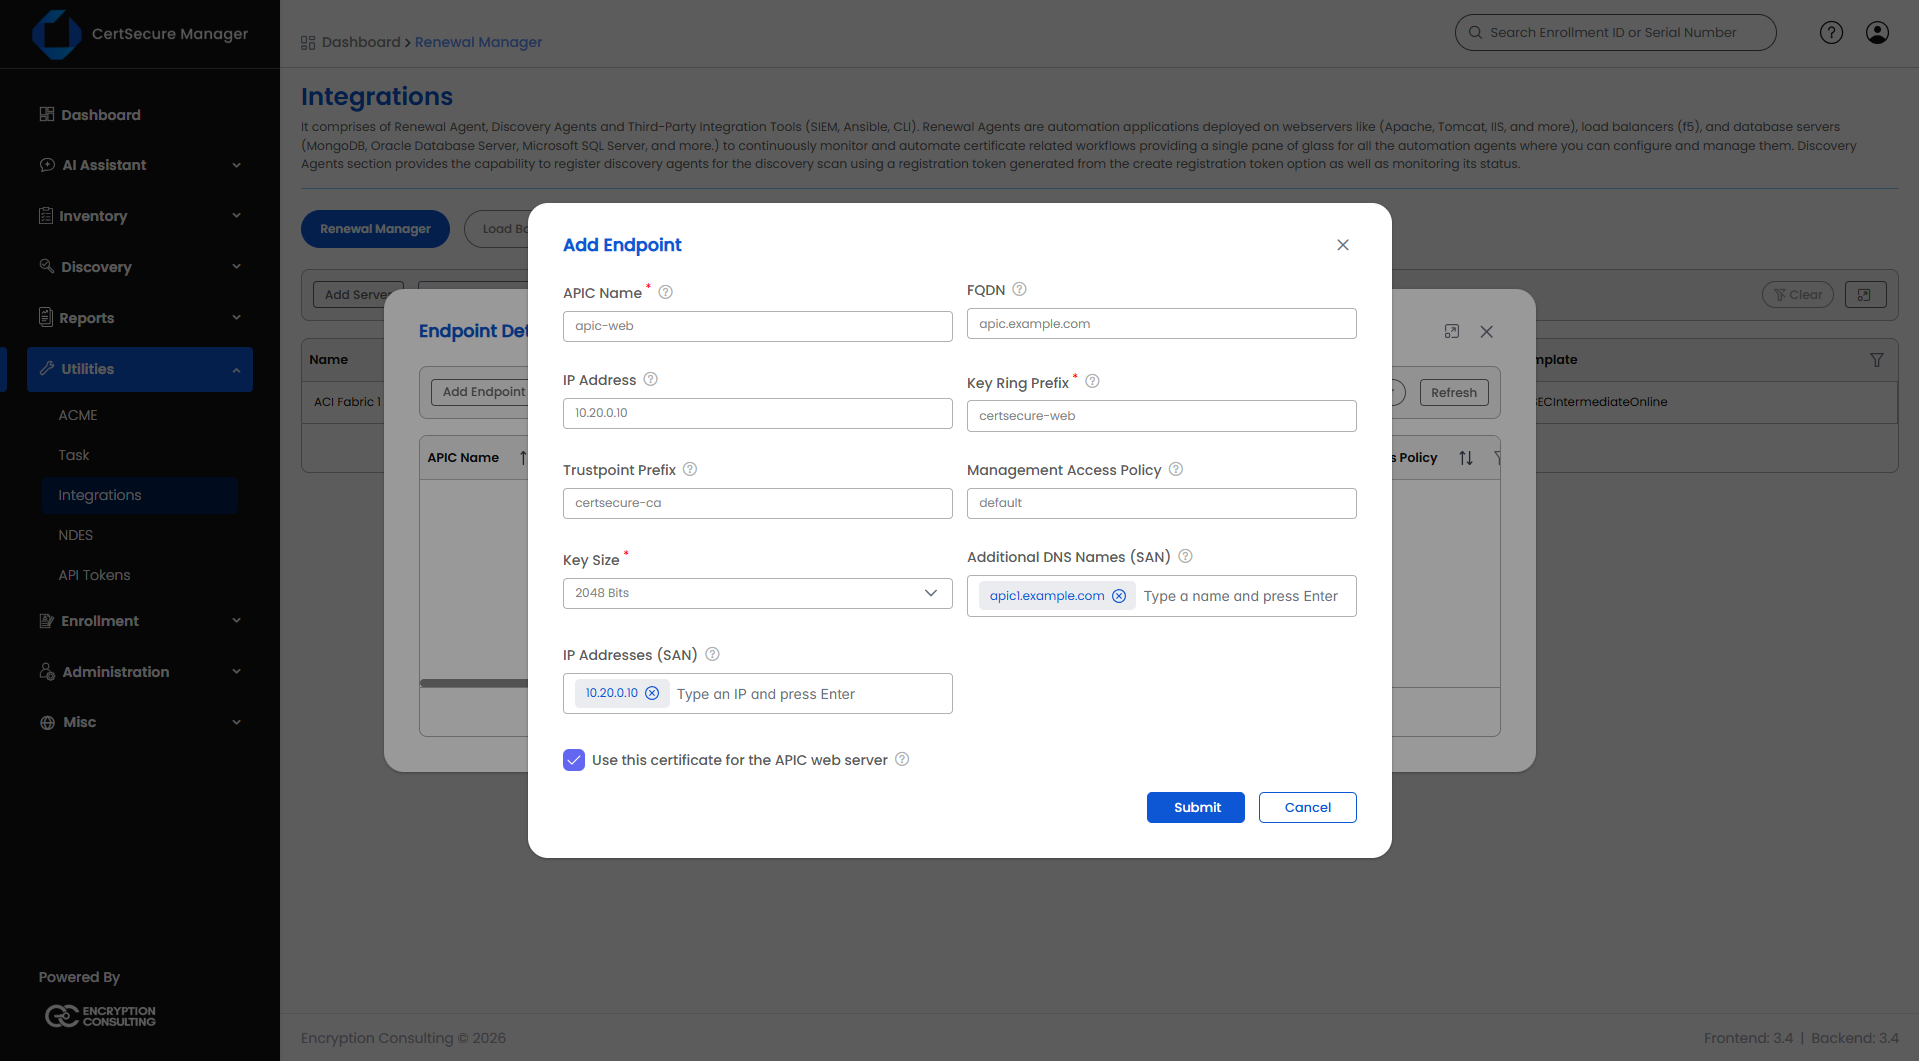
Adding a Cisco ACI Endpoint
  1. From the server list, open Manage Endpoints on the server (right-click → Manage Endpoints).
  2. Click Add Endpoint.
  3. Fill in the fields below.
  4. Click Submit.
Cisco ACI - Add Endpoint
Field Applies to What it means
APIC Name Required A label that identifies this endpoint, stored in lowercase. It is not the name on the certificate. A second endpoint with the same name on the server is skipped.
FQDN Optional, but FQDN or IP Address is required The DNS name on the certificate: its common name, a DNS SAN, and the TLS SNI. A DNS name only.
IP Address Optional, but FQDN or IP Address is required The IPv4 or IPv6 address the agent connects to. It is always added to the IP SANs.
Key Ring Prefix Required The prefix of the two key rings the agent manages. Up to 62 characters: letters, digits, "_", ".", ":" or "-". It cannot be, or start with, default, which is the APIC's built-in self-signed key ring. Each endpoint on a server needs its own prefix.
Trustpoint Prefix Optional The prefix of the APIC certificate-authority objects the agent creates. Up to 55 characters, same rule as the key ring prefix. Defaults to certsecure-ca.
Management Access Policy Optional The one Management Access policy this endpoint owns, for example default. 1 to 64 characters: letters, digits, "_", ".", ":" or "-". Leave blank to bind every policy a pod uses.
Key Size Required 2048 Bits or 4096 Bits. The default is 2048.
Additional DNS Names (SAN) Optional, but at least one SAN entry (DNS or IP) is required Up to 50 DNS names. List every APIC hostname and the name users browse to.
IP Addresses (SAN) Optional, but at least one SAN entry (DNS or IP) is required Up to 50 IP addresses: each APIC and the cluster VIP.
Use this certificate for the APIC web server Optional. Cleared by default in the form Points Management Access at this key ring once it completes. Binding restarts the APIC web server for a few seconds. Leave it cleared to update the key ring only.
Note: The port is always 443 and is not entered. No Certificate Path or Key Path is needed.
Note: Add the DNS name and IP address of every APIC controller to the SAN fields. The first certificate needs every controller's name and address on it, and an APIC has no cluster address from which they could be worked out, so they cannot be left for the agent to guess.
Note: Endpoints cannot be edited. To change an endpoint, delete it and add it again.
Rules for Several Endpoints on One Server
  • Each endpoint needs its own Key Ring Prefix. Two endpoints that share a prefix would replace each other's certificate.
  • A Management Access policy can be owned by only one endpoint.
  • An endpoint with no Management Access Policy binds every policy a pod uses, so it cannot sit beside an endpoint that owns a policy. Delete it and add it again with its own policy first.
  • Endpoints that own different policies also need a Trustpoint Prefix of their own, because the agent replaces the chain in its trustpoints at install.
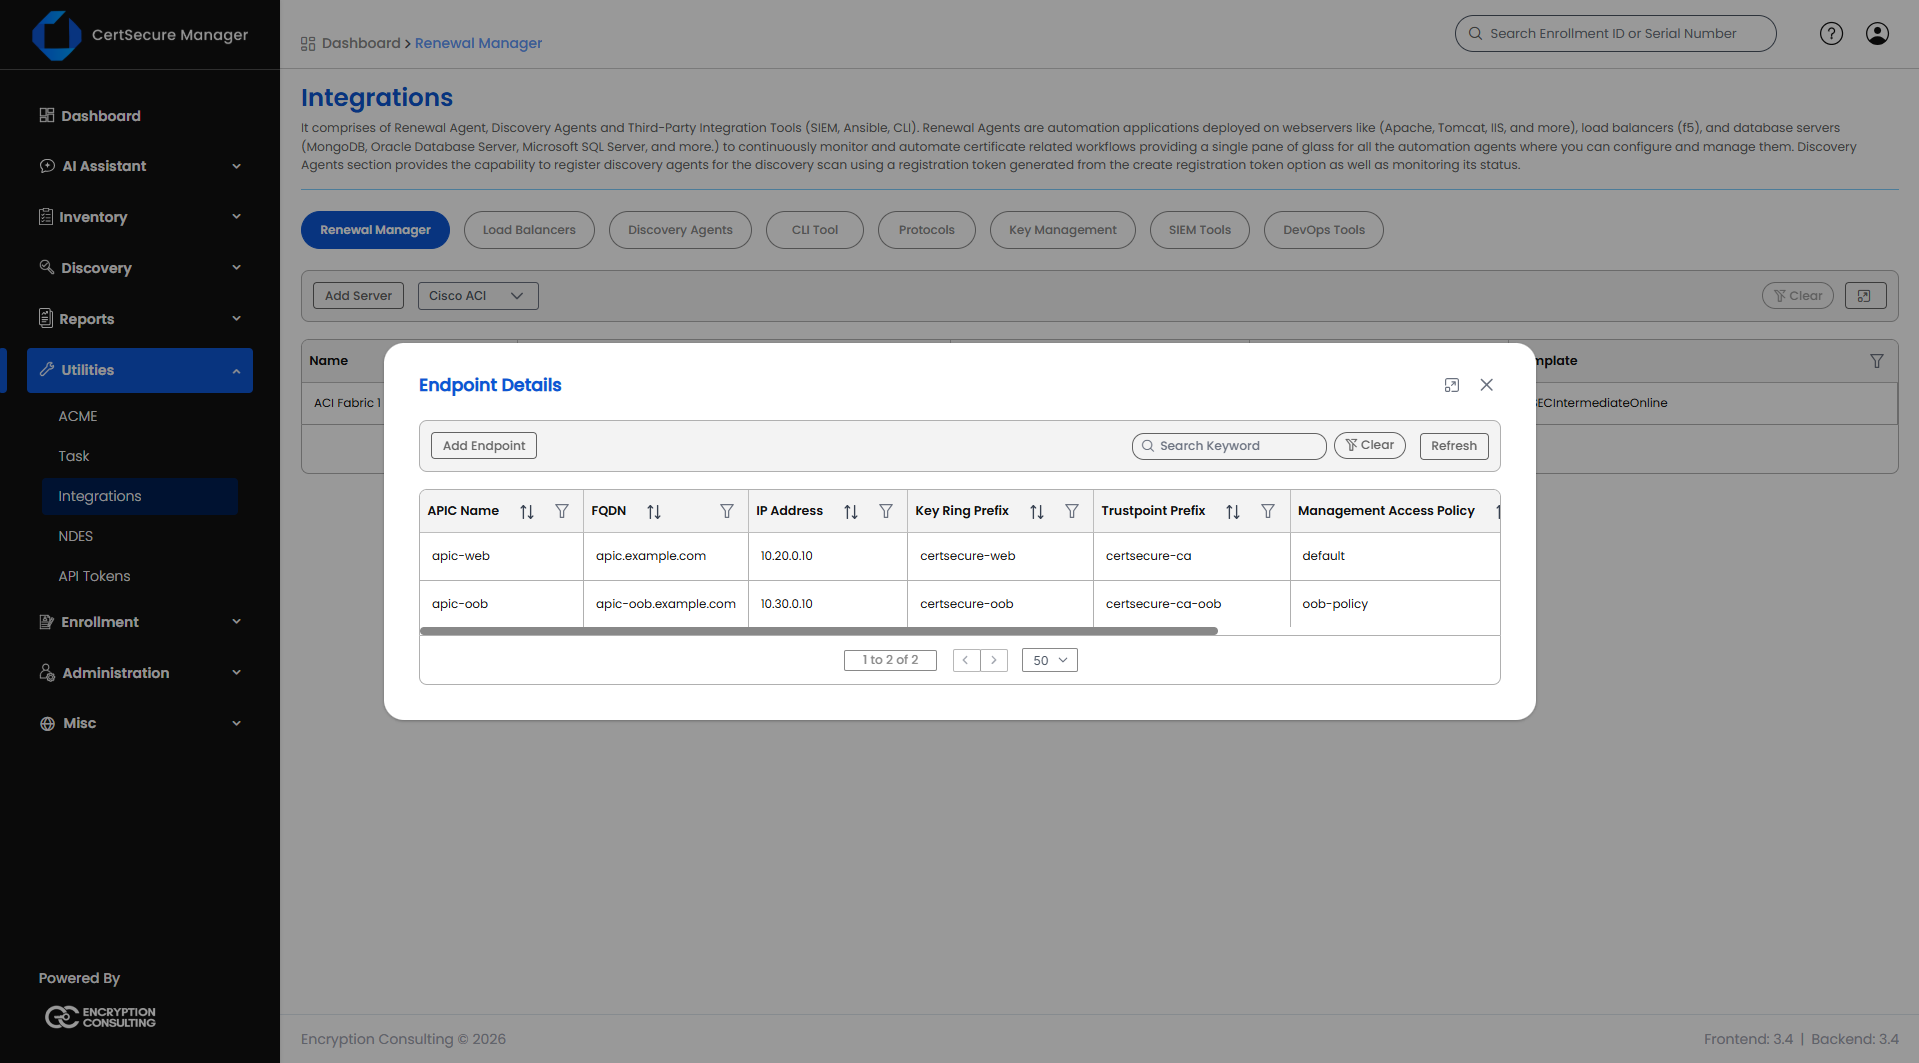
Cisco ACI - Several Endpoints
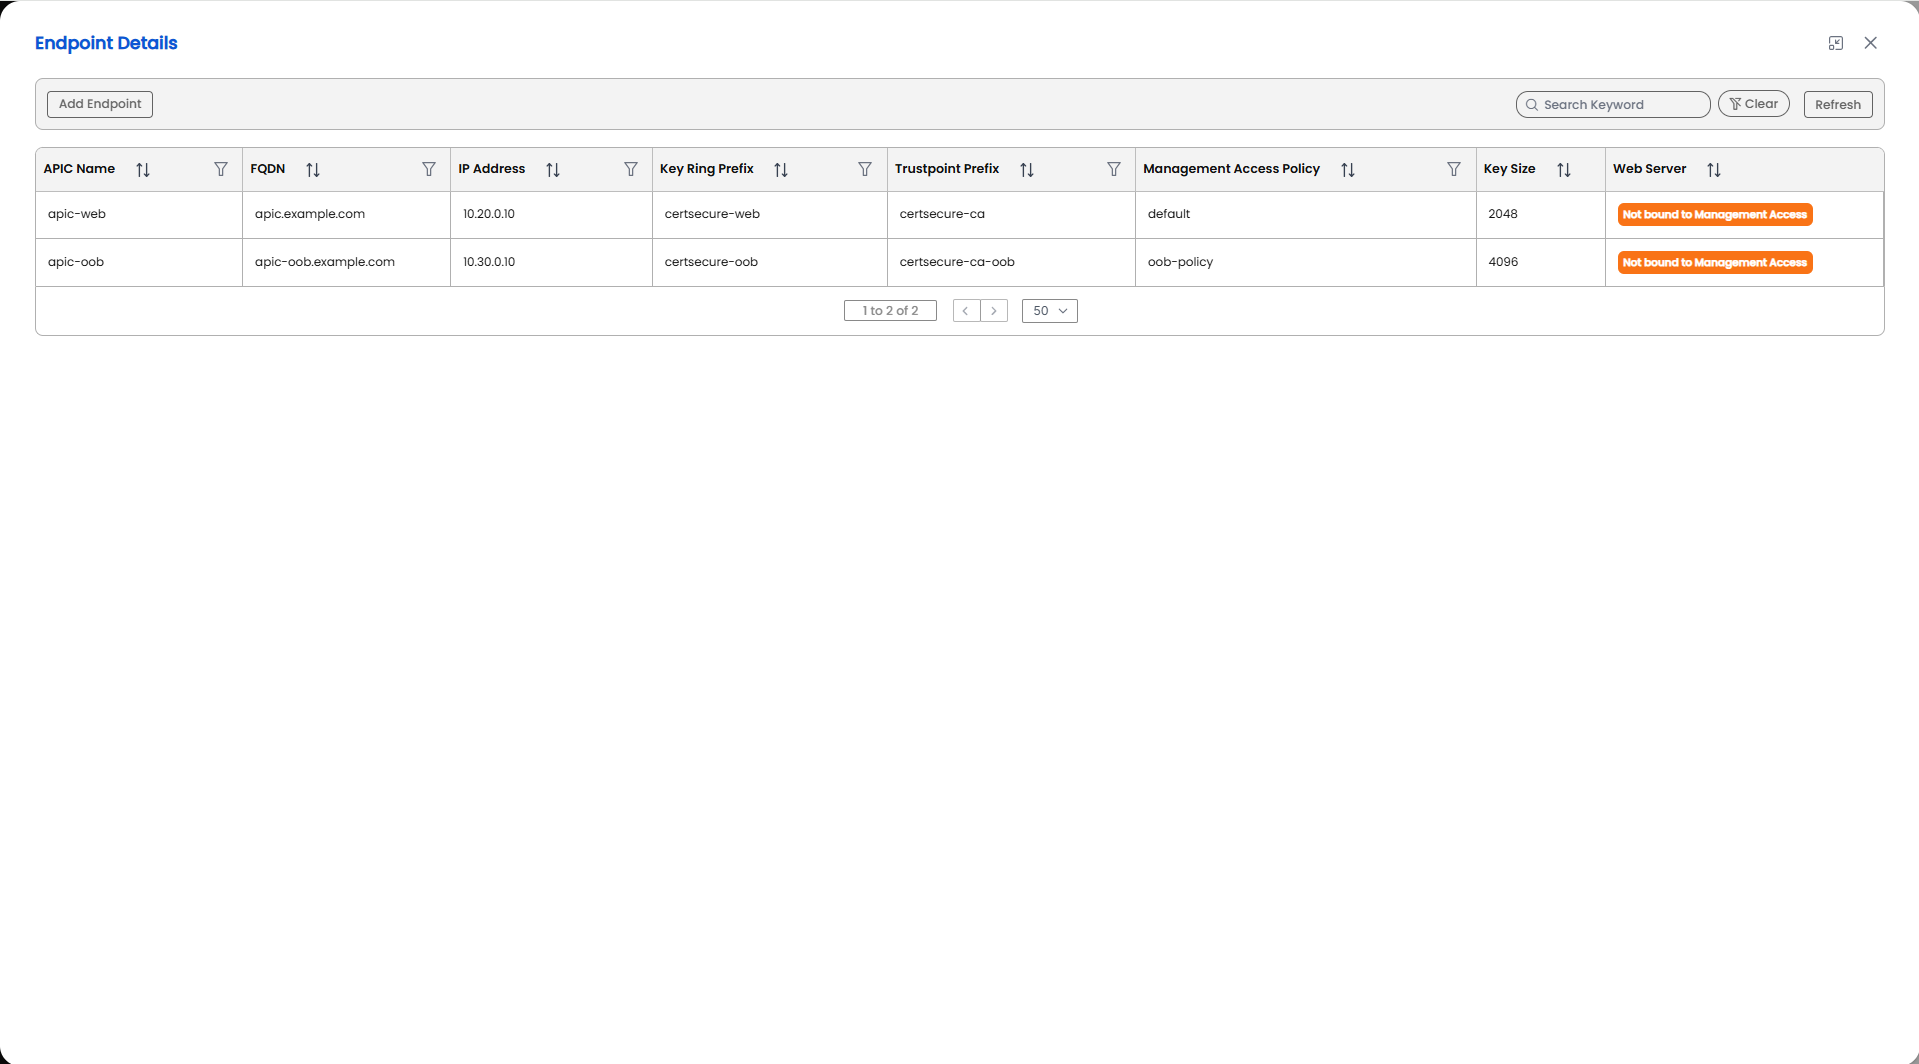
Endpoint List

The endpoint list shows these columns:

Column What it shows
APIC Name The label of the endpoint.
FQDN The DNS name on the certificate. N/A when none was entered.
IP Address The address the agent connects to. N/A when none was entered.
Key Ring Prefix The prefix of the two key rings.
Trustpoint Prefix The prefix of the trustpoint objects.
Management Access Policy The policy the endpoint owns, or All.
Key Size 2048 or 4096.
Web Server Shows Not bound to Management Access when the web server checkbox was cleared.
Cisco ACI - Endpoint List
Endpoint Actions

From the endpoint list, use the row actions (right-click or the actions menu) to:
  • View Details – opens a read-only summary of the endpoint.
  • Renew – opens the Renew Endpoint dialog.
  • Delete – removes this endpoint from the server after a confirmation prompt. It does not delete the key rings or trustpoints on the APIC.
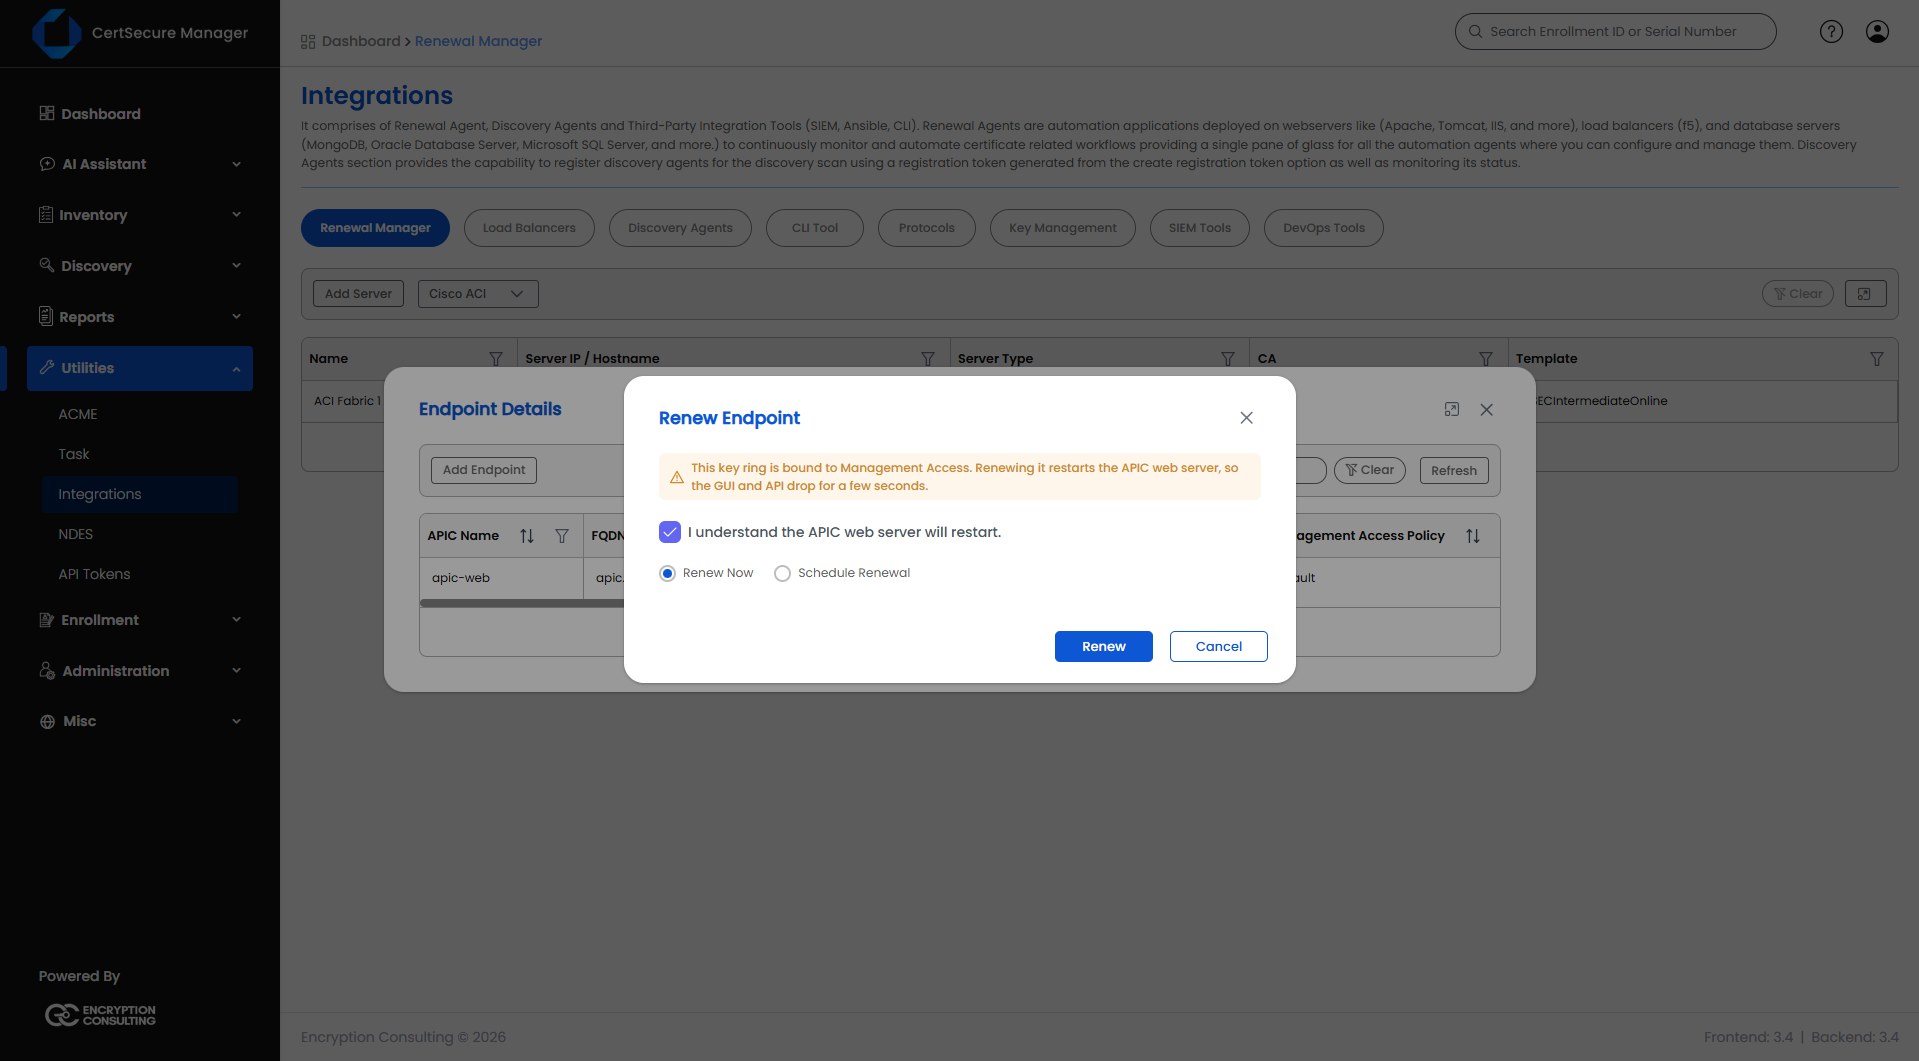
Renewing a Cisco ACI Certificate
  1. Open Manage Endpoints on the server, find the endpoint, and choose Renew.
  2. Pick one of:
    • Renew Now – queues the renewal immediately.
    • Schedule Renewal – pick a date and time at least 30 minutes from now using Enter Schedule Time.
  3. If the endpoint is bound to Management Access, select I understand the APIC web server will restart.
  4. Click Renew (or Schedule if you chose to schedule it).
Cisco ACI - Renew Endpoint

Before you can renew manually:

  • The Renewal Manager Agent must be Online.
  • The endpoint must already exist under the server. Add it first if it does not.
  • For an endpoint bound to Management Access, the restart acknowledgement must be selected. The dialog warns that renewing restarts the APIC web server, so the GUI and API drop for a few seconds.
What Happens When You Renew
  1. The agent signs in to the APIC with the server credentials, using the Login Domain when one is set.
  2. It writes to the key ring that is not currently in use, and generates the key pair and certificate request on the APIC.
  3. It submits the request to the Certificate Authority and template set on the server and receives the certificate and its issuing chain.
  4. It loads the issuing chain into a trustpoint created under the Trustpoint Prefix and uploads the certificate to the key ring.
  5. If the endpoint is bound, it switches Management Access to the new key ring. For an endpoint with a Management Access Policy, only that policy is switched; otherwise every policy a pod uses is switched. The APIC web server restarts for a few seconds.
Viewing Tasks

Here's how to check renewal progress:

  1. Right-click a server → View Tasks.
  2. Use Search Keyword, the column filters, or Refresh to find a specific task.

Task Columns

Column What it shows
Info A colored status badge: OK, ERROR, PROCESSING, PENDING, INITIALIZED, or WARNING.
Task ID The unique ID of this task.
Updated On When the task status last changed. Filterable by date.
Task Name What kind of task this is, for example a renewal.
Details A short description of the current status or the last error.
IP Address The endpoint address(es) involved.
Status The current status text.

Task Status Meanings

  • INITIALIZED – the task was just created and is queued.
  • PENDING – waiting for the agent to pick it up.
  • PROCESSING – the agent is actively working on it.
  • OK – completed successfully.
  • WARNING – completed, but with something worth checking.
  • ERROR – failed. Check Details for the reason.
Messages You May See When Adding an Endpoint
Message What to do
Up to 62 characters: letters, digits and _ . : - , and not "default" The Key Ring Prefix is too long, uses a character that is not allowed, or is or starts with default. The Trustpoint Prefix allows up to 55 characters.
Add at least one DNS name / Add at least one IP address Enter at least one SAN entry, either a DNS name or an IP address.
At most 50 DNS names / At most 50 IP addresses Remove entries from the SAN field.
Each entry must be a DNS name / Each entry must be an IPv4 or IPv6 address Correct the SAN entry.
1-64 characters: letters, digits and _ . : - The Management Access Policy name is not valid.
key ring prefix '<prefix>' is already used by endpoint '<name>' Choose a different Key Ring Prefix.
Management Access policy '<policy>' is already owned by endpoint '<name>' Each policy can belong to one endpoint.
trustpoint prefix '<prefix>' is already used by endpoint '<name>' Endpoints that own different Management Access policies need different Trustpoint Prefix values.
On this Page:
Support Privacy Policy Terms of Service

Copyright 2026 Encryption Consulting LLC. All rights reserved.