CertSecure Documentation
  • Overview
    • About CertSecure Manager
    • Documentation Guide
  • Reference Guide
    • Header Bar
      • CertSecure Documentation
      • Swagger API
      • Profile Section
      • Search
    • Dashboard
      • Key Performance Indicators
      • Expiring Certificates
      • CA metrics
      • Key Strength
      • Signing Algorithm
      • Certificate Risk Report Profile
      • PKI Posture Management
      • NDES Health Information
    • AI Assistant
      • Chat
      • Configuration
      • Usage Report
    • Inventory
      • Overview
        • Overall
        • CertSecure
      • Template Management
        • Switch Templates
        • Exclusion List
        • Alert Templates
        • Certificate Templates
      • Template Categories
    • Discovery
      • Inventory
      • Scan Config
      • Cloud Config
      • Vault Config
      • Discovery Analytics
      • Scan Details
      • Discovery Ingestion
    • Reports
    • Utilities
      • ACME
      • Tasks
      • Integrations
        • Renewal Manager
        • Load Balancers
        • Discovery Agents
        • CLI Tool
        • Key Management
        • SEIM Tools
        • DevOps Tools
        • Ansible Automation Platform
      • NDES
      • Azure Key Vault
      • API Tokens
    • Enrollment
      • Certificate Request
      • Generate CSR
      • Enroll CSR
      • Generate Certificate
      • Import Certificate
      • Bulk Certificate Generation
      • Manage Policies
      • Organization Details
    • Administration
      • Users
      • Roles and permission
      • Certificate Authorities
      • Departments
    • Miscellaneous
      • Logging
      • Service Setup
        • Zoom
        • Zendesk
      • Settings
        • Configure Realms
        • Schedule Alerts
        • Metrics
        • Web Branding
        • About License
  • Setup & Architecture
    • Identity and Access Control
    • Architecture
    • Installation
      • Pre-requisites
      • Windows
      • Linux
      • Docker
    • Upgrade
      • Windows
      • Docker
  • Release Notes
    • Releases for 2026
      • v3.4.0
      • v3.3.1
      • v3.3.0
    • Releases for 2025
      • v3.2.0
      • v3.1.0
    • Releases for 2024
      • v3.0.0
  • Workflow
    • Approval Workflow
  • API Reference
    • Getting Started
    • Authorizing Requests
    • Securing API Access
    • Request and Response Conventions
    • Endpoint Reference
      • Health
      • API Token Management
      • CA Management
      • Templates
      • Certificate Enrollment
      • Inventory
      • Certificate Discovery
      • Tasks
      • Watcher Groups
      • Alerts
      • Reports
      • Logs
      • Monitoring
      • Scheduling
      • SMTP
      • ACME
      • Azure Key Vault
      • Google Cloud (GCP)
      • HashiCorp Vault
      • EJBCA
      • ServiceNow
  • Integration Guide
    • Renewal Manager
      • Workflow
      • Setup
      • Troubleshooting
      • IIS
      • Apache
      • Tomcat
      • Nginx
      • MSSQL
      • MongoDB
      • Oracle
      • Cloudflare
      • AudioCodes
      • Cisco ISE
      • Palo Alto PAN-OS
      • Cisco ACI
    • Load Balancer
      • F5
        • Workflow
        • Setup
        • Onboarding
        • UI Guide
        • Troubleshooting
      • NetScaler
        • Workflow
        • Setup
        • UI Guide
        • Troubleshooting
    • Certificate Authorities
      • ACME CAs
      • AWS
      • DigiCert Connector
      • EJBCA
      • GlobalSign
      • GoDaddy
      • HashiCorp Vault PKI
      • Microsoft AD CS
      • Sectigo
      • Sectigo-PS
    • Ansible Automation Platform
    • Azure Key Vault
  • Discovery Agent Setup Guide

F5 UI Guide

This section shows how to use the F5 pages in CertSecure: adding a device, choosing the SSL profiles to manage, renewing, pushing a certificate, and checking tasks.
Where to Find It
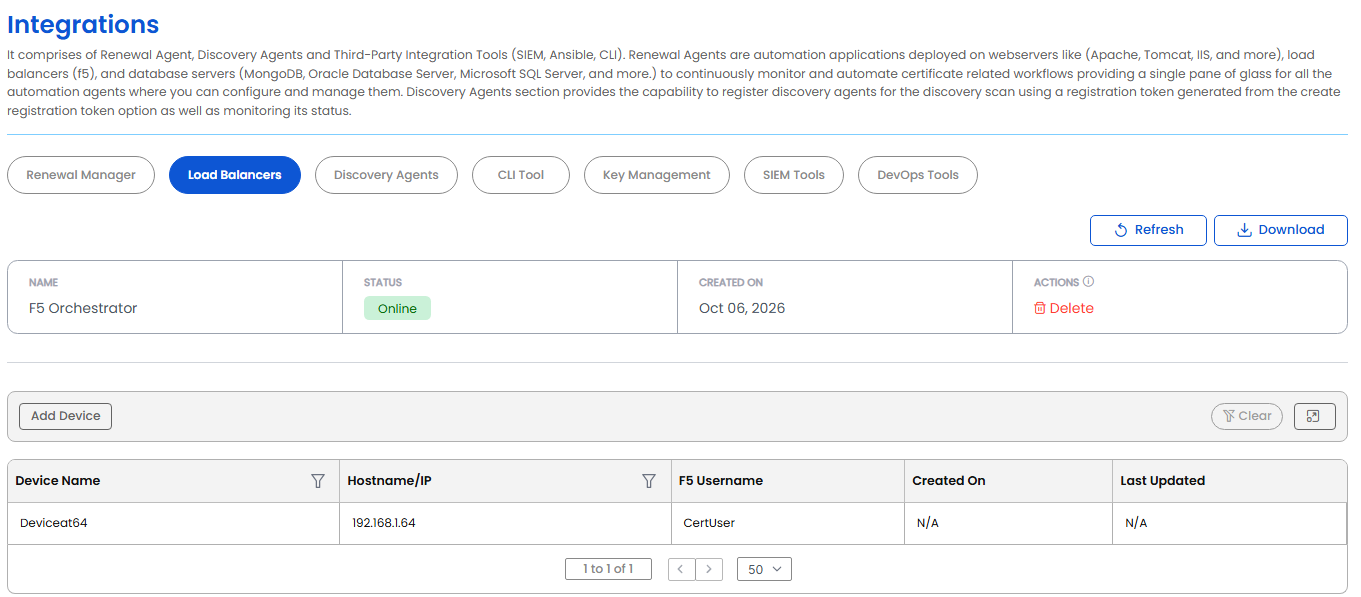
  1. Open the left navigation menu.
  2. Under Utilities, click Integrations.
  3. On the Integrations page, click the Load Balancers tab.
The Load Balancers tab: the F5 Orchestrator and its devices
Adding an F5 Device
  1. On the Load Balancers tab, click Add Device.
  2. Fill in the fields below.
  3. Click Submit.
Field Applies to What it means
Device Name Required A unique display name for this device.
Hostname/IP Required The management address of the F5. Each address can be added only once.
F5 Username Required The SSH account the F5 Orchestrator signs in with. It needs Advanced shell (bash) access and administrator rights (see F5 Requirements).
Password Required The password for F5 Username. It is stored encrypted, and only the F5 Orchestrator can read it.

CertSecure syncs the new device straight away. When the sync has finished, the SSL profiles found on the device are listed under Manage SSL Profiles.

Device Actions

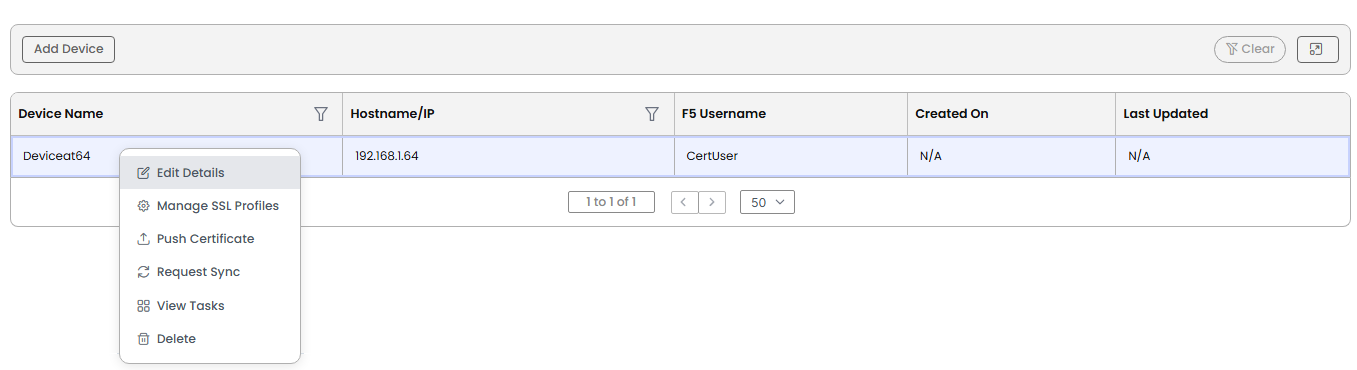
Right-click a device to see:

  • Edit Details – change the device name, address, username, or password. Changing the address, username, or password starts a new sync.
  • Manage SSL Profiles – opens the SSL profiles found on the device, staged and managed.
  • Push Certificate – creates a new certificate on this device (see Pushing a Certificate).
  • Request Sync – reads the device again now, for example after you changed a profile directly on the F5. Only one sync per device can be queued or running at a time.
  • View Tasks – opens the task history of this device.
  • Delete – removes the device from CertSecure, with all its profiles, after a confirmation prompt. Open tasks for the device are cancelled. Nothing is changed on the F5.
Right-click a device to see its actions
SSL Profiles

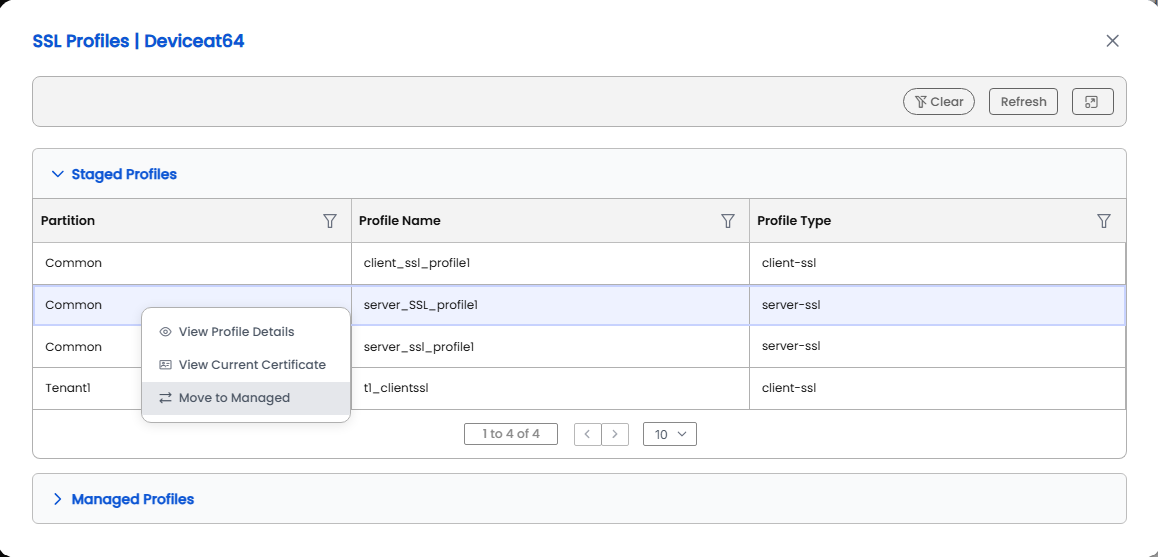
Manage SSL Profiles opens the list of SSL profiles found on the device, in two groups:

  • Staged Profiles – profiles CertSecure found on the device. They are shown, but not renewed.
  • Managed Profiles – profiles with a renewal configuration. Only these can be renewed.
  • Use the column filters, Clear, and Refresh to find a profile.

Right-click a staged profile to see:

  • View Profile Details – shows the details of the profile.
  • View Current Certificate – shows the certificate the profile uses now (subject, issuer, SANs, key, fingerprint, and expiry date), as seen at the last sync.
  • Move to Managed – opens the Move to Managed form, so CertSecure can renew this profile.
Staged profiles and their actions
Moving a Profile to Managed
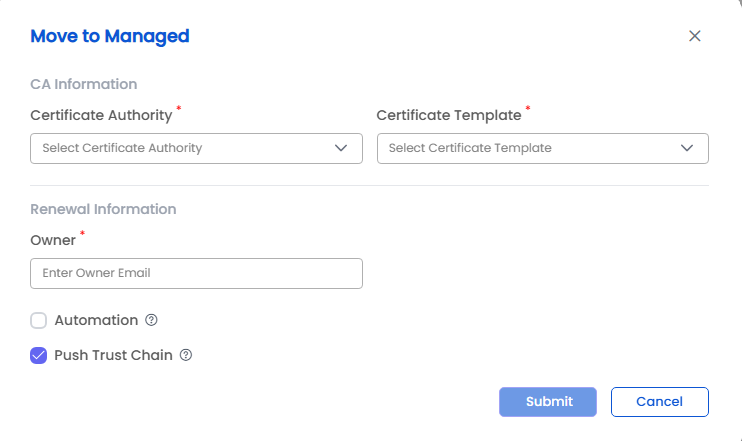
  1. Open Manage SSL Profiles on the device, expand Staged Profiles, right-click the profile, and choose Move to Managed.
  2. Fill in the fields below.
  3. Click Submit. The profile moves to Managed Profiles.
The Move to Managed form
Field Applies to What it means
Certificate Authority Required The CA that issues the renewed certificates for this profile.
Certificate Template Required The template to request from the selected CA. Options depend on the CA chosen.
Organization ID Only when CA = DigiCert The DigiCert organization to request the certificate under.
Order Validity Only when CA = DigiCert How many days the requested certificate should be valid for.
Owner Required The email address of the person who owns the renewed certificates and receives their notifications.
Automation Optional, off by default Renews the certificate automatically before it expires. While it is on, the profile cannot be renewed by hand.
Push Trust Chain Optional, on by default Installs the CA's intermediate certificates with each renewed certificate and sets them as the profile's chain. Turn it off to keep the profile's current chain.

A profile owned by an iApp application service, or one whose certificate CertSecure could not read, cannot be moved to Managed.

Managed Profile Actions

The Managed Profiles list shows each profile's Partition, Profile Name, Profile Type, CA, Template, Owner, and whether Automation is enabled. Right-click a managed profile to see:
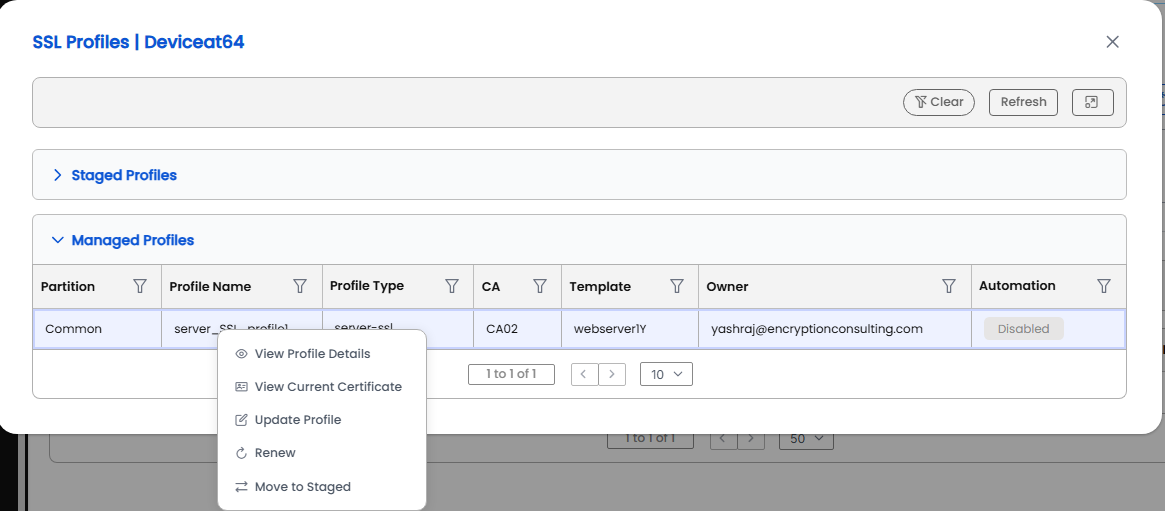
  • View Profile Details – shows the details of the profile.
  • View Current Certificate – shows the certificate the profile uses now, as seen at the last sync.
  • Update Profile – change the CA, template, owner, Automation, or Push Trust Chain. Turning Automation on cancels a manual or scheduled renewal of this profile that has not started yet.
  • Renew – renews the certificate now or at a scheduled time (see Renewing a Certificate).
  • Move to Staged – stops CertSecure from managing the profile and clears its settings. Not possible while a renewal of the profile is queued, scheduled, or running.
Managed profiles and their actions
Renewing a Certificate
  1. Open Manage SSL Profiles on the device, expand Managed Profiles, right-click the profile, and choose Renew.
  2. Choose the action: Renew and Bind switches the profile to the new certificate straight away; Renew and Push installs the new certificate but leaves the profile on the old one.
  3. Choose to renew now, or schedule the renewal for a date and time at least 30 minutes from now.
  4. Confirm. The renewal appears in the device's tasks.

Before you can renew manually:

  • Automation must be off for the profile. While it is on, the profile is renewed automatically and Renew is refused; turn it off with Update Profile first.
  • No other renewal of the profile can be queued, scheduled, or running.
  • The F5 Orchestrator should be Online. If it is offline, the renewal waits and runs when it comes back.

To see what the F5 Orchestrator does during a renewal, see Workflow Steps under F5 Workflow.

Pushing a Certificate

Push Certificate creates a brand-new certificate on the device, for example for a new application. It is installed in the partition you choose and is not bound to any profile.

  1. Right-click the device and choose Push Certificate.
  2. Enter the partition, the certificate details, and the CA, template, and owner.
  3. Click Submit. The push appears in the device's tasks.
Field Applies to What it means
Partition Required The partition the certificate is created in, for example Common. It must already exist on the F5.
Certificate details Required Common name, organization, organizational unit, country (2 letters), state, city, and at least one email address.
SAN Required The names the certificate covers, for example DNS=www.example.com, IP=10.0.0.5.
Key Length Required RSA 2048, 3072, or 4096 bits, and at least the template's minimum.
Certificate Authority, Template, Owner Required The same as for a managed profile, including the Organization ID and Order Validity for DigiCert.

When the push has finished, the new certificate, key, and chain are on the F5. Attach the certificate to a profile on the F5 when you need it.

Viewing Tasks
  1. Right-click the device and choose View Tasks.
  2. Use the column filters or Refresh to find a task. The Details column shows the progress or the failure reason.
Task name Created when
F5 Device Sync A device is added or edited, Automation is turned on, or you choose Request Sync.
Automated F5 Device Sync The regular sync, every 12 hours by default.
Renewal Task You renew a profile now.
Scheduled Renewal Task You schedule a renewal. It waits until the scheduled time.
Automated Renewal Task A sync finds managed profiles with Automation on that are close to expiry.
Push Certificate Task You push a certificate.
  • While the F5 Orchestrator waits for the CA, Details shows how many seconds it has been waiting.
  • A renewal ends as Success, Partial (some profiles were renewed and some failed), or Failed. Details gives the reason for each failure.
Good to Know
  • One F5 Orchestrator per environment. It manages every F5 device you add.
  • Only managed profiles are renewed. Staged profiles are listed so you can see their certificates.
  • Automation blocks manual renewal. Turn Automation off with Update Profile before using Renew.
  • Scheduled renewals need at least 30 minutes lead time, and never start before the scheduled time.
  • The private key never leaves the F5.
  • Changes made directly on the F5 are seen at the next sync. Use Request Sync after changing profiles on the F5.
On this Page:
Support Privacy Policy Terms of Service

Copyright 2026 Encryption Consulting LLC. All rights reserved.