
Certificate Enrollment
The portal offers several ways to obtain a certificate. The right choice depends on where the private key must be created and how many certificates are needed.
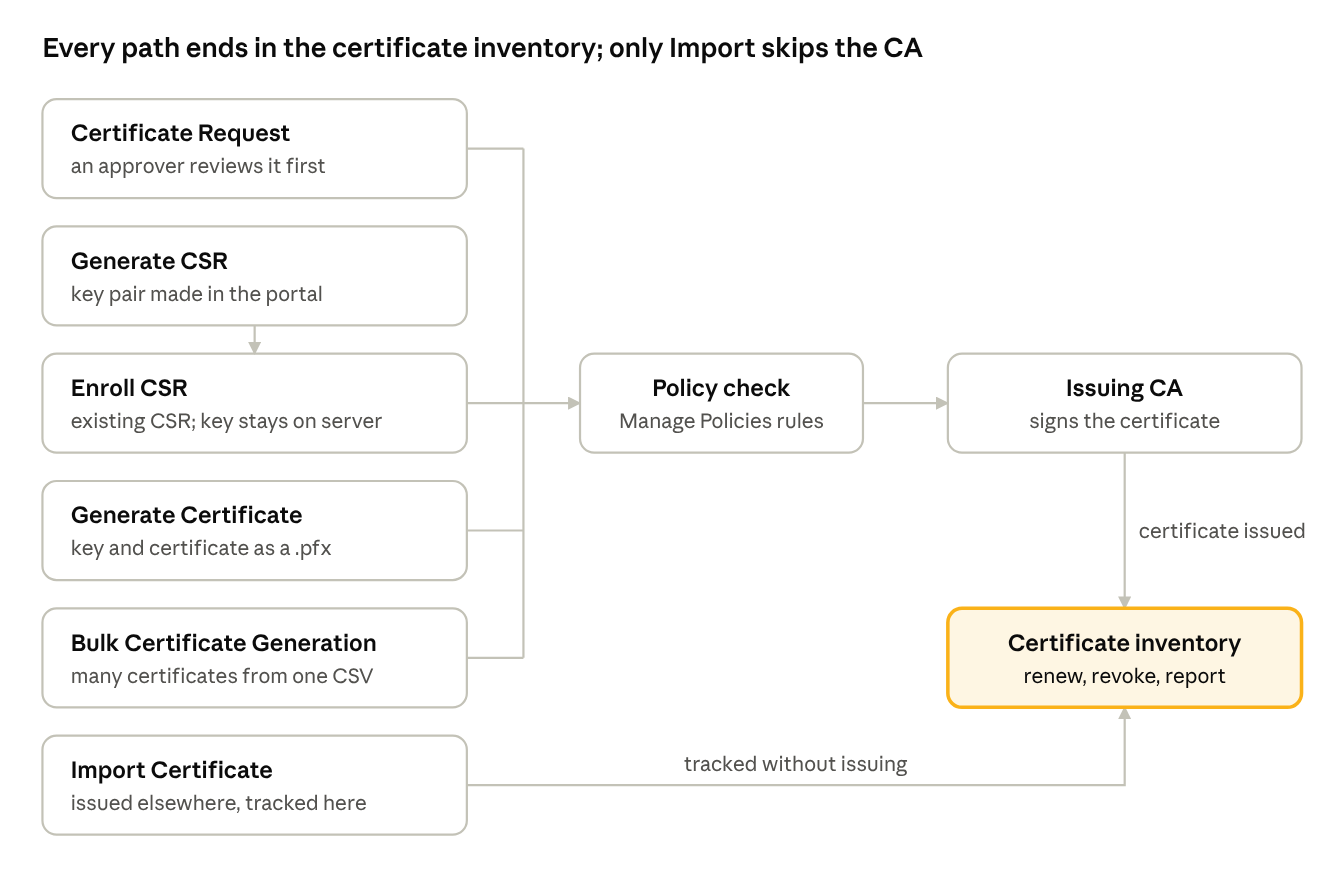
- Certificate Request: used when a certificate must be approved before issuance.
- Generate CSR: used when a device or server cannot create its own CSR; the key pair is created in the portal.
- Enroll CSR: used when a CSR already exists on the server or device; the private key stays on that system.
- Generate Certificate: used when a complete certificate and key pair are needed in one step; they are delivered as a protected file.
- Import Certificate: used to track a certificate that was issued elsewhere.
- Bulk Certificate Generation: used when many certificates are needed at once.
Certificate Request
The Certificate Request page is where administrators review the requests that need approval before a certificate is issued.
- Go to Enrollment > Certificate Request. An overview of all pending certificate requests awaiting approval is shown.
- Review the details of each request, such as Enrollment ID, CA and template.
- Select View Details in Cert Info to see the full request, including the owner details.
-
In the Action column, select Accept or Deny. An approved request is issued and appears in the inventory; the requester is notified of a denial.
Generate CSR
This page creates a key pair and a Certificate Signing Request (CSR) inside the portal.
- Go to Enrollment > Generate CSR.
- Organizational information: enter the organization address details and the e-mail address. The organization values come from Organization Details.
- Credential information: create a unique private key password. The password is used to encrypt the private key.
- Password generator: select Generate Password to create a strong password that meets the password restrictions defined in Manage Policies.
-
Select Generate CSR. The request is created, and the CSR and the encrypted private key are downloaded.
Enroll CSR
This page submits an existing CSR to a CA. It is the preferred method for servers, because the private key never leaves the server.
- Create the CSR on the server, for example with IIS,
certreqor OpenSSL. - Go to Enrollment > Enroll CSR.
- Certificate Authority: choose the CA that will issue the certificate.
- Certificate Template: select the template that matches the certificate requirements.
- Certificate Information: paste the CSR content in PEM format.
- Subject Alternative Names: add any additional SANs. By default they are added to the SANs in the CSR; select Override CSR SAN Attributes to replace them instead.
- Watchers List: add the e-mail addresses that receive notifications about the certificate.
- Tags and Custom Fields: add tags, and complete any required custom fields. Optional fields are added with Add Custom Fields.
-
Select Enroll CSR.
-
When the certificate is issued, select Download Certificate and choose the format: Cert (.cer), P7B (.p7b), ZIP, ZIP with Password, Text (.txt) or PFX (.pfx).
-
Install the certificate on the server that created the CSR.
Generate Certificate
This page creates certificates directly, without a CSR. It is useful for devices that cannot generate a CSR.
- Go to Enrollment > Generate Certificate.
- Select the Certificate Authority and the Certificate Template.
- Specify the Key Length and the Common Name (CN), which identifies the primary domain or host name.
- Add Subject Alternative Names: additional domains, IP addresses or e-mail addresses.
- Add the Watchers list, Tags, Custom Fields and any notes.
- Enter the organization information.
- Enter a strong password to protect the private key and select Generate.
-
Download the certificate in the required format: TXT, ZIP, CRT, PFX or P7B.
Security note: the password must be shared with the certificate owner through a separate channel from the file.
Import Certificate
Import brings certificates issued outside the portal, or managed manually, under central tracking, so that expiry alerts and reports include them. The Import Certificate permission is required.
- Go to Enrollment > Import Certificate.
- Select Container: choose the certificate container in which the certificate will be stored.
- Certificate content: paste the full PEM-formatted certificate into the text area.
- Watchers (optional): add the e-mail addresses that receive updates and notifications about the certificate.
-
Select Submit. The certificate becomes visible and manageable alongside all other certificates in the inventory.
Bulk Certificate Generation
Bulk generation issues many certificates in one operation.
- Go to Enrollment > Bulk Certificate Generation.
- Download the CSV template.
- Fill one row per certificate: Common Name, Subject Alternative Names, template, department and any other required columns.
- Upload the completed file. The portal validates every row and lists any errors.
- Correct errors, if any, and select Generate.
- Download the results as a single archive. Each certificate also appears in the inventory.
Manage Policies
Policies set the rules that every request must meet. A request that breaks a policy is refused or sent for approval.
- Go to Enrollment > Manage Policies.
-
Certificate approval workflow: select a CA and configure a quorum of approvers for specific certificate templates.
-
Enrollment CSR restriction: turn on the switch to allow each CSR to be used only once.
- Wildcard certificate prohibition: select the check box to stop wildcard certificates from being issued automatically. Any wildcard request made in the CSR section then requires manual approval.
- Short DNS names: enable this option to allow certificates that include short (not fully qualified) DNS names in the SAN field.
-
CSR verification policy: set DNS validation, and the password restrictions for private key encryption used when generating CSRs and PFX files.
-
Select Save.
Organization Details
Organization Details set the values that users can choose when they generate a certificate or enroll a CSR, so that subject details stay consistent with the organization's requirements. Access is restricted to PKI administrators and the main administrator.
- Go to Enrollment > Organization Details.
- Add the Location Details (locality, state or province, country).
- Add the Organization's Data (organization name).
- Add the Organization's Units.
- Select Enable Other to add an Other entry to each drop-down, if users may enter a value that is not in the list.
-
Select Save. The values appear as drop-down options when a CSR or certificate is generated.
After issuance: renew and revoke
- Renew: open the certificate in the inventory and select Renew. A new certificate with the same subject is issued; the old one stays valid until it expires or is revoked.
- Revoke: open the certificate, select Revoke and choose a reason (for example Key Compromise, Superseded, Cessation of Operation). The CA adds the serial number to its next CRL, which is published to the CDP.