
- Overview
- Reference Guide
- Setup & Architecture
- Release Notes
- Workflow
- API Reference
- Integration Guide
- Discovery Agent Setup Guide
install-linux.sh reads /etc/os-release and continues only if it finds one of the IDs below. Anything else stops with Unsupported or unknown Linux distribution.
Table 1: Supported Linux Distributions
| Distribution | /etc/os-release ID | Minimum version | Recommended | Package manager | Notes |
|---|---|---|---|---|---|
| Ubuntu Server LTS | ubuntu | 22.04 LTS | 24.04 LTS (tested) | apt | Python 3.12 comes from the deadsnakes PPA if the OS doesn't provide it. |
| Red Hat Enterprise Linux | rhel | 8.10 / 9.4 | 9.x | dnf | EPEL must be enabled before you start (see note A). |
| Rocky Linux | rocky | 8.10 / 9.4 | 9.x | dnf | EPEL is installed automatically. |
| AlmaLinux | almalinux | 8.10 / 9.4 | 9.x | dnf | EPEL is installed automatically. |
| Oracle Linux | ol | 8.10 / 9.4 | 9.x | dnf | EPEL must be enabled before you start (see note A). |
| Amazon Linux | amzn | 2023 | 2023 | dnf | Uses Amazon's own MongoDB repository and Corretto 21. |
Where the minimum versions come from: the installer needs Python 3.12 and Java 21 from the OS repositories, and those appear in RHEL 8.10 / 9.4 and in the Rocky, Alma and Oracle releases built on them. MongoDB 8.0 needs Ubuntu 22.04 or later.
Not supported: SLES/openSUSE, Fedora, Amazon Linux 2, RHEL/CentOS 7, Ubuntu 20.04 or older, and any non-x86_64 architecture (the MongoDB repository path is hard-coded to x86_64).
Table 2: Common Requirements for Every Distribution
| Item | Requirement |
|---|---|
| Architecture | x86_64 |
| Linux kernel | 6.18 or older. MongoDB 8.0 won't start on kernel 6.19 or newer (MongoDB bug SERVER-121912), and the installer stops if it finds one. Check with uname -r. |
| Access | A user with sudo rights |
| Free ports | 443 (nginx), 5000 (backend, local only), 8443/8080 (Keycloak), 27017 (MongoDB, local only) |
| Internet access during install | Distro repositories, github.com (OpenSSL source, yq, Keycloak fallback download), repo.mongodb.org and pgp.mongodb.com, and PyPI (not needed if the package includes a pkgs/ folder) |
| DNS | Frontend, backend and Keycloak hostnames all resolve to this server |
| TLS certificate | One PEM certificate and key whose SAN covers all three hostnames |
Note A (RHEL and Oracle Linux)
The installer runs dnf install epel-release, and that package isn't in the default RHEL or Oracle repositories, so the install stops. Enable EPEL before you start:
RHEL 9:
sudo subscription-manager repos --enable codeready-builder-for-rhel-9-x86_64-rpms
sudo dnf install https://dl.fedoraproject.org/pub/epel/epel-release-latest-9.noarch.rpm
Oracle Linux 9:
sudo dnf install oracle-epel-release-el9You don't need to install any of these beforehand. The script installs them in this order:
Table 3: Components Installed by the Installer
| Component | Version | Location / service |
|---|---|---|
| OpenSSL (installed alongside the system copy, not replacing it; built from source, which takes several minutes) | 3.5.0 | /opt/openssl-3.5 |
| yq, jq | 4.44.3, distro version | /usr/local/bin |
| Java | 21 (OpenJDK, or Corretto on Amazon Linux) | used by Keycloak |
| MongoDB | 8.0.21, with log rotation | mongod.service |
| Python and virtual environment | 3.12 | <install dir>/venv |
| Keycloak | 26.6.0 | /opt/keycloak, keycloak.service (HTTPS 8443) |
| OpenTelemetry Collector | optional (you're asked) | /usr/local/bin/otelcol |
| Nginx (reverse proxy for the UI and API) | distro version | nginx.service, port 443 |
| CertSecure backend | — | certsecure.service |
| CertSecure MCP server | optional (you're asked) | /opt/certsecure-mcp, certsecure-mcp.service |
The installer also configures SELinux contexts on the RHEL family. It does not open firewall ports; you do that in step 9.
cat /etc/os-release
uname -r
sudo ss -ltnp | grep -E ':(443|5000|8443|8080|27017)\b'
Make sure the OS and version appear in the table in section 1, the kernel is 6.18 or older, and nothing else is using those ports. The only exception is an nginx that systemd already manages, which the installer can take over.
From your workstation:
scp CertSecure-Manager.tar.gz <admin-user>@<server>:/home/<admin-user>/(WinSCP works too when copying from Windows.)
sudo mkdir -p /home/CLM
sudo tar -xzf /home/<admin-user>/CertSecure-Manager-v3.3.tar.gz -C /home/CLM
ls /home/CLM
The extracted folder holds install-linux.sh, conf.ini, conf/, UI/, install/ and requirements.txt. In the example screenshots it is /home/CLM/CertSecure_Backend/build. The rest of this section calls it <install dir>.
Choose this folder carefully, because it becomes the permanent install location. The installer registers its current directory as the backend home, so don't move or delete it after installation.
Give the admin user who runs the installer ownership of the extracted files, with read, write and execute rights:
sudo chown -R $USER:$USER <install dir>
sudo chmod -R u+rwx <install dir>
chmod +x <install dir>/install-linux.sh
The installer then runs as root and switches ownership of the folder to the service account (root, mode 755). This step makes sure you can place the certificate files in the next step and start the script.
Copy the PEM certificate (with the full chain) and the private key into the package:
cp /path/to/certsecure.pem <install dir>/conf/cert.pem
cp /path/to/certsecure.key <install dir>/conf/key.pemCreate DNS A records pointing to this server for all three hostnames, for example:
The installer maps the Keycloak hostname to 127.0.0.1 in /etc/hosts so the backend can reach Keycloak locally. Users' browsers still need real DNS records.
The script must be run from inside the install folder:
cd <install dir>
sudo ./install-linux.sh
The first log line shows the detected OS, for example Detected OS: ubuntu 24.04 (pkg: apt).
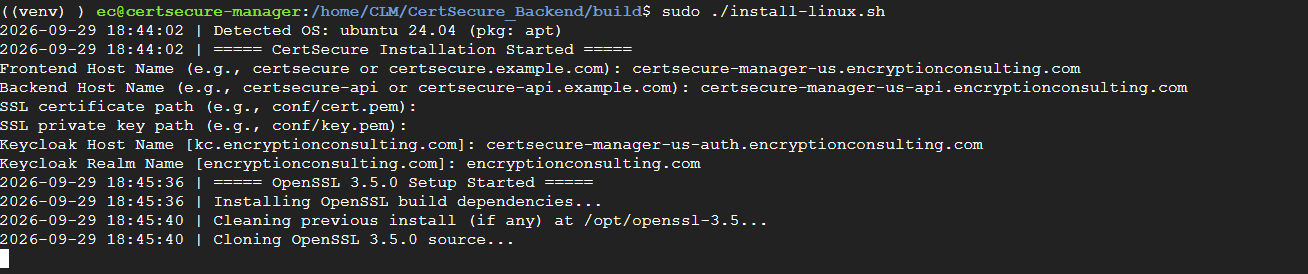
Table 4: Installer Prompts
| Prompt | What to enter | Default if left blank |
|---|---|---|
| Frontend Host Name | FQDN users browse to, e.g. certsecure-manager-us.encryptionconsulting.com | required |
| Backend Host Name | API FQDN, e.g. certsecure-manager-us-api.encryptionconsulting.com | required |
| SSL certificate path | Path to the PEM certificate | conf/cert.pem |
| SSL private key path | Path to the PEM key | conf/key.pem |
| Keycloak Host Name | Keycloak FQDN, e.g. certsecure-manager-us-auth.encryptionconsulting.com | kc.<frontend base domain> |
| Keycloak Realm Name | Letters, digits, ., - and _ only, e.g. encryptionconsulting.com | <frontend base domain> |
| Install OpenTelemetry Collector? (y/n) | y if logs or telemetry should go to an OTLP endpoint | asked during the install |
| Install CertSecure MCP server? (y/n) | y only if AI agents should get read-only access at https://<backend host>/mcp | asked at the end |
| Enable the MCP server at boot and start it now? (y/n) | only asked if you chose to install the MCP server | — |
After the prompts, the script works through section 2 on its own. The OpenSSL build and the MongoDB and Keycloak steps take the longest, and a full install usually takes 30–75 minutes, depending on the server and network. It's finished when you see:
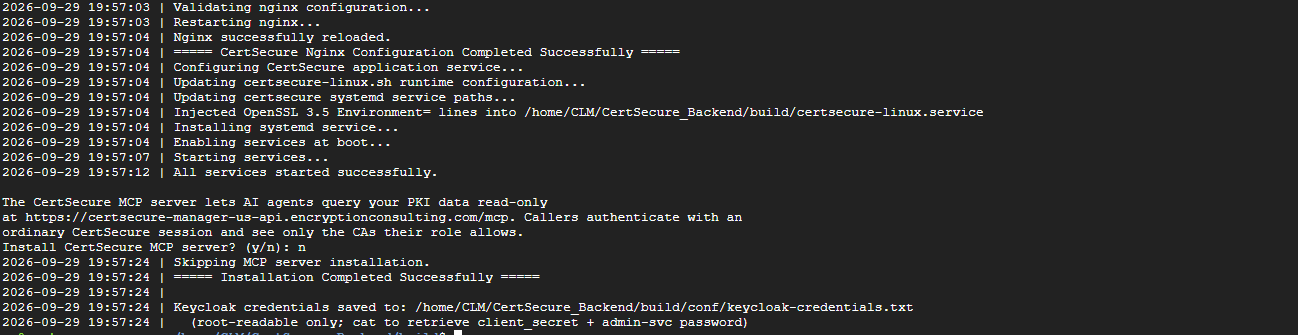
Keycloak credentials saved to: <install dir>/conf/keycloak-credentials.txtEverything the installer does is logged to <install dir>/installation-logs.log. Check that file first if anything fails.
Ubuntu:
sudo ufw allow 443/tcpRHEL family and Amazon Linux:
sudo firewall-cmd --permanent --add-service=https
sudo firewall-cmd --reload
On cloud VMs (AWS, Azure, GCP), also allow inbound 443 in the security group or NSG.
sudo systemctl status mongod keycloak nginx certsecure --no-pagerAll four services should show active (running). Then:
To get the Keycloak credentials:
sudo cat <install dir>/conf/keycloak-credentials.txtThe file contains the Keycloak admin console URL, the bootstrap admin login, the realm service user (admin-svc) and the OAuth client secret. Store these in your vault and change the bootstrap admin password at https://<keycloak host>/admin/. The file is root-only (0600).
To skip the prompts (for example when scripting the install), pass each answer as a flag:
sudo ./install-linux.sh --install \
  --frontend-host certsecure.example.com \
  --backend-host certsecure-api.example.com \
  --ssl-cert conf/cert.pem --ssl-key conf/key.pem \
  --keycloak-host kc.example.com --keycloak-realm example.com \
  --install-otel no --install-mcp no
To upgrade, extract the new package into a new folder and point the installer at the old one. It carries over conf.ini, conf/ and the UI config.js, and reuses the existing Keycloak:
sudo ./install-linux.sh --upgrade -d /home/CLM/<previous install folder>sudo ./install-linux.sh --help lists every option.
Table 5: Installation Troubleshooting
| Symptom | Cause / fix |
|---|---|
| Unsupported or unknown Linux distribution | The OS isn't in the table in section 1. |
| MongoDB ... refuses to start on this host's Linux kernel | The kernel is 6.19 or newer. Boot a kernel of 6.18 or older, or use Ubuntu 24.04 LTS on its standard kernel. |
| Fails at epel-release on RHEL or Oracle Linux | Enable EPEL first (note A). |
| Stopped apt/dpkg processes detected | Run sudo dpkg --configure -a and sudo apt-get install -f -y, then run the installer again. |
| Port 443 is already in use | Stop whatever else is using 443 (Apache, a hand-started nginx) and run the installer again. |
| SSL certificate not found / SSL private key not found | Fix the path. Relative paths are resolved from the install folder. |