
- Overview
- Reference Guide
- Setup & Architecture
- Release Notes
- Workflow
- API Reference
- Integration Guide
- Discovery Agent Setup Guide
This section provides a detailed, beginner-friendly instructions for setting up and using the Discovery Agent feature in CertSecure Manager. It includes Scan Configuration, Analytics, Scan Details, Certificate Discovery Ingestion, Container Discovery, the Discovery Inventory page, the Certificate Type analytics split (Onboarded PKI / Third Party), and OS-specific agent installation.
How Discovery Works
Every scan is a task. When you initiate a scan, CertSecure Manager queues a task with the status pending. A registered Discovery Agent that is online polls the backend at the interval set by POLL_INTERVAL (default 120 seconds), picks up the task, runs the scan against the configured targets, and sends the results back. The results then appear under Scan Details, Analytics, and the Discovery Inventory.
The following table shows where each scan type runs and what it reads.
| Scan type | Where it runs | What it reads |
|---|---|---|
| Network | Discovery Agent on Windows or Linux | Certificates presented by TLS services at the IP addresses, subnets, or URLs and ports you configure. |
| Store: Windows | Discovery Agent on a domain-joined Windows machine, over WinRM | Windows certificate stores (Local Machine and/or Current User) on the domain machines selected by the host filter. |
| Store: Linux | Discovery Agent on Windows or Linux, over SSH | Certificate files in the configured trust-store paths on each host. |
| Store: IIS CCS | Discovery Agent on a domain-joined Windows machine | .pfx files in the IIS Centralized Certificate Store. |
| Store: JKS | Discovery Agent on Windows or Linux | Java keystores and PKCS12 files at the configured paths. |
| Container | Discovery Agent on Windows or Linux, over SSH | Certificates inside running Docker containers. |
| Cloud | Agentless, run by the CertSecure Manager backend | Certificates from the selected Azure and AWS services. |
| Vault | Agentless | Certificates stored in HashiCorp Vault. |
A user account with the required privileges, i.e., ‘Admin,’ must be used for the setup. The selected machine must also be domain-joined for Windows, and the Discovery Agent must operate under a service account with the necessary permissions.
The requirements for this deployment are:
General Requirements
For Windows
For Linux
Deployment rules to remember
For Cloud Discovery
Use the following tables as a checklist before the first scan.
Windows store discovery (Local Machine scope)
| Requirement | Where |
|---|---|
| Standard domain user account in the same forest as the Domain Controller and the target machines | Active Directory |
| Log on as a service right, and the EC_DiscoveryAgent service configured to run as this account (Services.msc, Log On tab) | Discovery Agent machine |
| Machine is domain-joined and can resolve the Domain Controller FQDN | Discovery Agent machine |
| Member of the Remote Management Users group | Domain Controller and every target machine |
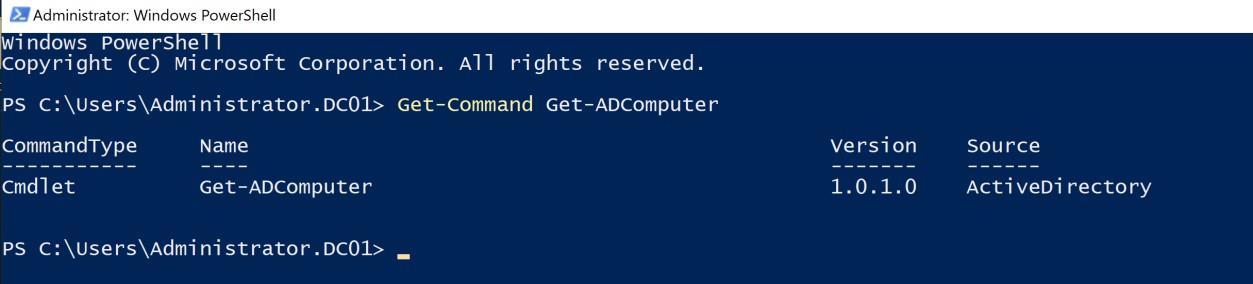
| Read access to AD computer objects (used by Get-ADComputer to enumerate machines) | Active Directory |
| Read permission on Cert:\LocalMachine\My | Every target machine |
| Windows Remote Management service running, with remote server management allowed (IPv4 and IPv6 filter set to *) | Discovery Agent machine, Domain Controller, and every target machine |
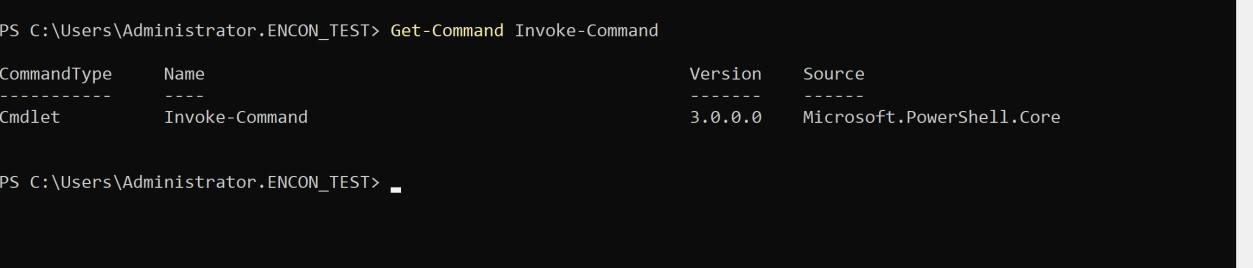
| Invoke-Command cmdlet available | Discovery Agent machine |
| Get-ADComputer cmdlet available | Domain Controller |
Linux target machines (Store, JKS, and Container scans)
| Requirement | Details |
|---|---|
| SSH service | Running and reachable from the Discovery Agent machine on the configured port (default 22). |
| Authentication | Password authentication enabled for the service account. The scan configuration takes a username and password for each host; SSH keys are not entered in the scan configuration. |
| Certificate files | Read permission on each certificate file or directory in the configured paths. |
| Directory traversal | Execute permission on the target directory and on all of its parent directories. |
| Container scans only | The account is a member of the docker group, so it can run docker ps and docker exec. |
Network ports
| From | To | Port | Used for |
|---|---|---|---|
| Discovery Agent | CertSecure Manager backend URL | HTTPS (443 unless the URL specifies another port) | Registration, polling for tasks, and sending results |
| Discovery Agent | Domain Controller and Windows targets | TCP 5985 (HTTP) or 5986 (HTTPS) | WinRM for Windows store scans |
| Discovery Agent | Domain Controller | DNS (53) and Kerberos (88) | Name resolution and Kerberos authentication for WinRM. Normally already open between domain members and domain controllers. |
| Discovery Agent | Linux and Docker hosts | TCP 22 (or the configured SSH port) | SSH for Linux store, JKS, and Container scans |
| Discovery Agent | File shares (IIS CCS, JKS on Windows) | TCP 445 | Read access to the share |
| Discovery Agent | Network scan targets | Ports in the scan configuration (Standard: 443 and 8443) | Network scans |
| Discovery Agent | AWS APIs | HTTPS (443) | Host discovery and Secrets Manager (Linux Host Discovery) |
| CertSecure Manager backend | Azure and AWS API endpoints | HTTPS (443) | Cloud discovery |
Before a scan can begin, at least one Discovery Agent must be deployed. This section outlines the prerequisites and steps for downloading and installing a Discovery Agent on either Windows or Linux.
Download the Discovery Agent
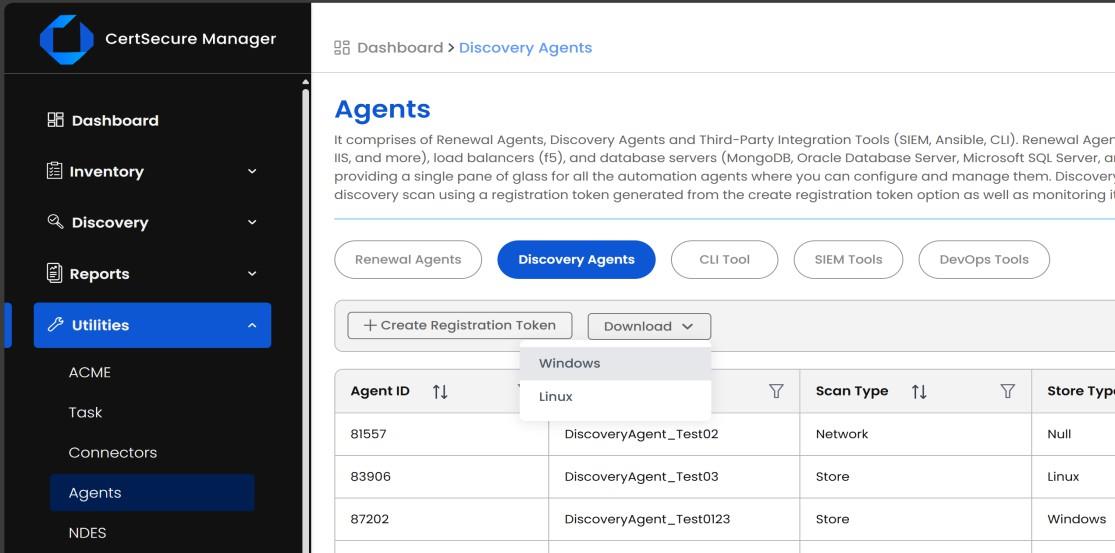
Navigate to Utilities → Agents from the left pane.
Under the Agents tab, click Discovery Agents.
Click the Download dropdown.
Choose either Windows or Linux based on your target machine. This will download the pre-packaged agent bundle required for deployment.
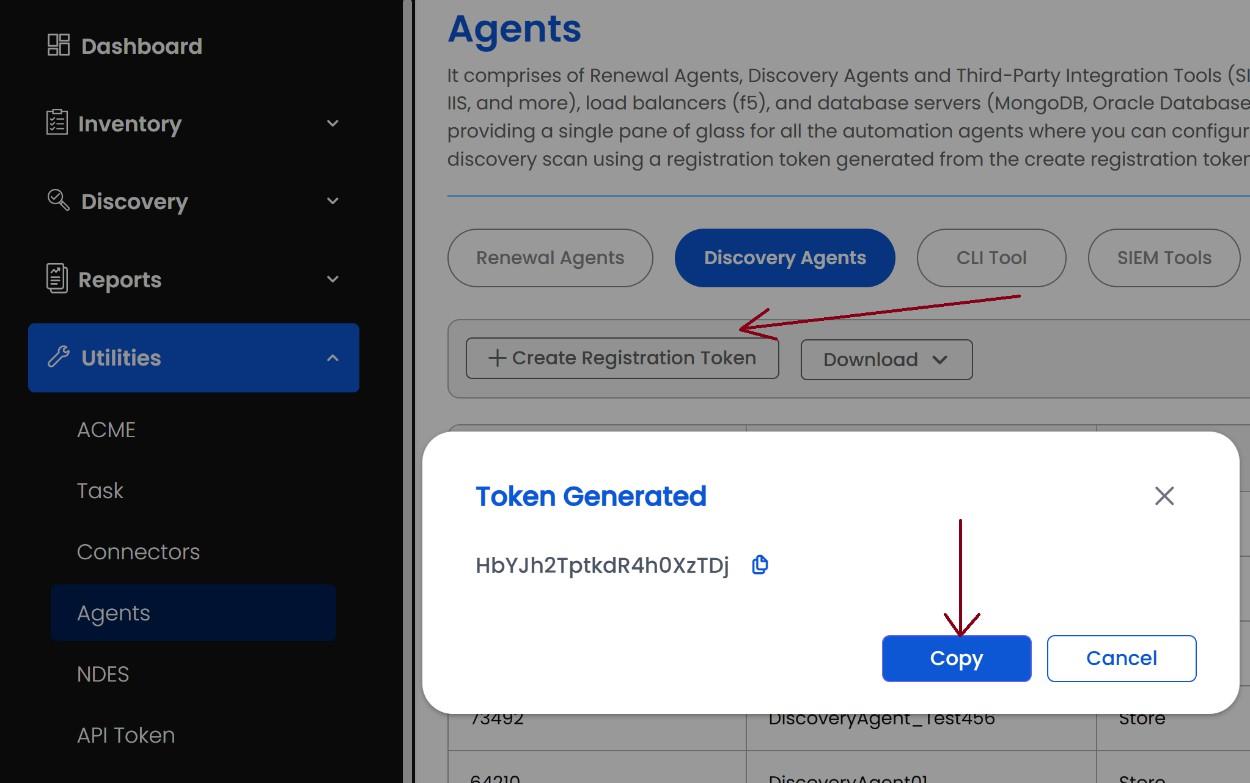
You must have a registration token. Click Create Registration Token in the Discovery Agents tab to generate one. Copy the Registration Token.
Windows Installation & Usage
Unzip the Package
Extract the contents of the discovery_agent_windows.zip file. You will receive an iso file inside it.
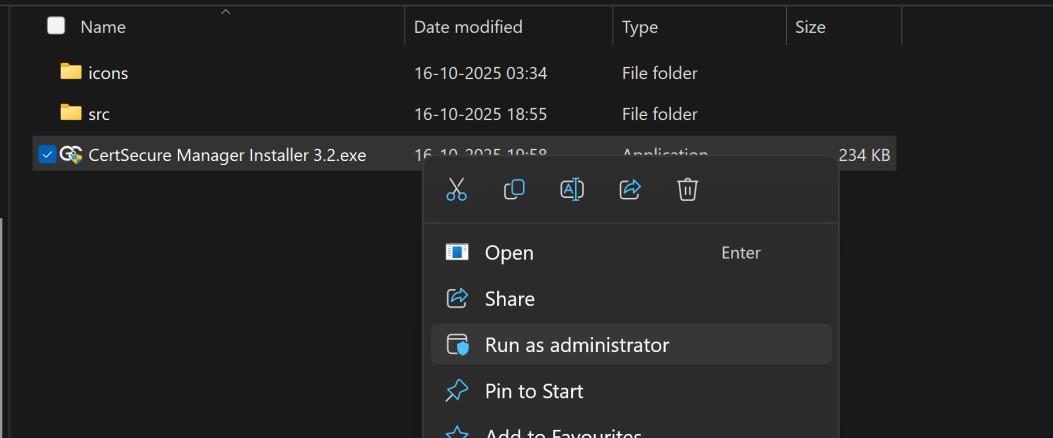
To install the CertSecure Discovery Agent, first, mount the ISO file by right-clicking and selecting Mount. Open the mounted drive, locate the installer, and run it as Administrator.
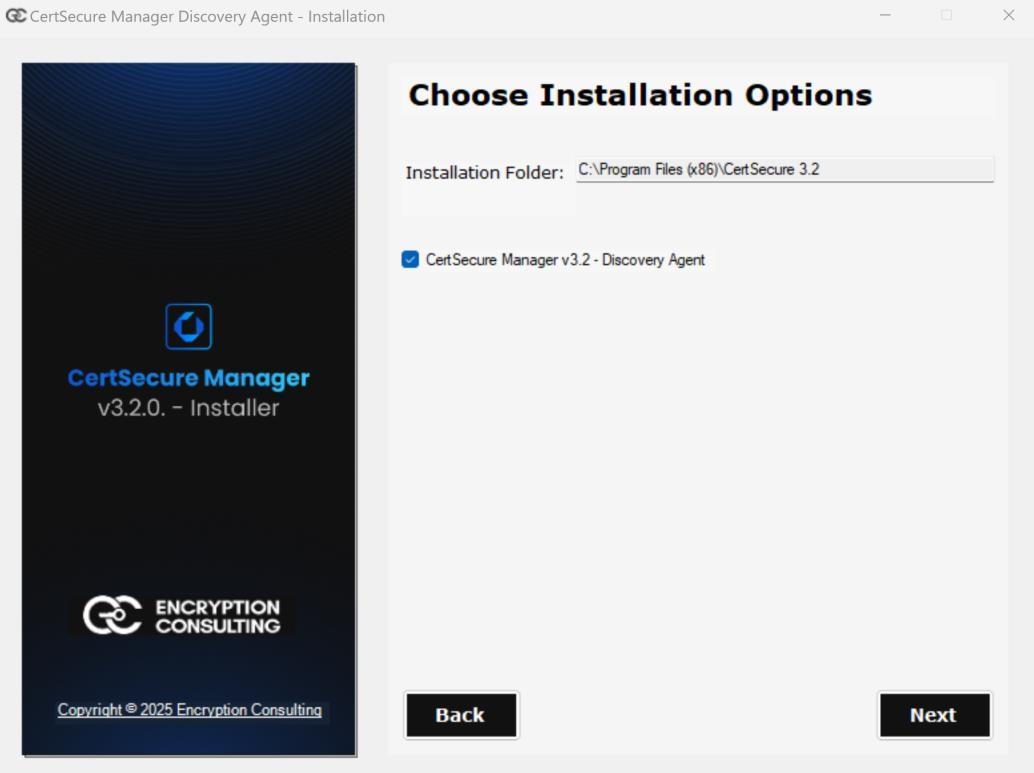
Click on Next and accept the license agreement. The CertSecure Manager Discovery Agent Installation path is C:\Program Files (x86)\CertSecure 3.2.0. Click Next.
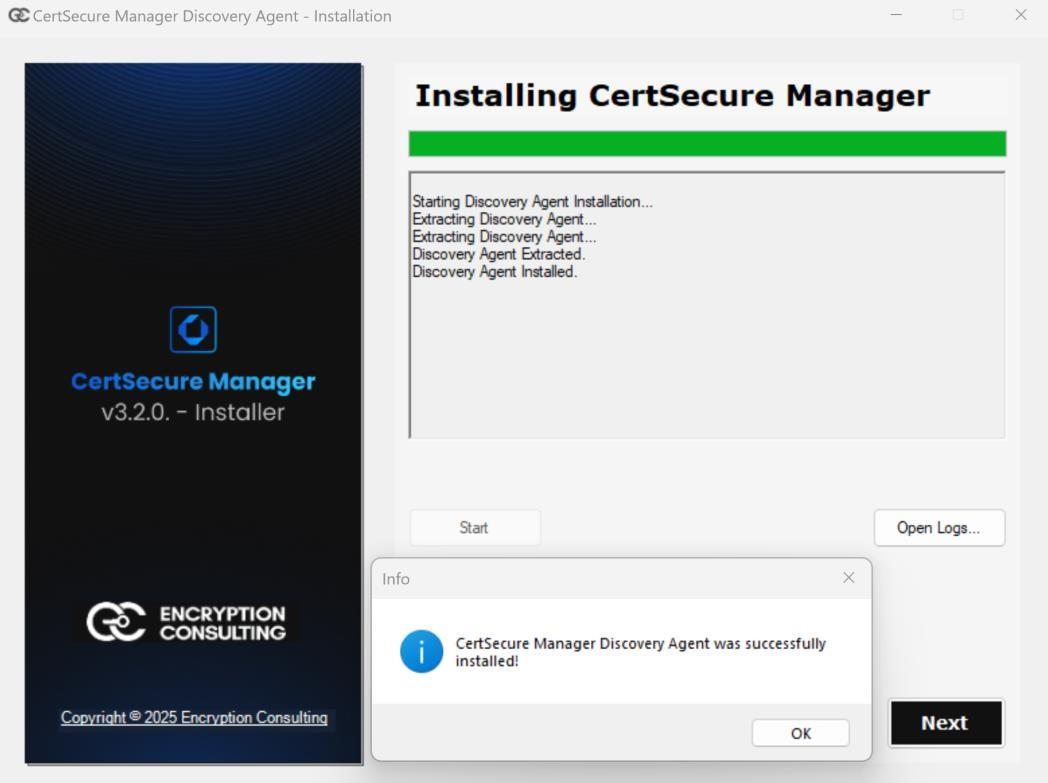
On the installation page, click Start and wait for the installation to be completed. You can monitor the logs on the screen or click Open Logs to access the log file. Click on OK and then Next.
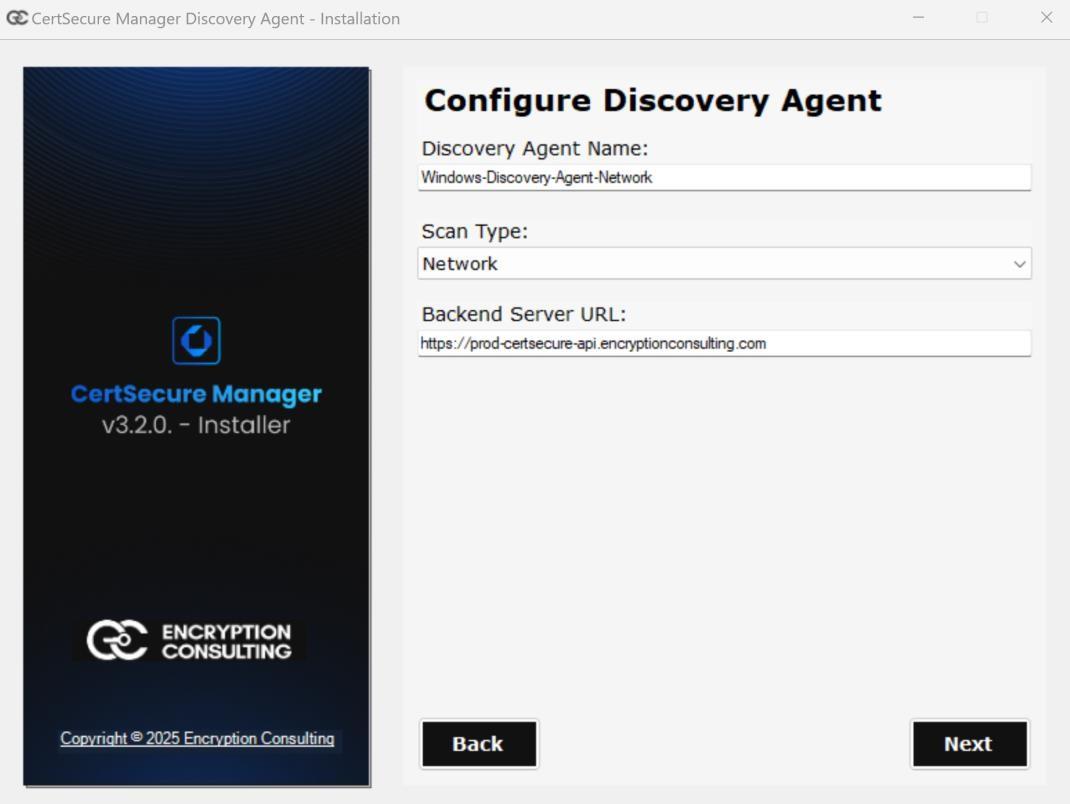
On the Configure Connector Settings page, you can configure how the Discovery Agent will operate. Below are the main sections and fields relevant to Windows installation:
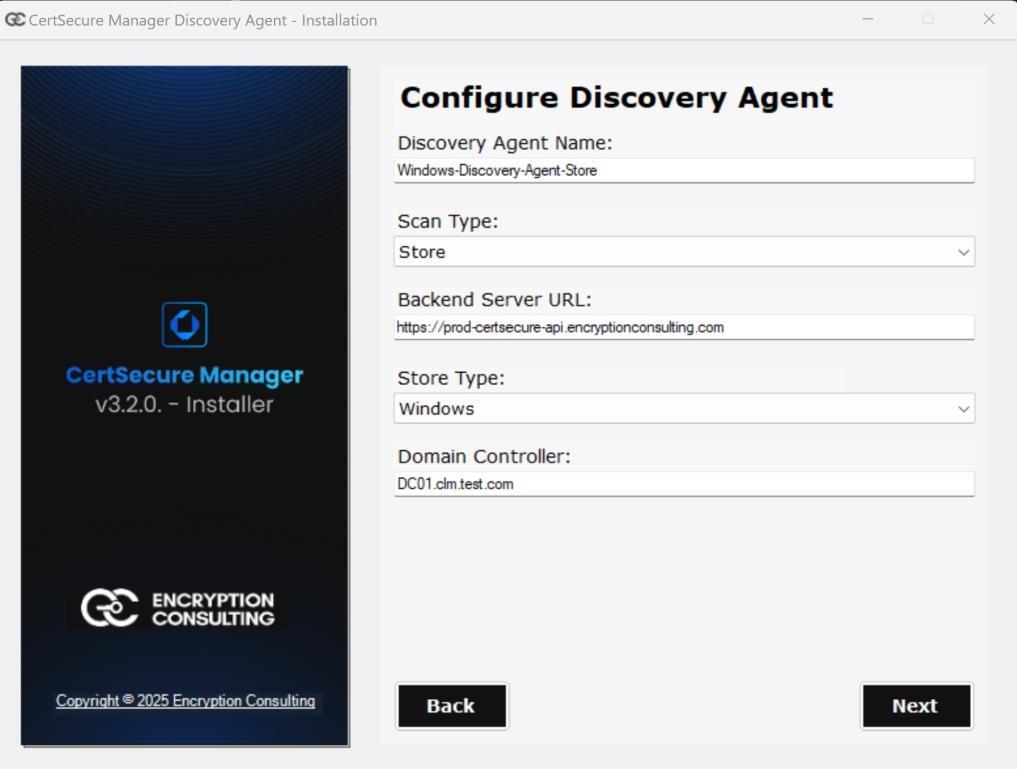
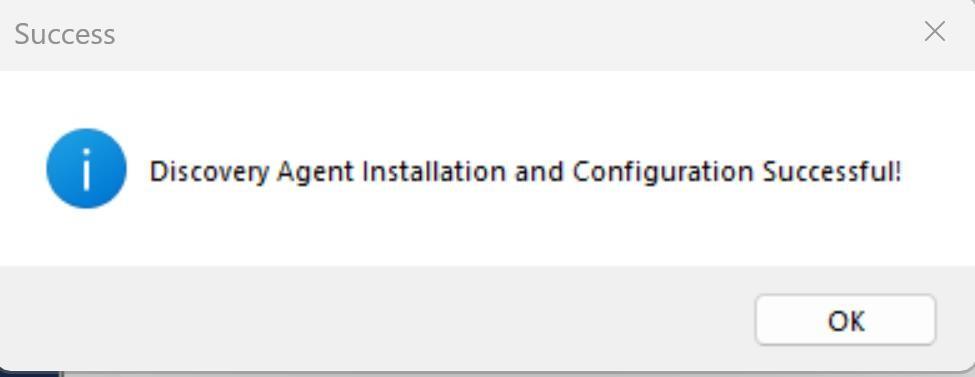
On the Install Service Page. Click on the Install Button to begin the installation of the service. Once the service is installed successfully, the output is displayed on the screen.
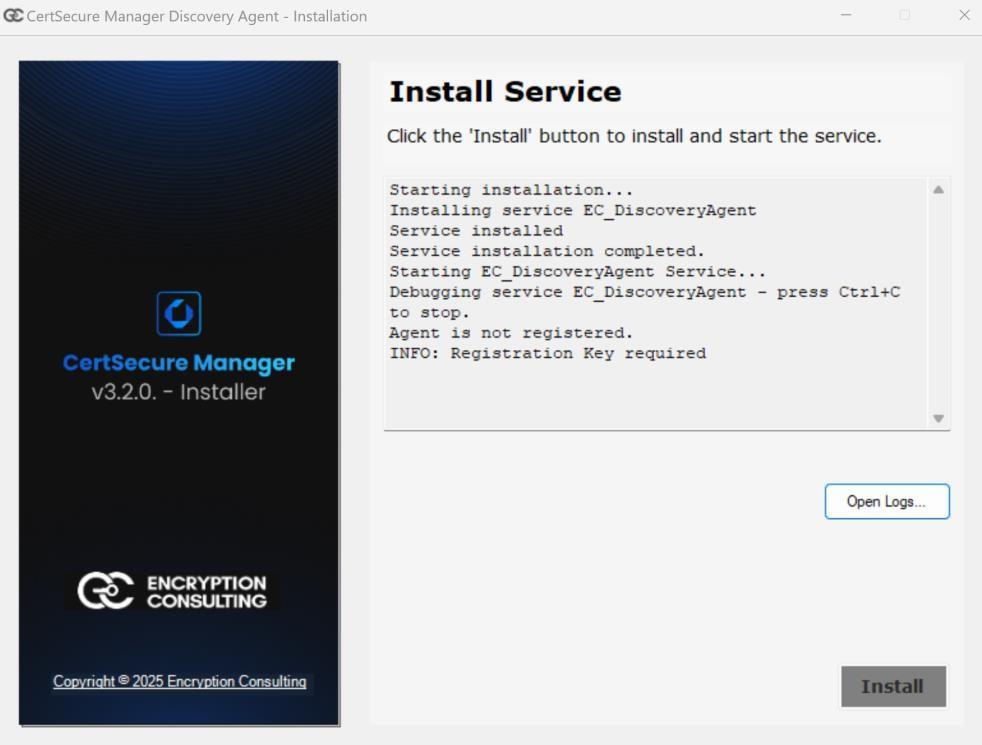
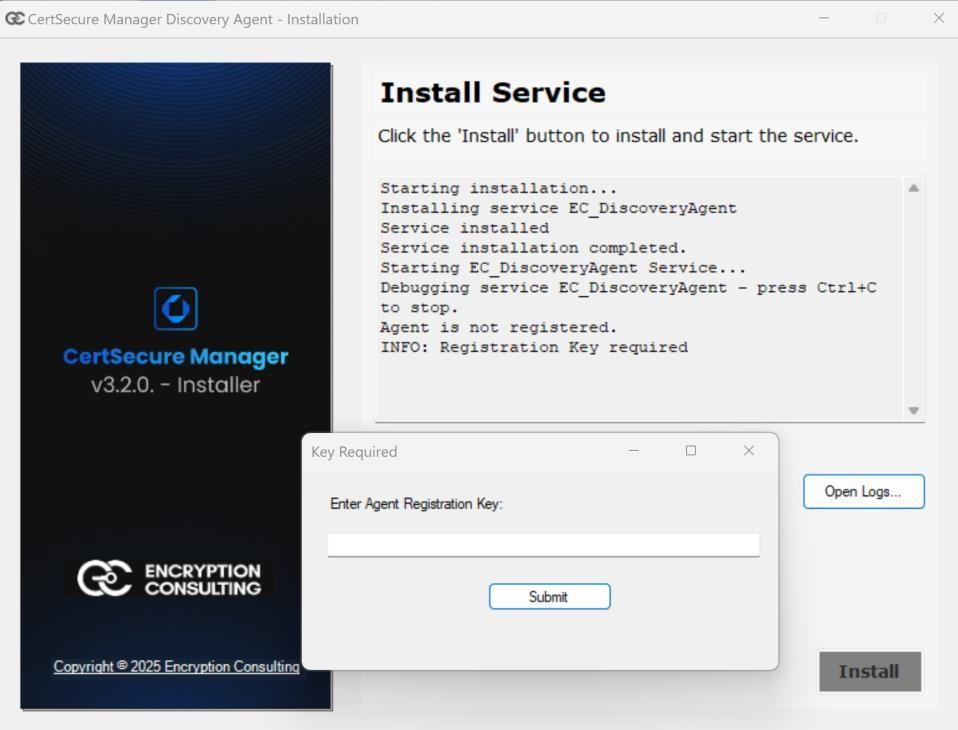
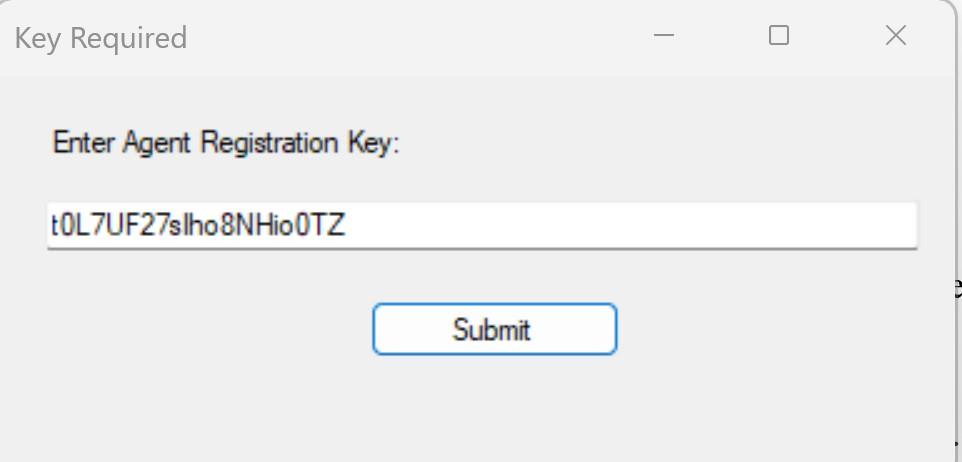
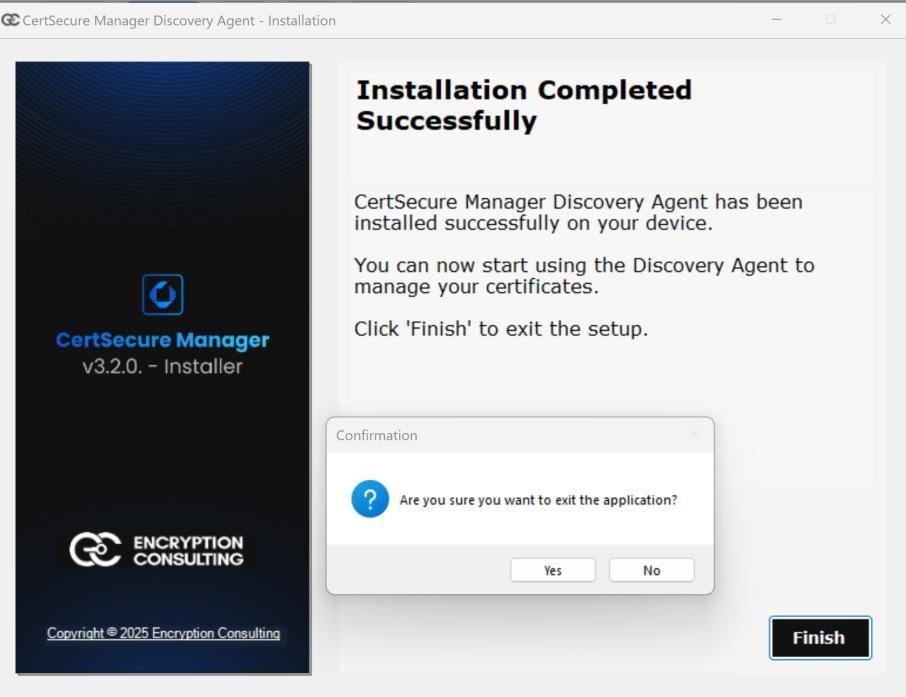
You can now close the Installer by clicking on the Finish Button. Click yes on the Confirmation Box and exit the application.
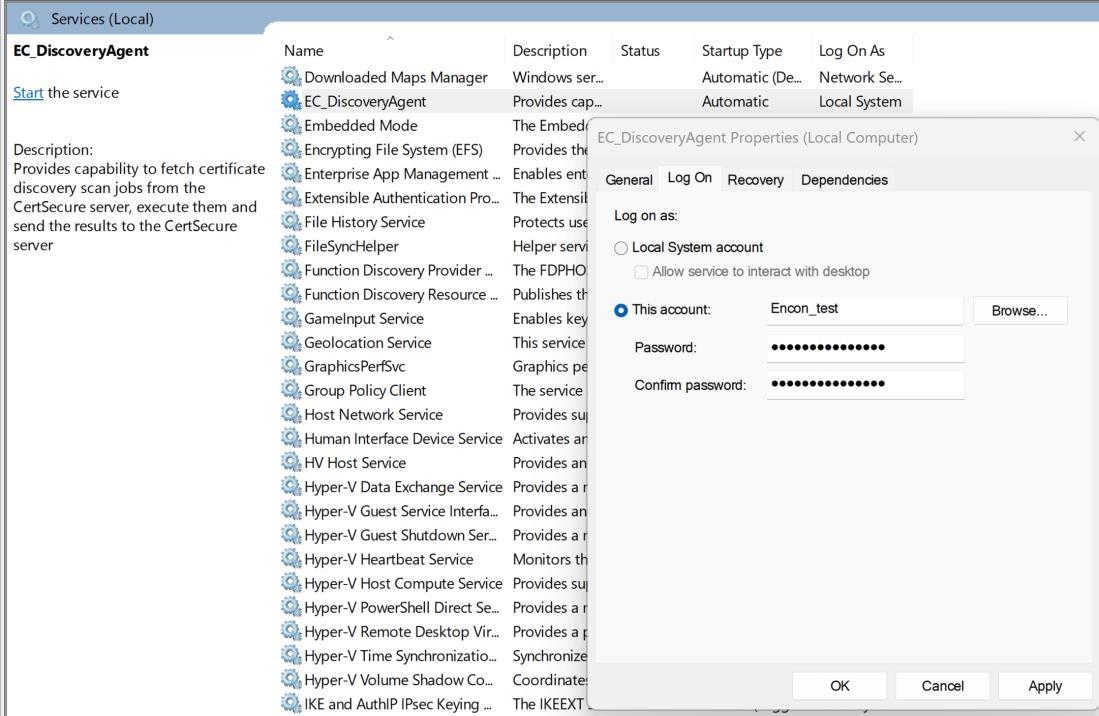
Now, type and run Services.msc on Windows. Right-click on EC_DiscoveryAgent. Go to Properties-> Log On and click on This Account. Now, specify your service account credentials. Click Apply and then OK.
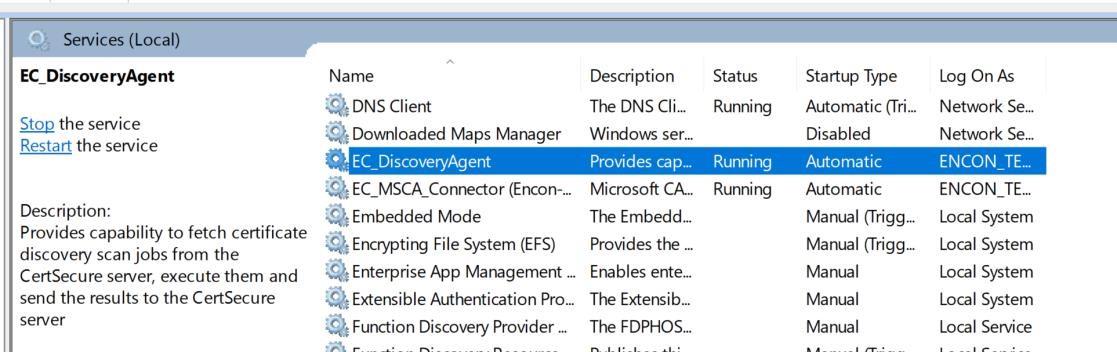
Post-Registration
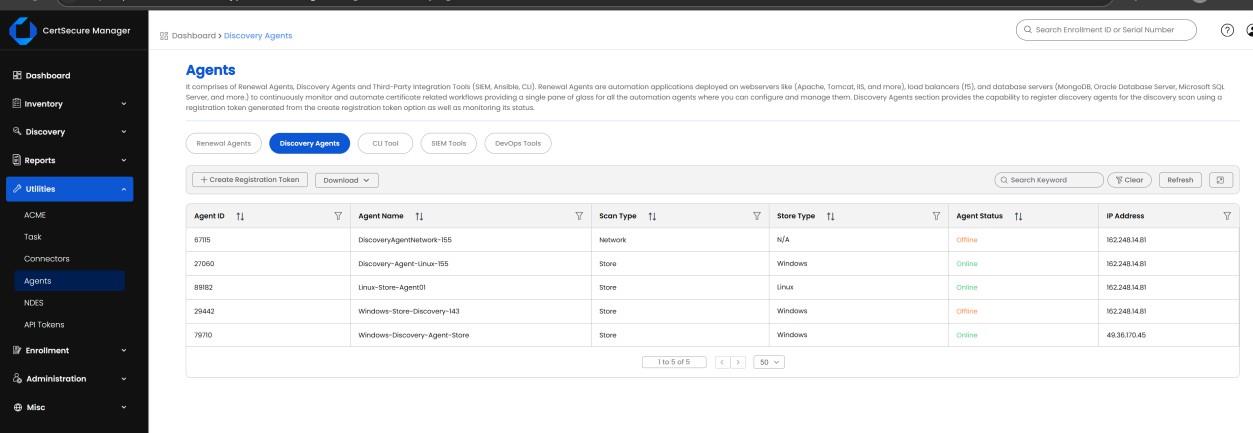
Linux Installation & Usage
Create a directory:
mkdir /home/discovery-agentCopy discovery-agent.tar into that directory and extract the archive:
tar -xvf DiscoveryAgent.tarAssign ownership:
chown -R <service-account>:<service-account> discovery-agentOpen conf.ini and configure the following:
Under [CERTSECURE], update the CertSecure backend IP. Under [LOGGING], update LOGDIR.
Under [INFO], set SCAN_TYPE to either Store or Network. Under [CERTSECURE], POLL_INTERVAL sets how many seconds the agent waits between checks for new work. The default is 300. Lowering it makes the agent pick up queued scans sooner; it does not affect scan speed.
If SCAN_TYPE = Store, then in [STORE_DISCOVERY], set STORE_TYPE = Linux. Otherwise, leave it empty for the network scan.
Register the agent:
sudo ./cert_discoveryEnter the registration token when prompted.
Copy the systemd service file:
cp discovery-agent.service /etc/systemd/system
chown -R <service-account>:<service-account> /etc/systemd/system/discovery-agent.service
Reload systemd and enable the service:
sudo systemctl daemon-reload
sudo systemctl enable discovery-agent.service
NOTE: To enable Linux host discovery across your AWS infrastructure, configure the [AWS_DISCOVERY] section in the conf.ini file as described here.
Linux installation notes
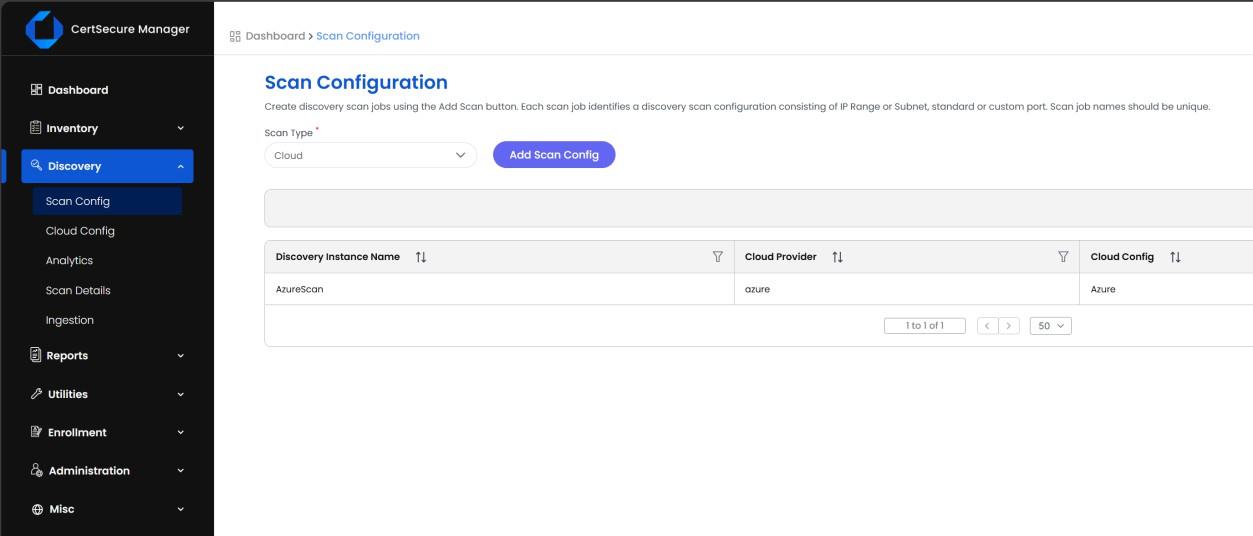
Create discovery scan jobs using the Add Scan Config button. Each job includes a scan name, and a set of parameters based on the selected scan type.
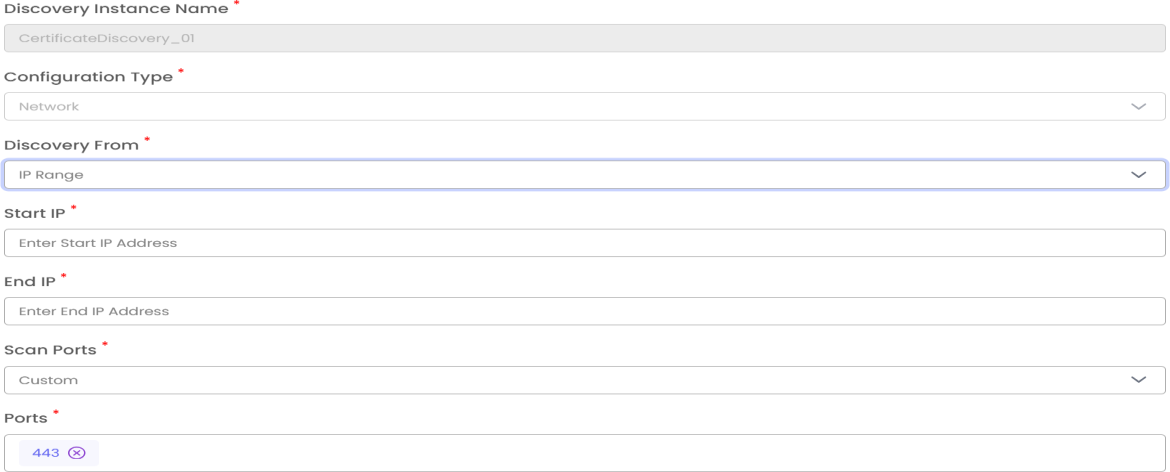
Start IP and End IP if you select the IP Range option.
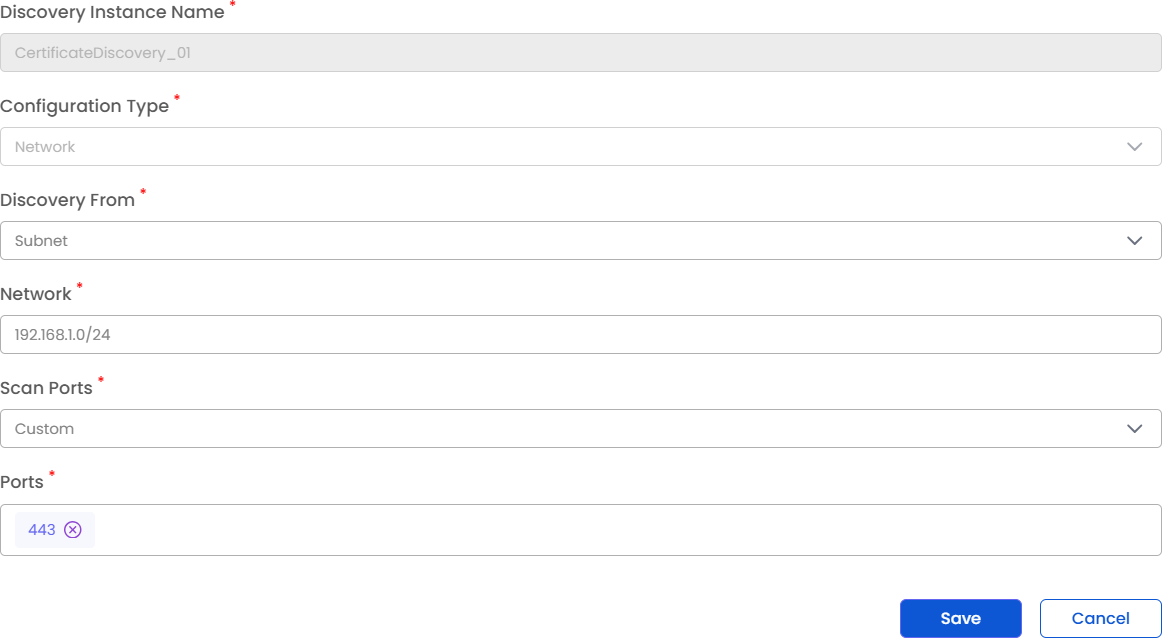
If you select the Subnet option, then enter the Network, such as 192.168.1.0/24, in CIDR format.
For Both IP Range, URL and Subnet. You get the Scan Ports option. You have three options here: Standard, Custom, and All.

Bulk URL upload via CSV: For scanning the URLs, they can be uploaded in bulk from a CSV with two columns — URL and Ports. The Ports cell accepts a list (e.g., 443;8443) or the keywords STANDARD or ALL.
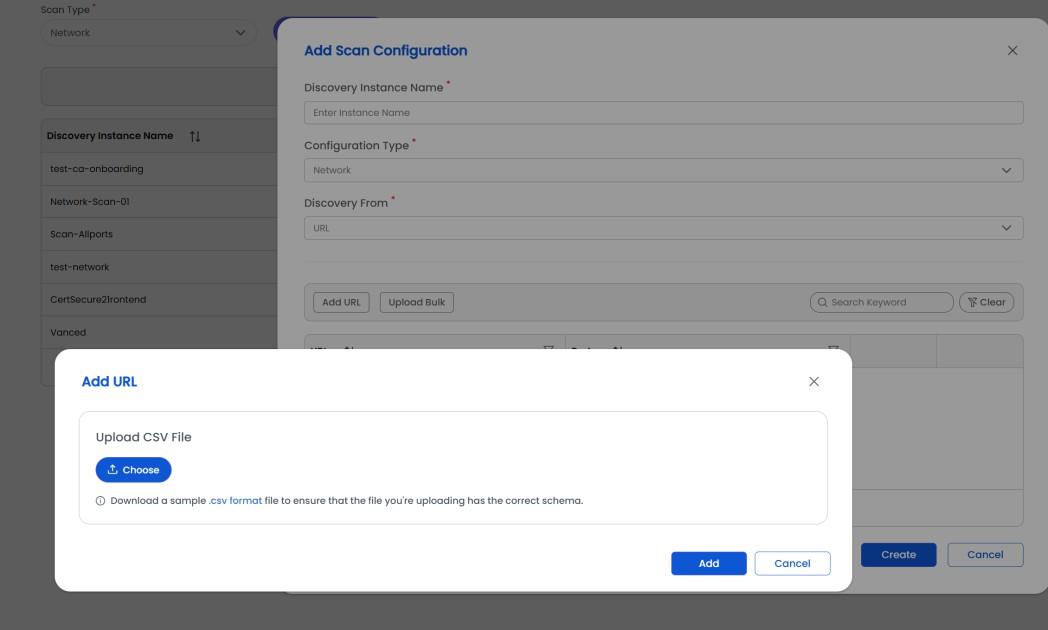
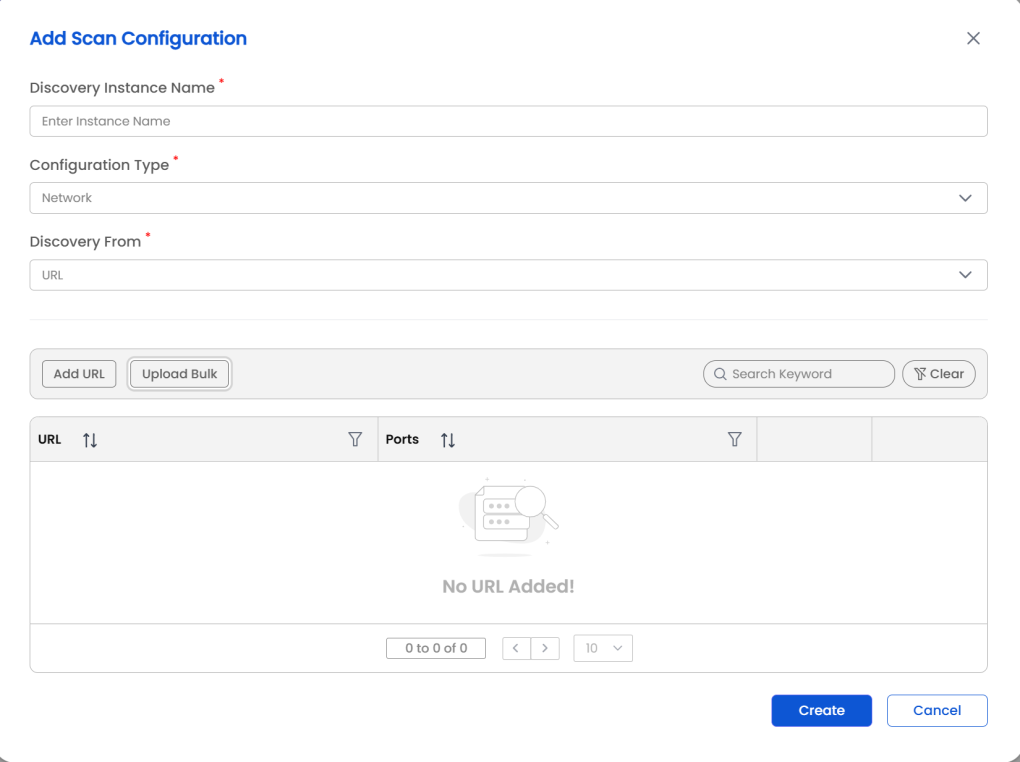
If you select the URL option, then add the URLs to the table. Once the table appears, click the Add URL button.
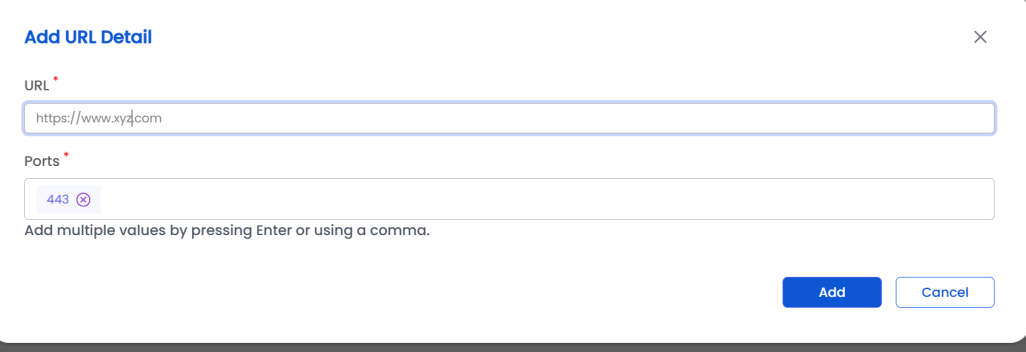
In the Add URL Dialogue box, add the URL and the port details you wish to discover. Click on the Add button to add the scan to the table.
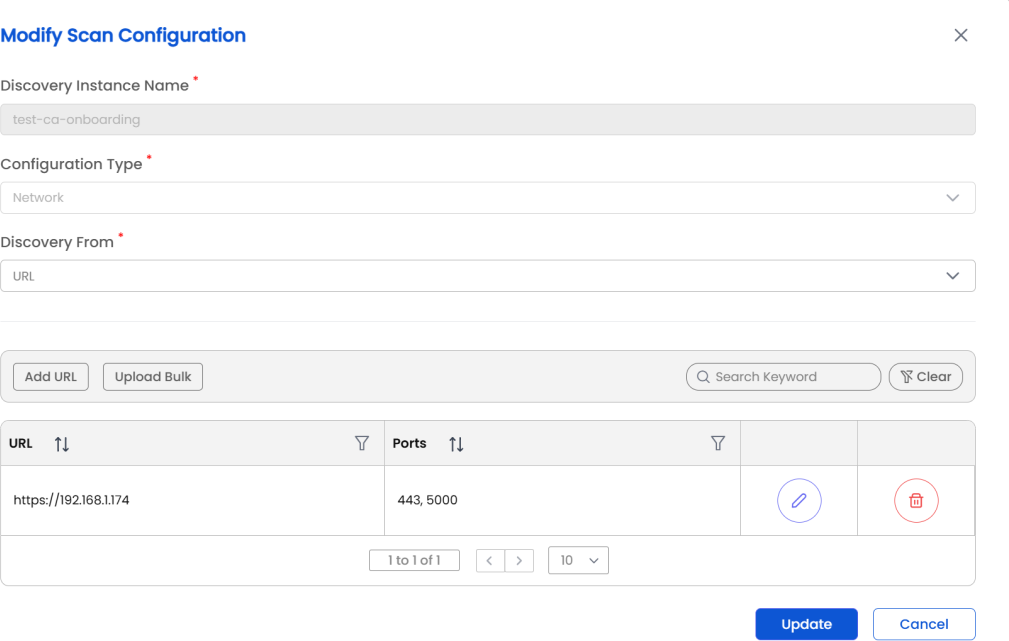
Once the URLs are added, you can edit or delete them as needed. Click on Create to add the configuration.
Network scan performance settings
Network scan behaviour is tuned in the [NETWORK] section of the agent conf.ini. The defaults shipped with the agent are:
| Parameter | Default | Description |
|---|---|---|
| NETWORK_WORKERS | 50 | Number of parallel workers used for network scans. |
| NETWORK_TIMEOUT | 10 | Timeout applied to each connection attempt. |
| NETWORK_BATCH_SIZE | 10000 | Number of targets processed in each batch. |
| NETWORK_ASYNC_CONCURRENCY | 500 | Maximum number of concurrent connections. |
Restart the Discovery Agent service after changing conf.ini.
Verify connectivity before scanning
Before running a network scan, confirm from the Discovery Agent machine that a few representative targets are reachable on the ports you plan to scan.
On Windows (PowerShell):
Test-NetConnection -ComputerName <target> -Port 443On Linux:
nc -zv <target> 443
openssl s_client -connect <target>:443 </dev/null
A successful connection on the TCP test but a failure on the openssl test points to something interfering with the TLS handshake, such as a proxy or inspection device. Run a sweep across a full range only with the approval of the network and security team that owns it.
Note: When 'Windows' or ‘IIS CCS’ is selected for Store Type, ensure the agent is installed on a domain-joined Windows machine, and WinRM is correctly configured. Click Save to create a scan job.
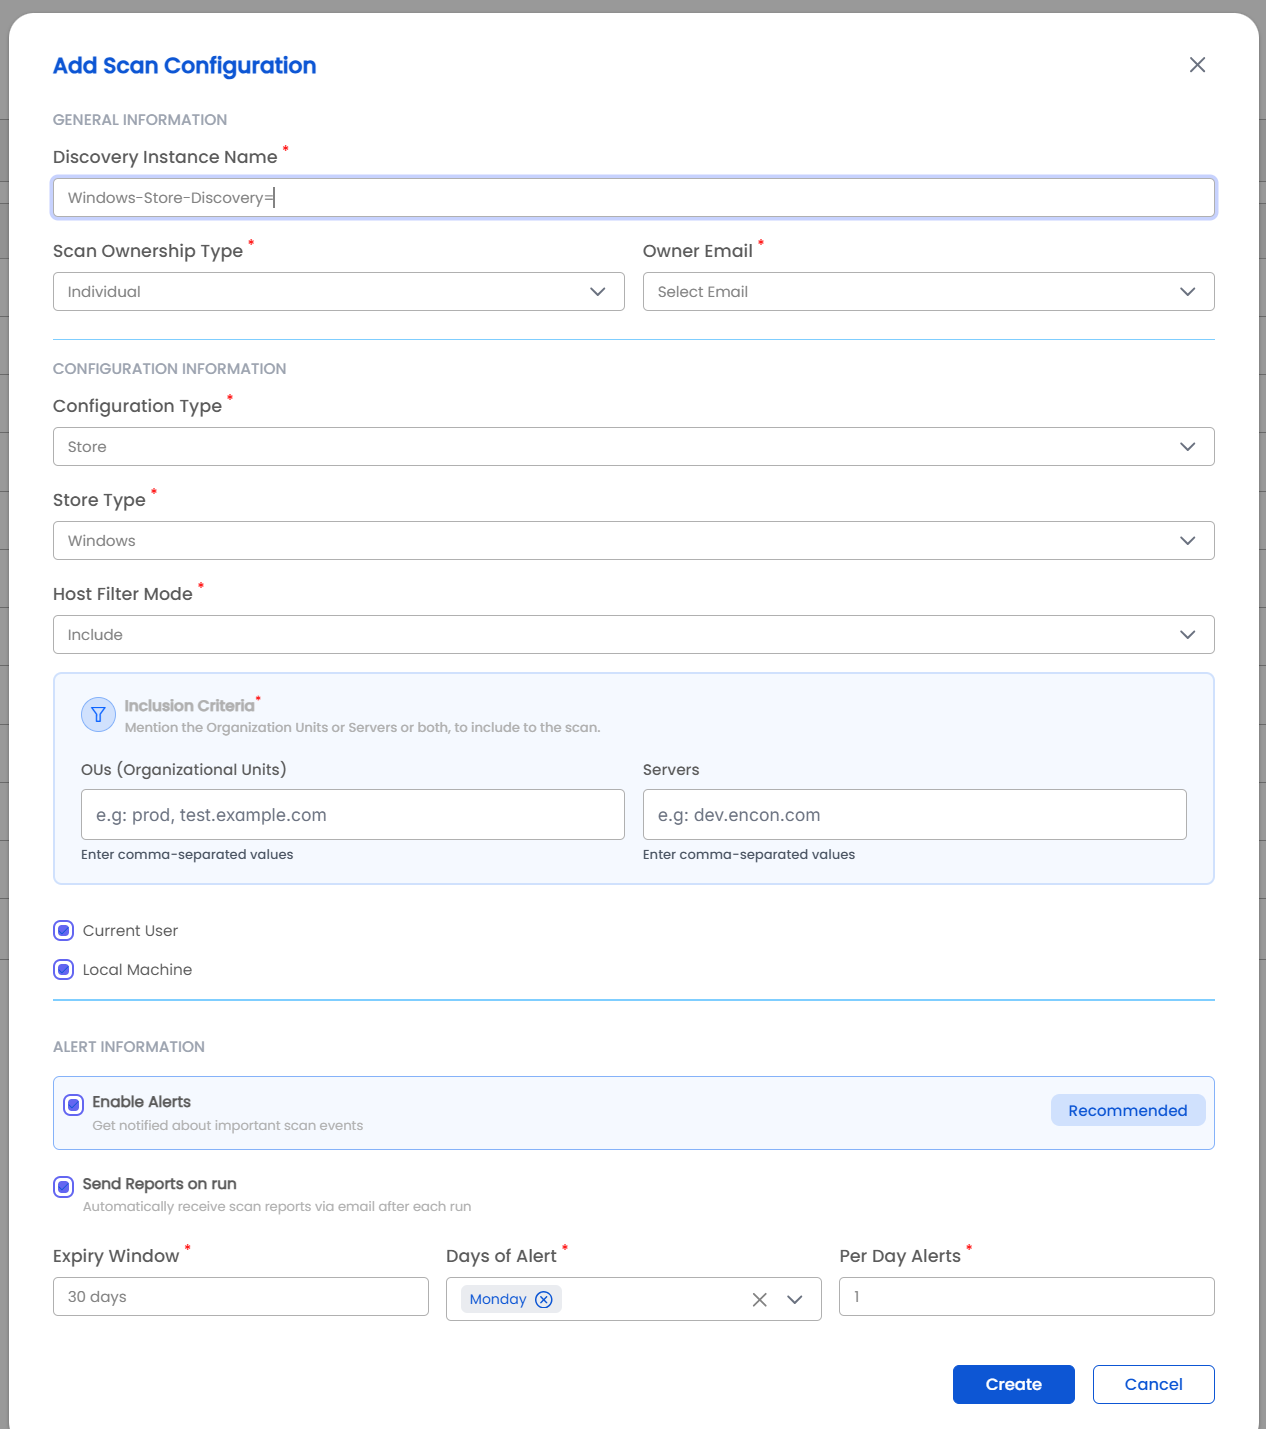
Windows store scope: When Store Type is Windows, two checkboxes — Local Machine and Current User — let you choose which Windows certificate stores to scan on each remote machine. Both are enabled by default; at least one must remain enabled.
Current User refers to the certificate store of the account that connects to each machine, which is the agent service account. It does not cover the stores of other users who log on to that machine. The permissions listed in the Service Account Permissions and Network Requirements summary cover the Local Machine store, so clear the Current User checkbox unless you specifically need the service account's own store.
Windows Host Filter (OUs and Servers)
The host filter controls which domain machines are included in a Windows Store scan. It is set per scan in the UI.
| Field | Required | Default | Notes |
|---|---|---|---|
| Host filter mode | No | None | None, Include, or Exclude. |
| Filter OUs | If the mode is not ‘None’ | — | Organizational units to match. |
| Filter Servers | If the mode is not ‘None’ | — | Hostnames to match. |
| Mode | Effect |
|---|---|
| None | Scan every machine found in Active Directory. |
| Include | Scan only the machines matching the lists. |
| Exclude | Scan every machine except those matching the lists. |
Store Type is Linux
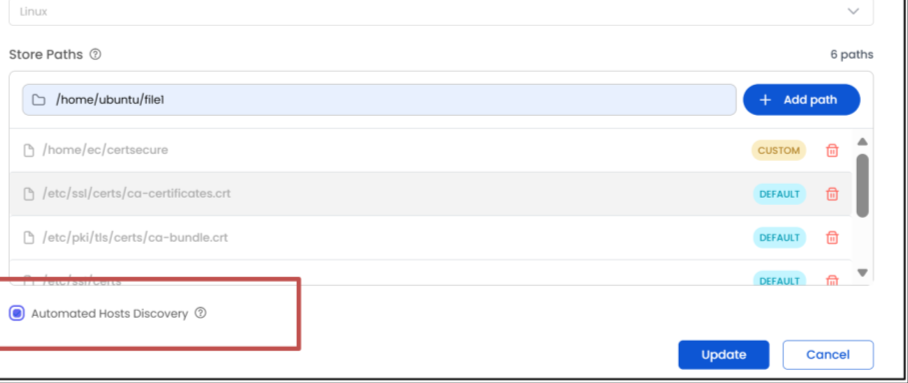
Whenever you select the Store Type to Linux, you will get additional options, like adding a host and port.
When configuring a Store scan with Linux as the Store Type, you must manually add the target systems to be scanned. If your Linux machines are set up across AWS infrastructure, you can also use the Discover Hosts option mentioned above instead of adding the host machines manually.
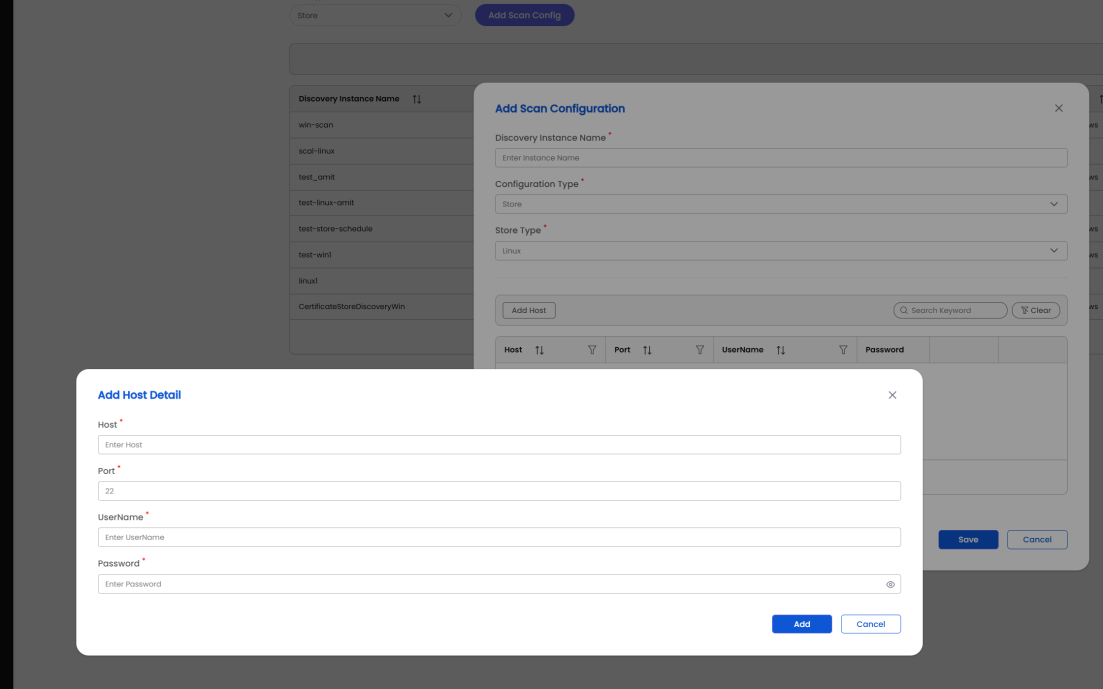
Use the Add Host option to input SSH-based login details, and once done, click Add.
Input Fields:
| Field | Description |
|---|---|
| Host* | IP address of the Linux target (e.g., 192.168.1.50) |
| Port* | SSH port of the target (default is 22) |
| Username* | SSH username with read access to certificate locations |
| Password* | Password for the above user account (entered securely) |
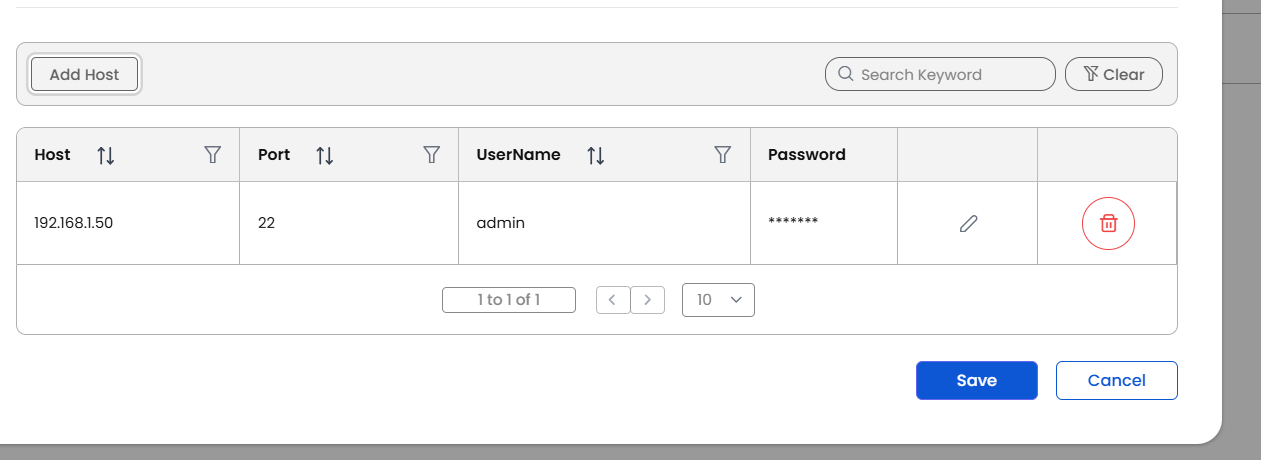
After the Addition, you will see the host added in the Linux store dialog box, where you get additional options like editing the host or deleting the host.
Custom File Path Discovery: You can also add custom file paths for Linux store discovery if your certificates are stored in a location other than the default ones.
Editable Trust-Store Paths
The file paths scanned on each Linux host are editable in the scan configuration. The list is pre-filled with the five standard locations below; edit, add, or remove entries as required. Leave the list empty, and the defaults are used.
| Default path |
|---|
| /etc/ssl/certs/ca-certificates.crt |
| /etc/pki/tls/certs/ca-bundle.crt |
| /etc/ssl/certs |
| /usr/local/share/ca-certificates |
| /etc/pki/ca-trust/source/anchors |
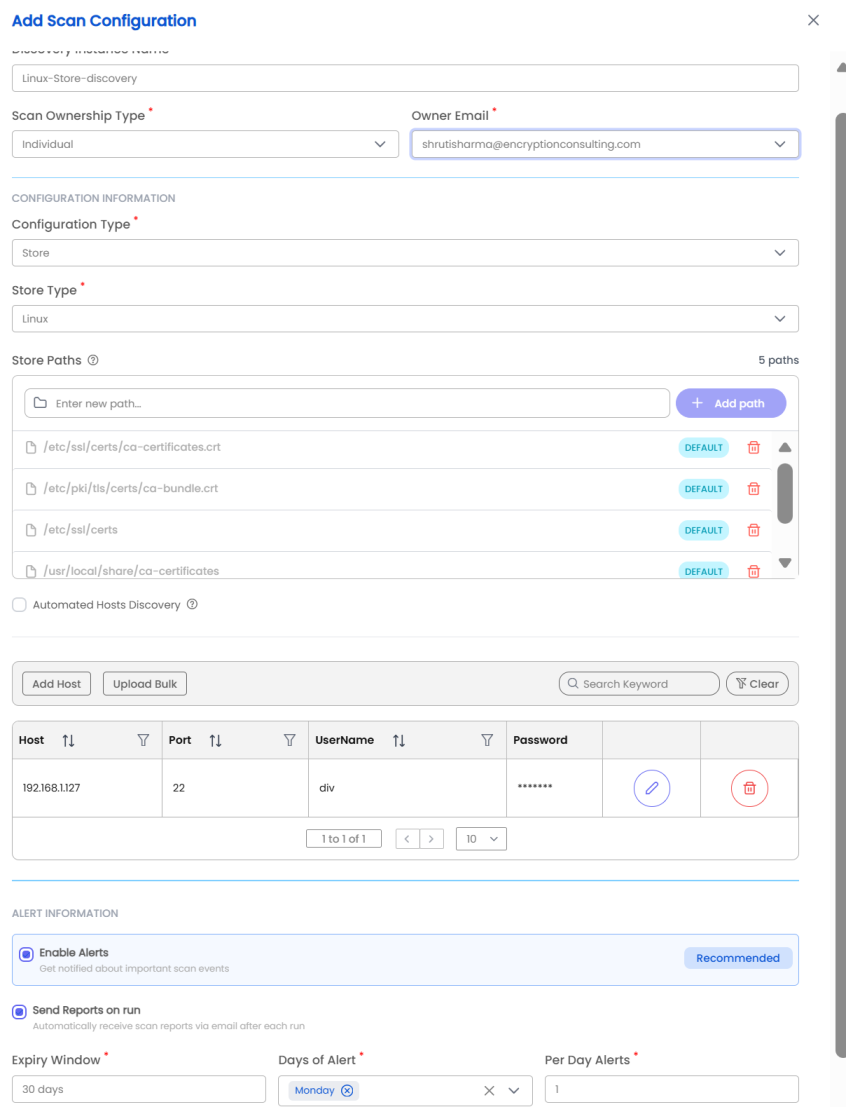
Certificate access: The AD/SSSD account used for SSH access must be able to read the certificate files in any custom path and traverse (execute permission) the target directory and all its parent directories.
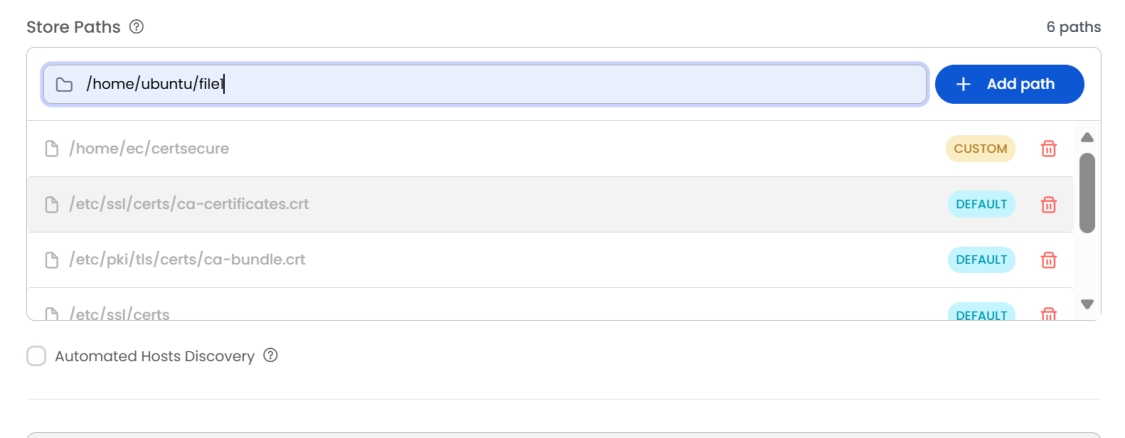
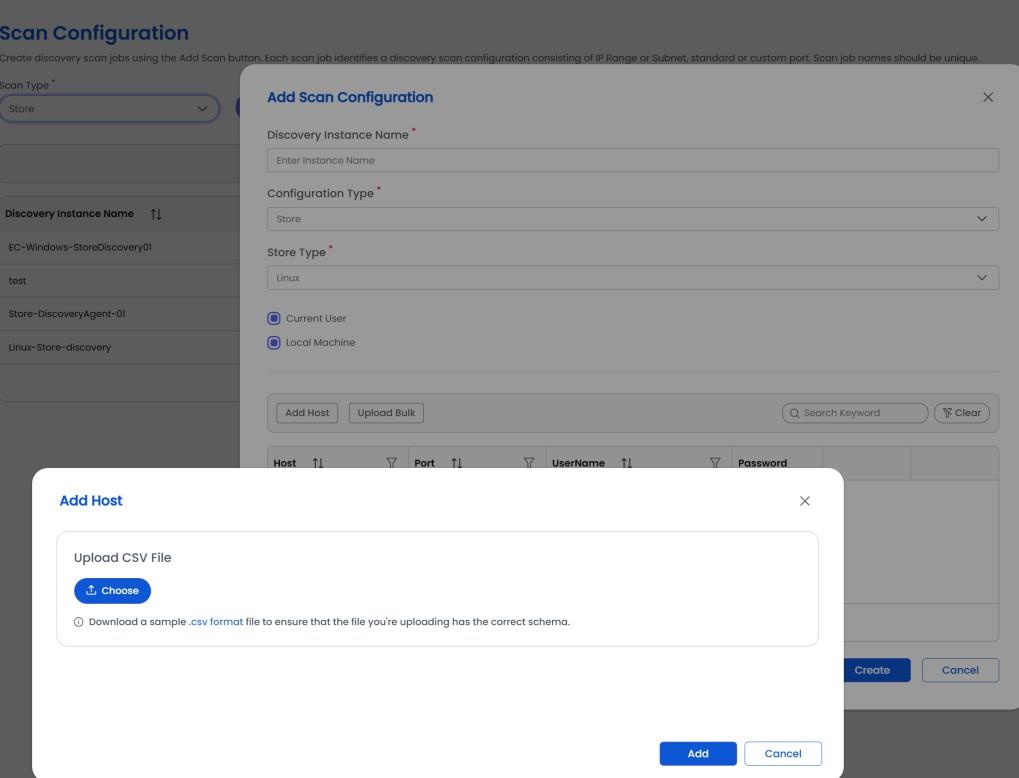
Bulk Host upload via CSV: Hosts can be uploaded in bulk from a CSV instead of adding one at a time. Required columns: Host and Password. Optional columns: Port (default 22) and UserName (default root). Column matching is case-insensitive. Uploaded hosts merge into the existing table and can still be edited or removed before saving. The same Upload CSV control is also available in the Container scan dialog.
If the UserName column is left empty, the host is added with the user root. Many environments disable direct root SSH login, so enter the service account name in the UserName column for every host.
Store Type is IIS CCS
Whenever you select the Store Type as ‘IIS CCS’, the Discovery Agent scans certificates in the IIS Centralized Certificate Store (CCS) directory rather than local certificate stores.
Prerequisites for IIS CCS Store Discovery:
Discovery Agent should be running on any domain-joined Windows machine with the following settings in conf.ini.
SCAN_TYPE=Store
STORE_TYPE=IIS CCS
Discovery agent Windows service requirements and configuration: The Discovery agent service must run under a domain account. Define a domain account e.g., DOMAIN\CCSServiceUser
Then configure your Windows service to run under this account.
Give this domain user permissions on the CCS file share as below-
Configuring a Scan Job for IIS CCS Store Discovery
Once you have the discovery agent correctly configured to discover the IIS CCS store certificates, the next job is to create a scan:
Select the scan as IIS CCS by going to Discovery → Scan Config → Add Scan Config.
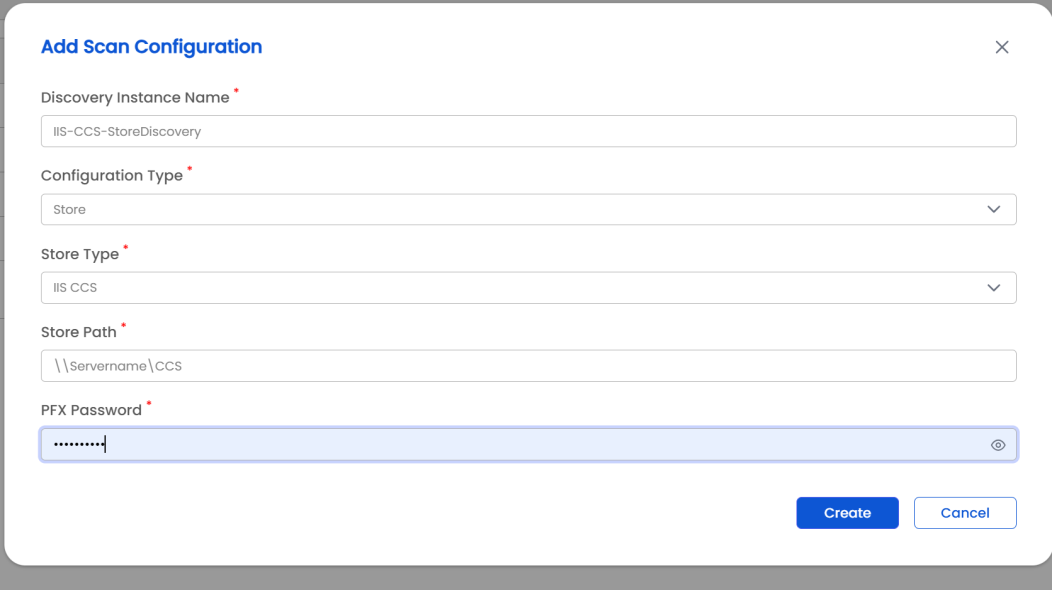
Input Fields:
| Field | Description |
|---|---|
| Discovery Instance Name* | Unique name for this IIS CCS scan configuration (e.g., IIS-CCS-StoreDiscovery). |
| Configuration Type* | Select the Store to scan a certificate storage location. |
| Store Type* | Select IIS CCS to scan the IIS Centralized Certificate Store. |
| Store Path* | Physical or UNC path of the CCS directory (e.g. \\Server\CCS). Must match IIS CCS configuration. The agent account requires Read (Share + NTFS) permissions. |
| PFX Password* | It is the password protecting the .pfx files in CCS. |
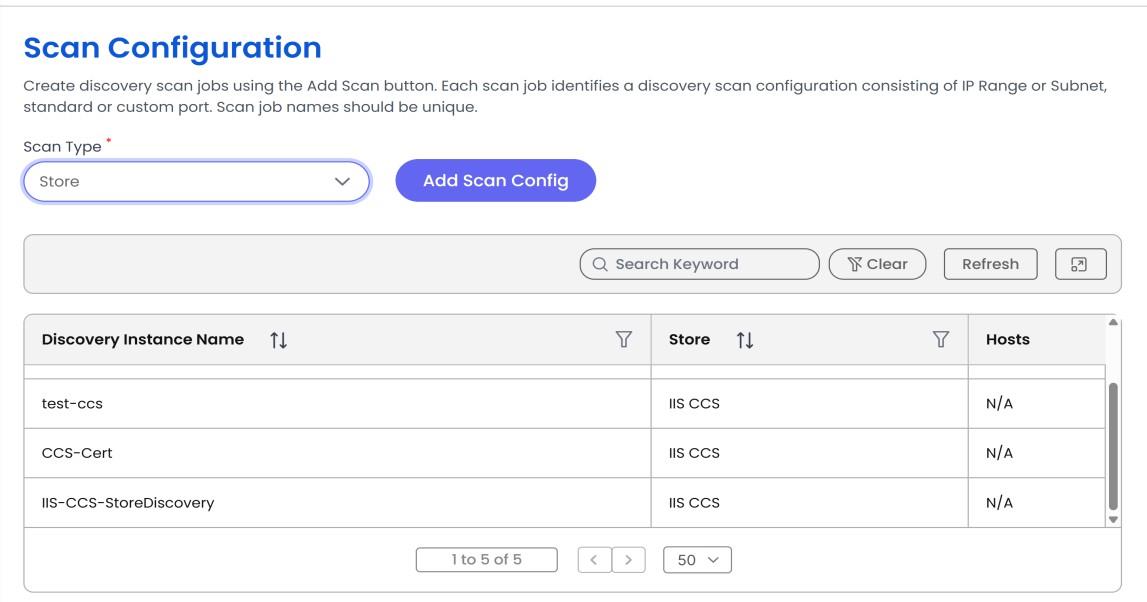
Store Type is JKS
When you select JKS as the Store Type, the Discovery Agent discovers certificates stored inside Java keystores and PKCS12 files. Use this store type to discover certificates for a Java application that keeps a keystore or a truststore.
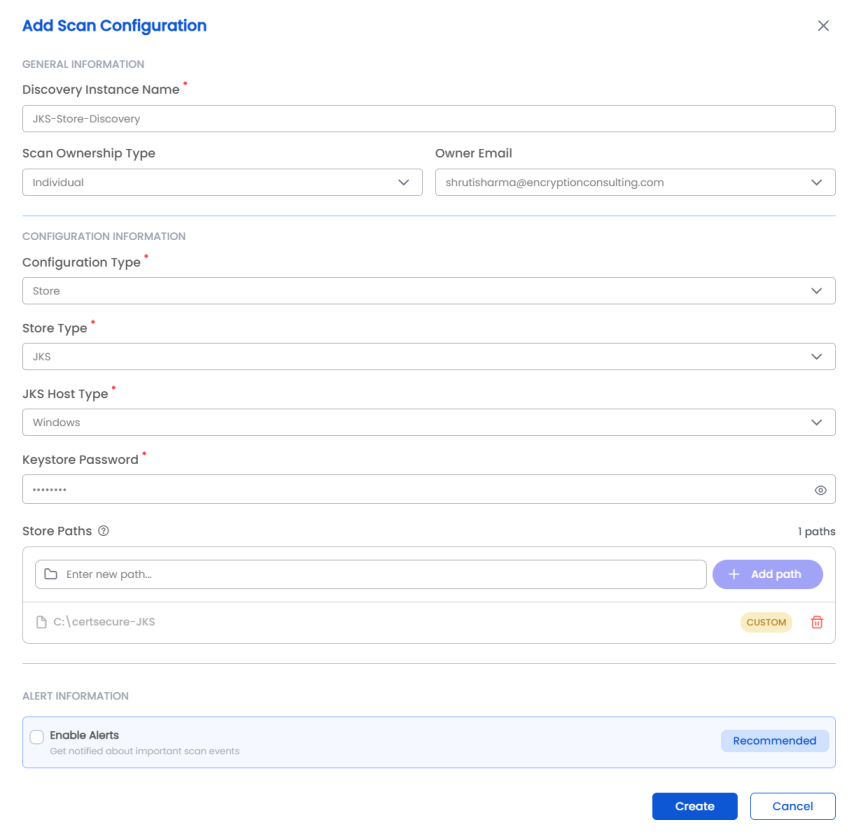
Certificates inside all three formats, like jks, jceks, pkcs12, are stored as DER and are read natively. Java does not need to be installed on the Discovery Agent machine or on any target host.
NOTE: Windows: Run the agent service as a service account with Read on the keystore folder for \\server\share\... paths; it needs both share and NTFS read, and TCP 445 open. Linux: The SSH account needs password authentication enabled, read on each keystore, and execute on every parent directory.
Input Fields
| Field | Description |
|---|---|
| Store Type* | Select JKS. |
| Target* | Windows, Linux – host list, or Linux – discover hosts. Determines where the keystores are read from. |
| Paths | Repeatable list of keystore files and folders to read. Pre-filled with the standard locations for the selected target; edit, add, or remove entries. Leave it empty to let the agent search its own default locations. |
| Keystore Password | Always optional. Used only to validate the keystore and to open PKCS12 files. |
| Hosts | Required for the Linux – host list target. Host, Username, and Password per server. CSV upload is supported. |
| Discover Hosts | Available for the Linux target. Lets the agent find its own EC2 targets. |
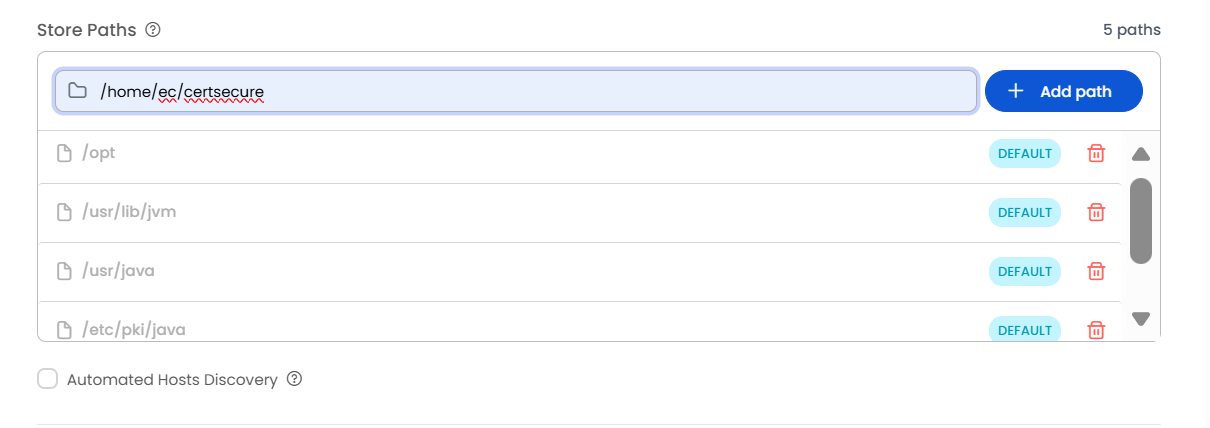
Discover Hosts (Linux Target Only)
Turn on Discover Hosts to have the agent find EC2 instances by tag rather than listing them yourself. Discovery settings and the shared SSH credential come from the [AWS_DISCOVERY] section of the agent's conf.ini.
Scan Type is Container
The Container scan type discovers SSL/TLS certificates inside Docker containers
running on remote Linux hosts. The Discovery Agent connects to each host over
SSH, lists running containers with docker ps, then runs
docker exec inside each container to read certificates from the
standard CA paths. Containers on a single host are scanned in parallel using a
bounded thread pool that respects the host's SSH MaxStartups limit.
Prerequisites:
Configuring a Container scan:
Go to Discovery → Scan Config and click Add Scan Config.
Select Container as the Scan Type. The Store Type selector appears; choose Linux (the backend rejects IIS CCS).
You can also add custom file paths for Linux store discovery if your certificates are stored in a location other than the default ones.
Certificate access: the AD/SSSD account used for SSH access must be able to read the certificate files in any custom path and traverse (execute permission) the target directory and all its parent directories.
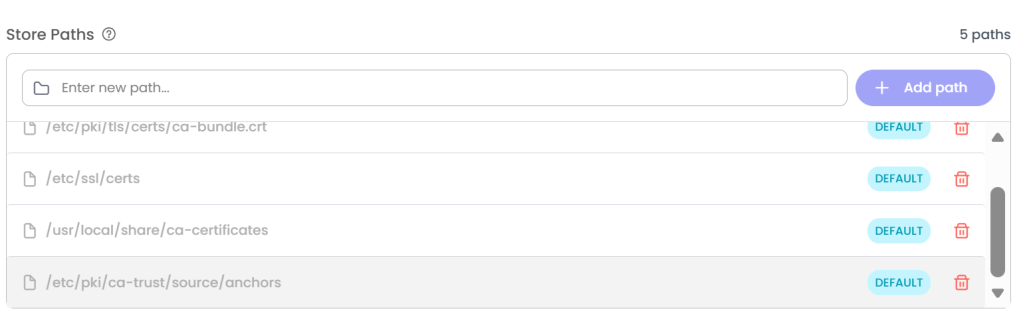
Add the target Docker hosts. Each entry takes Host (IP/FQDN), Port (SSH port, default 22), Username, and Password. Bulk CSV upload is supported. If your Linux machines are set up across AWS infrastructure, you can also use the Discover Hosts option instead of adding the host machines manually.
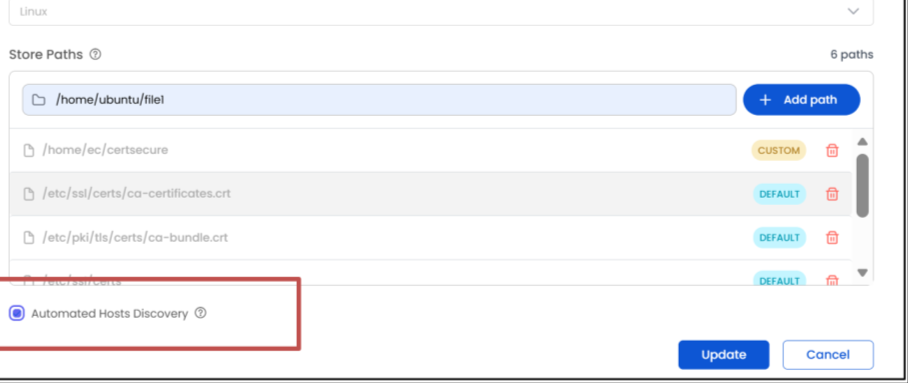
Click Create to save the scan job, then run it on demand or on a schedule like any other scan.
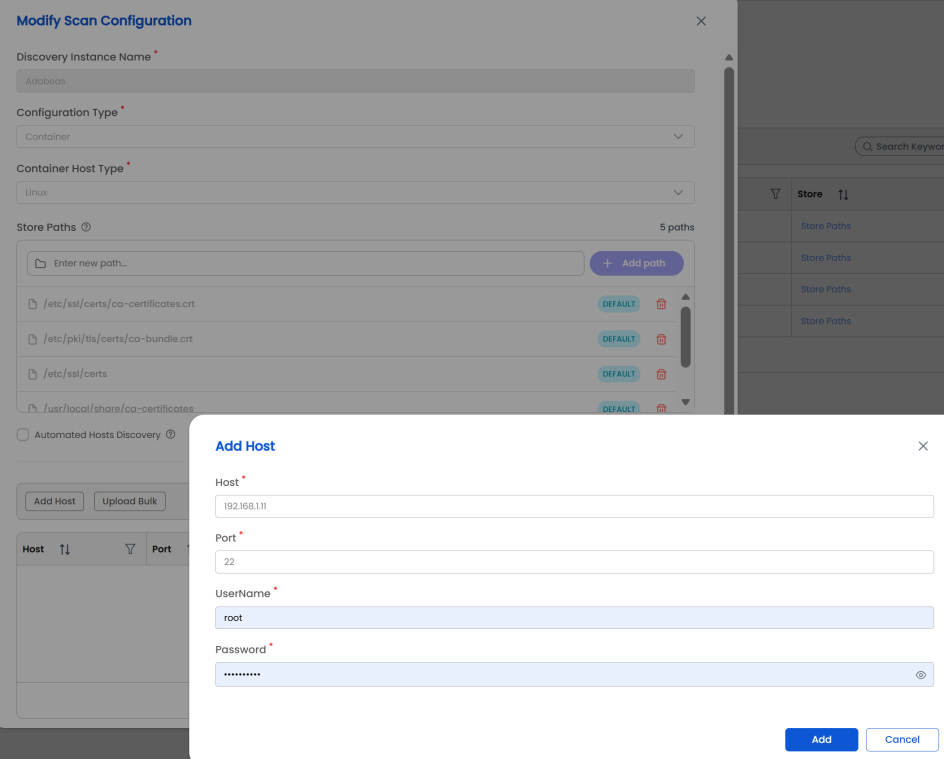
The Container scan type works through the Docker CLI on each host (docker ps and docker exec). Only Docker hosts are covered by this scan type.
Creating a Cloud Configuration
Before creating a Cloud Scan, you must first set up a Cloud Configuration. This stores credentials and access details for the cloud provider.
Steps to Create Cloud Configuration for Azure
Navigate to: Discovery → Cloud Config → Cloud Type, choose Azure.
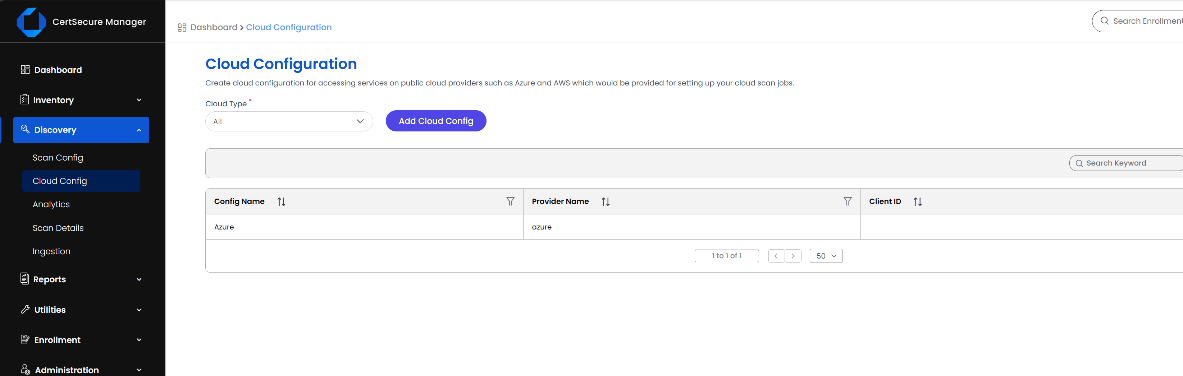
Click “Add Cloud Config”.
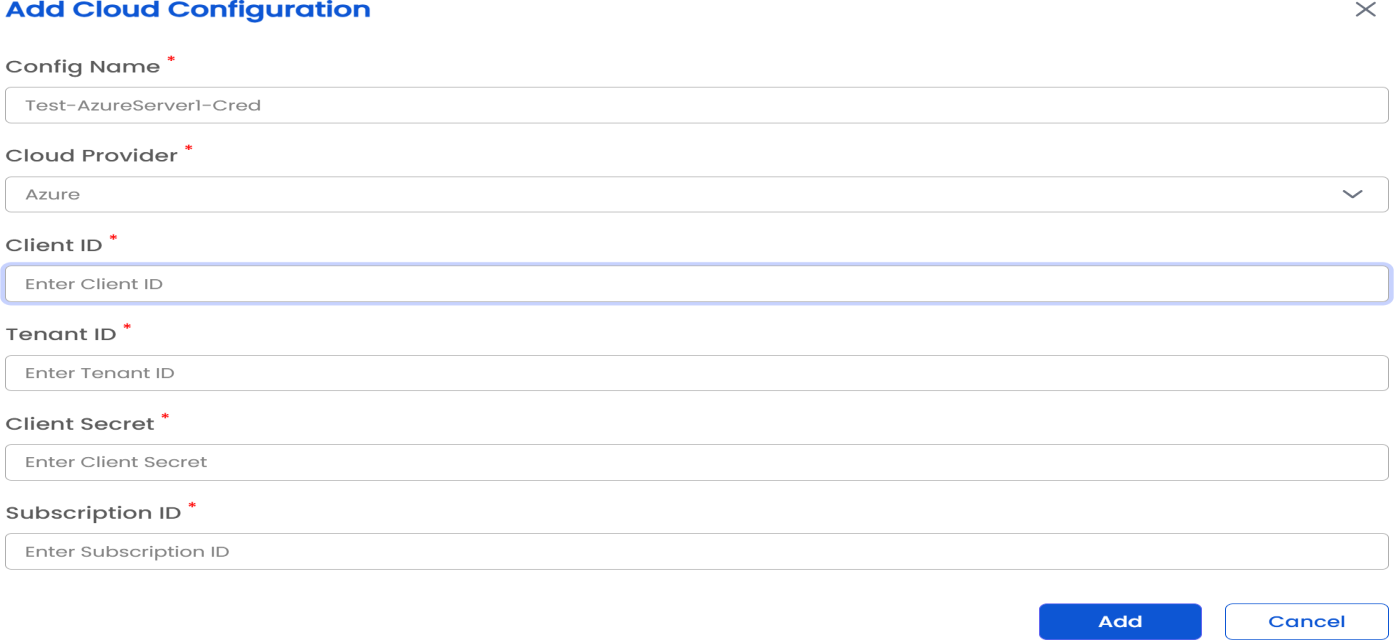
Fill in the required details:
| Field | Description |
|---|---|
| Config Name | Enter a unique name for this configuration (e.g., Azure-Tenant1). |
| Cloud Provider | Select the cloud provider (e.g., Azure). |
| Tenant / Account Details | Provide Tenant ID, Subscription ID, Client ID, and Client Secret for the cloud account. |
Once the configuration is created, you can edit, view, and delete the configuration.
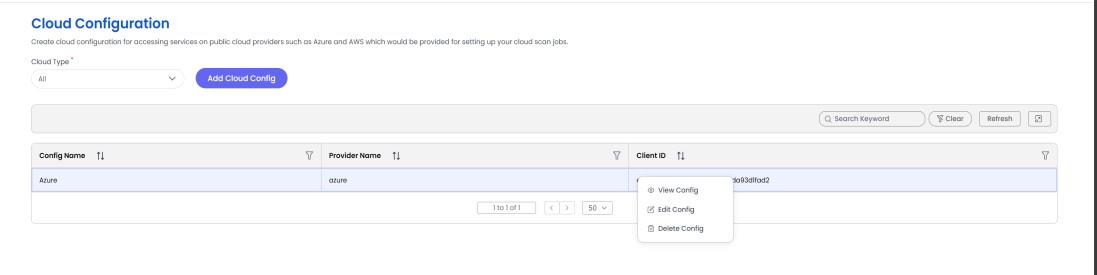
Notes:
Steps to Create Cloud Configuration for AWS
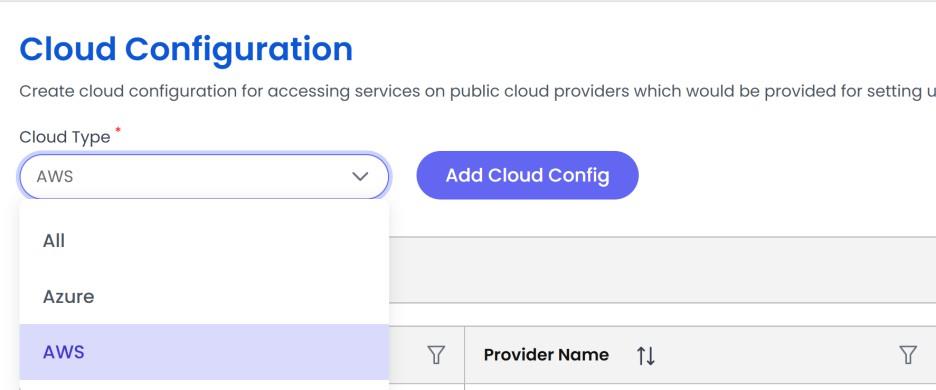
Navigate to: Discovery → Cloud Config → Cloud Type, choose AWS.
Click “Add Cloud Config”.
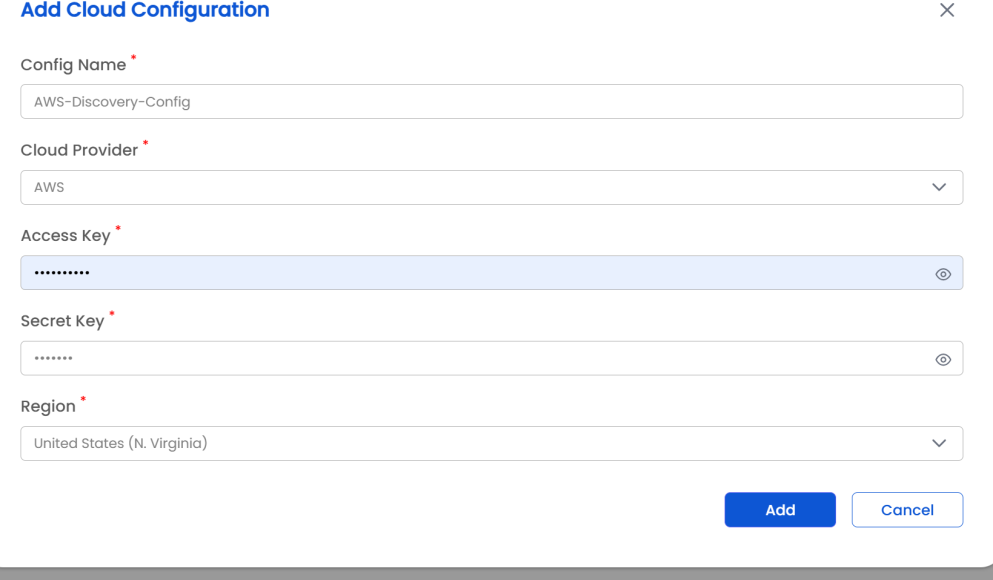
Fill in the required details:
| Field | Description |
|---|---|
| Config Name | Enter a unique name for this configuration (e.g., AWS-Discovery-Config). |
| Cloud Provider | Select AWS. |
| Access Key | Enter the AWS IAM Access Key ID. |
| Secret Key | Enter the AWS IAM Secret Access Key. |
| Region | Select the AWS region where services will be discovered (e.g., us-east-1, ap-south-1). |
Add the configuration. Once created, it will appear in the Cloud Configurations list.
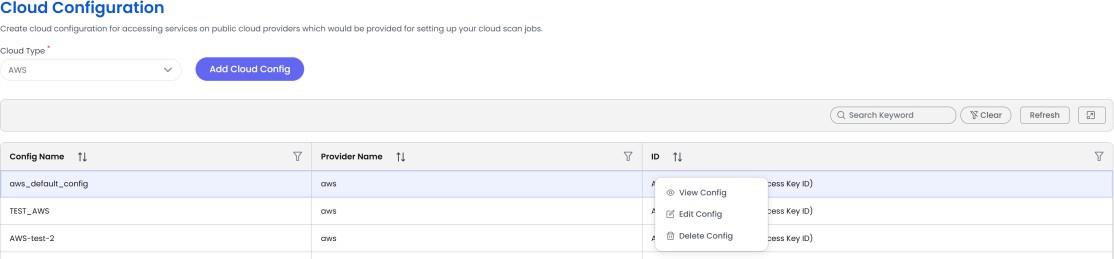
Notes:
Creating a Cloud Discovery Scan Configuration
Navigate to: Discovery → Scan Config.
On the Scan Configuration page. Select Cloud from the Scan Type dropdown options.
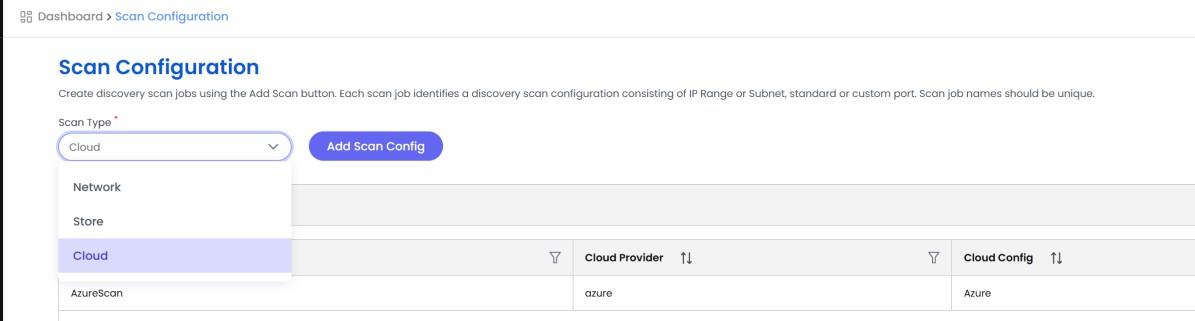
Click the Add Scan Config button.
In the Add Scan Configuration window, fill in the following details:
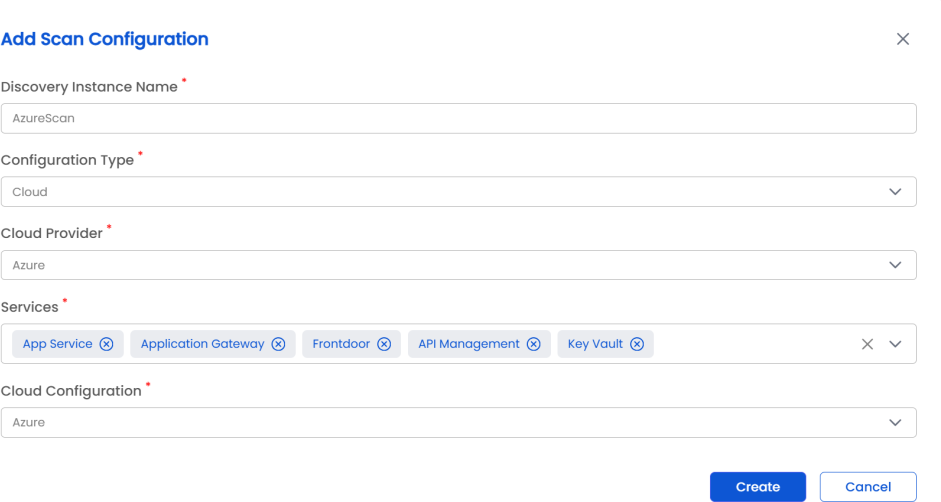
| Field Name | Description |
|---|---|
| Discovery Instance Name | A unique name to identify this cloud discovery job (e.g., Cloud-Cert-Scan-01). |
| Configuration Type | Select Cloud from the dropdown. This indicates the discovery will target a cloud environment instead of a network or store. |
| Cloud Provider | Choose the cloud provider for which the scan should run. Currently supported: Azure, AWS. |
| Services |
Select one or more services to be scanned within the chosen cloud
provider. Supported Services for Azure: Azure Key Vaults (for stored certificates) Azure App Services (for web app bindings) Azure API Management – for APIs with TLS endpoints Azure Front Door – for global HTTP/TLS endpoints Azure Load Balancers / Application Gateways (for TLS endpoints) Supported services for AWS: AWS Certificate Manager (ACM) Identity and Access Management (IAM) You can select multiple services to broaden discovery coverage. |
| Cloud Configuration | Select a preconfigured Cloud Configuration profile containing authentication and access credentials for the selected cloud provider. These configurations are created under Cloud Configurations (found under Discovery → Cloud Config), as we successfully configured in the above step. |
Post-Configuration Creation Actions:
After creating a Cloud Scan Configuration Job, you can:
Right-click on it to initiate the scan.
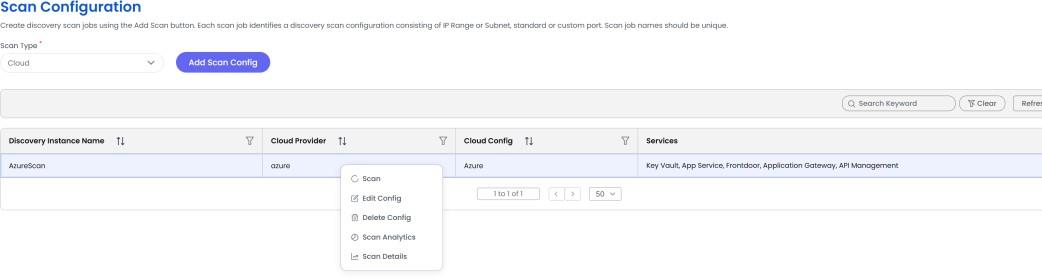
In the Scan dialogue box, select the Scan Mode. You can either run the Scan on demand (right now) or schedule it for a particular time.
On Demand:
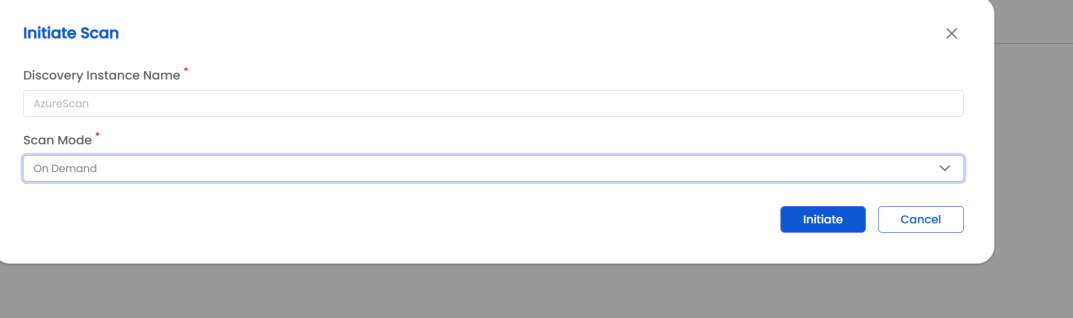
Scheduled: In scheduled scan option, you can also set it to repeat the scan on a daily, weekly or custom basis.
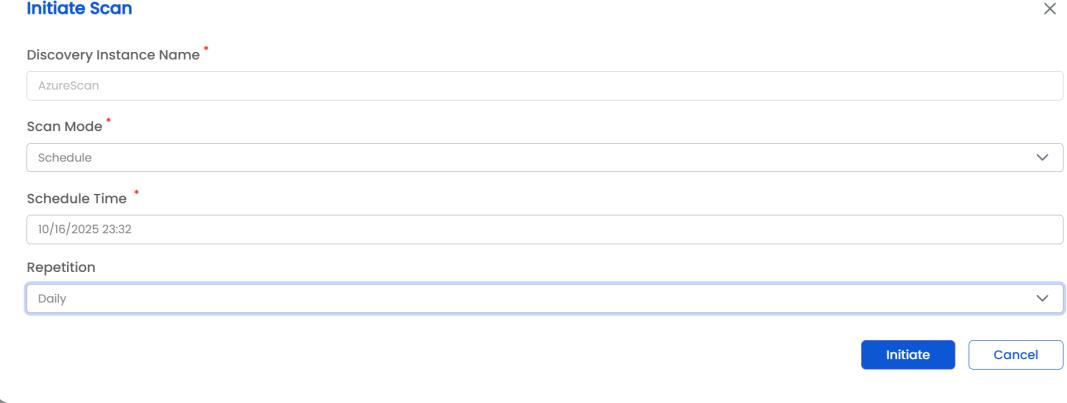
Click on Initiate to start the scan.
After adding scan configurations, go to the Scan Configuration page.
You’ll see a list of all configured scans.
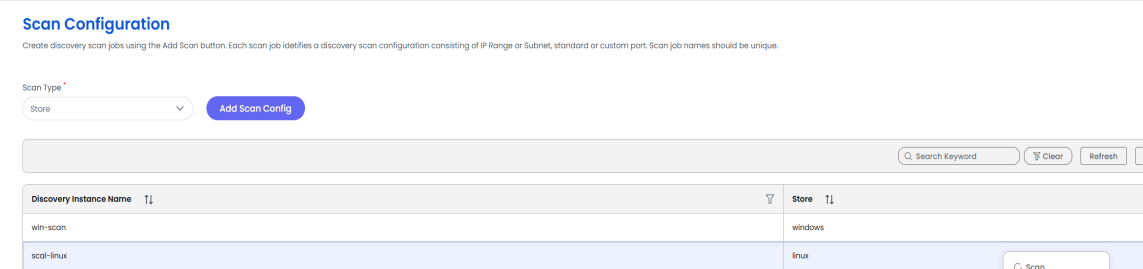
Right-click on any scan to view available options like Scan, Edit Config, Delete Config, Scan Analytics, and Scan Details.

For Windows store scans, Edit Config is not available as the scan name is the only input and cannot be changed after creation.

Provide the required details:
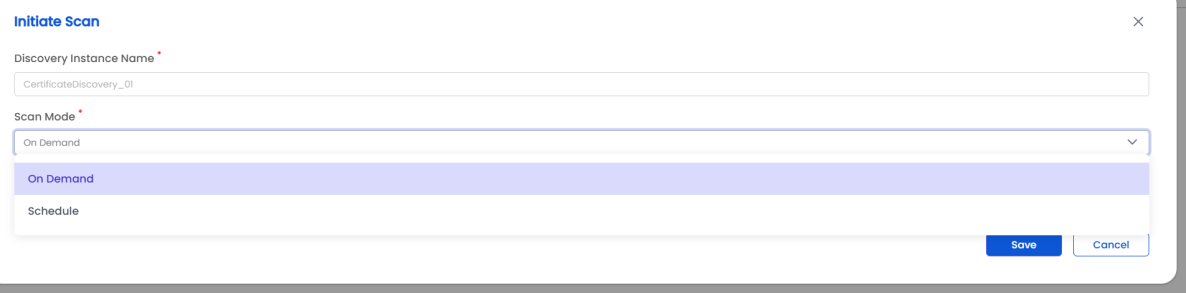
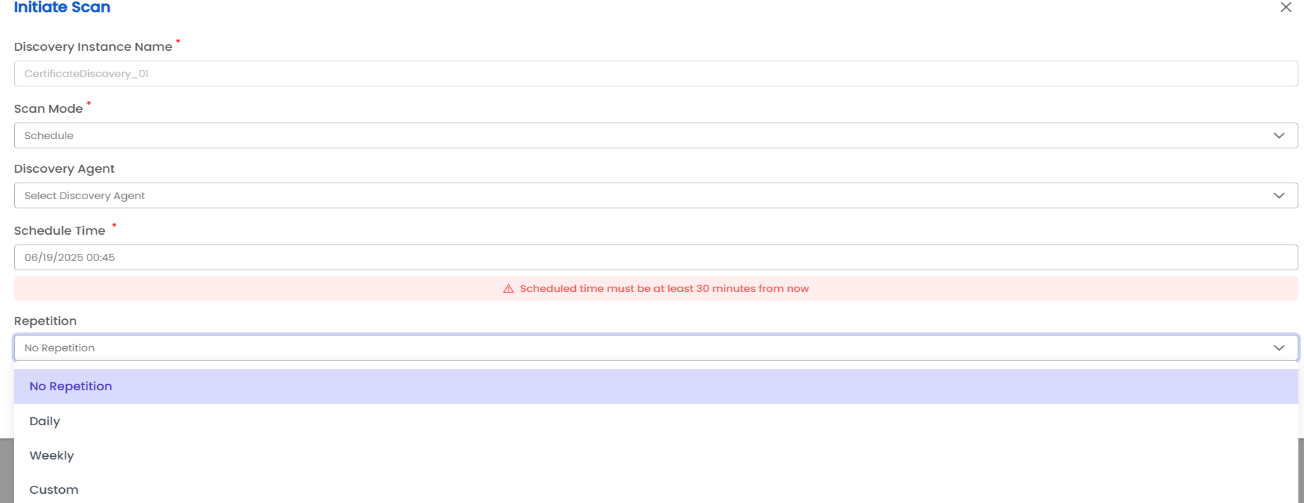
Click Save to begin the discovery process.
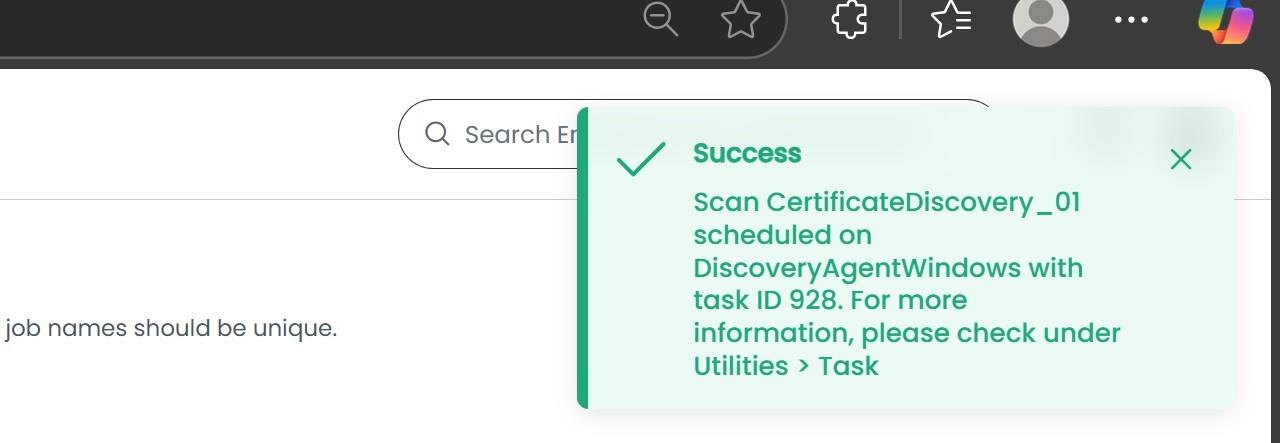
You can view all scan job details for a specific scan instance on the Scan Details page. Enter the scan configuration name and click Search to see the results.
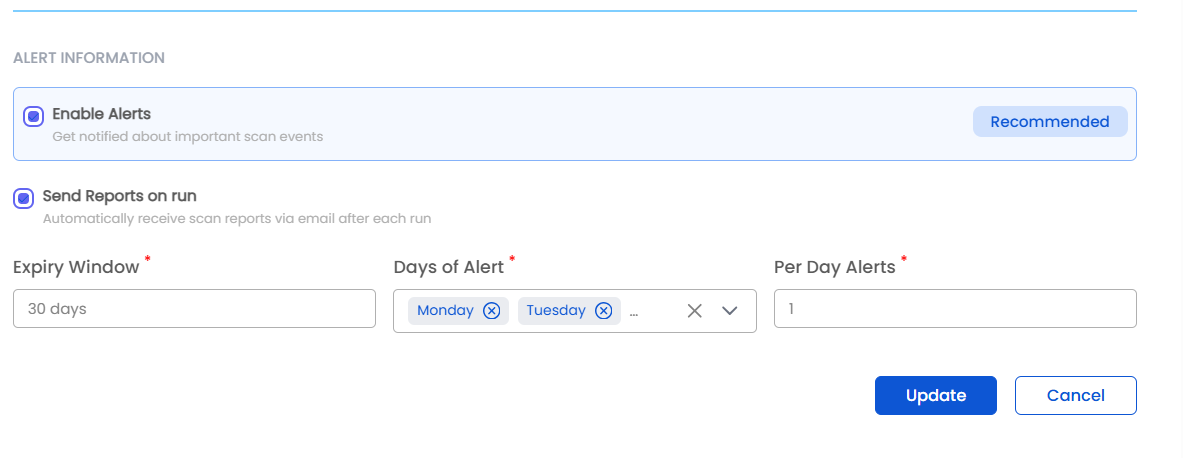
Ownership and notification settings are available on the Create Scan form for every scan type.
| Field | Required | Default | Notes |
|---|---|---|---|
| Owner | No | — | A single registered CertSecure Manager user's email address. The user must already exist. |
| Watcher Groups | No | — | One or more groups. Mutually exclusive with Owner — choose one or the other, never both. |
| Send report on run | No | Off | Emails a CSV of everything found after each run. Requires an Owner or a Watcher Group, as the report has no other recipient. |
| Expiry alerts | No | Off | Emails when discovered certificates approach expiry. Falls back to each certificate's own owner, so a scan-level owner is not required. |
| Expiry window (days) | No | 30 | How far ahead to alert. Accepts 1–3650. |
| Times per day | No | 1 | How often the alert is sent. Accepts 1–24. |
| Send days | No | Mon–Fri | The days on which the alert is sent. |
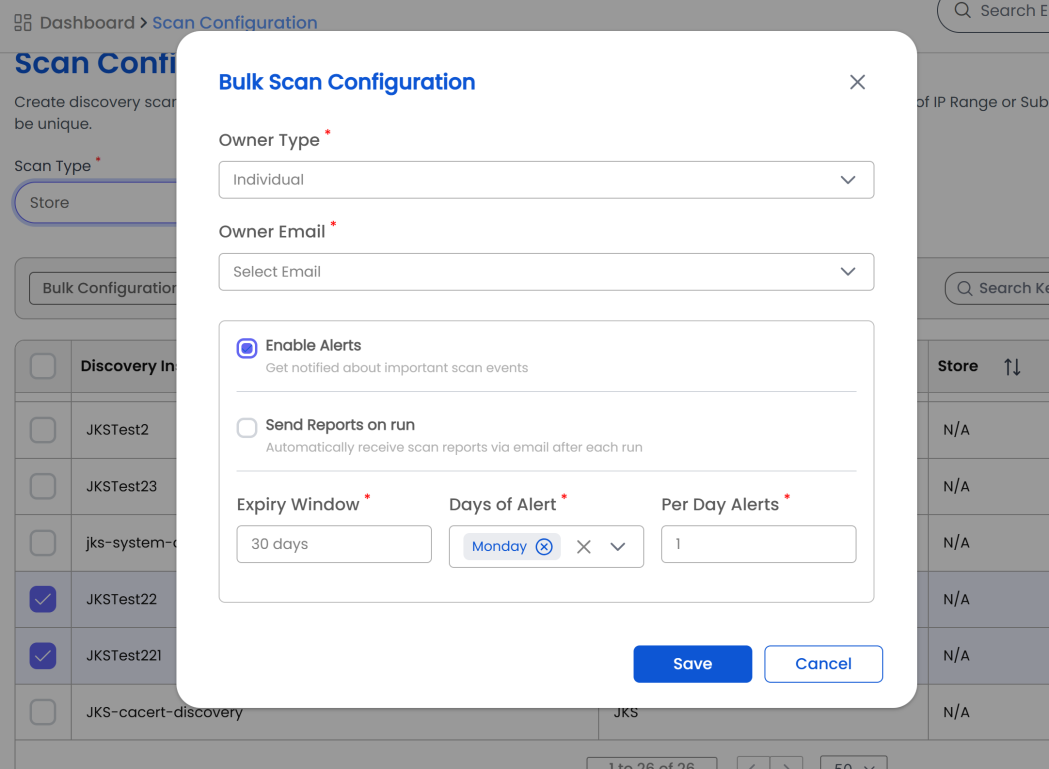
Bulk Notification Update
To change ownership or notification settings across many scans at once, select them in the Scan Configuration list and use Bulk Edit. Only the fields you set are updated; each scan's targets are left untouched.
Use the Analytics section to gain deep insights into discovered certificates across your environment. This interface provides detailed certificate metrics to help you make informed decisions. You can view analytics in two ways: go to the Analytics page, enter the scan name, and view the results or right-click on a scan job and select Scan Analytics as shown below.

To get started on the Analytics page:
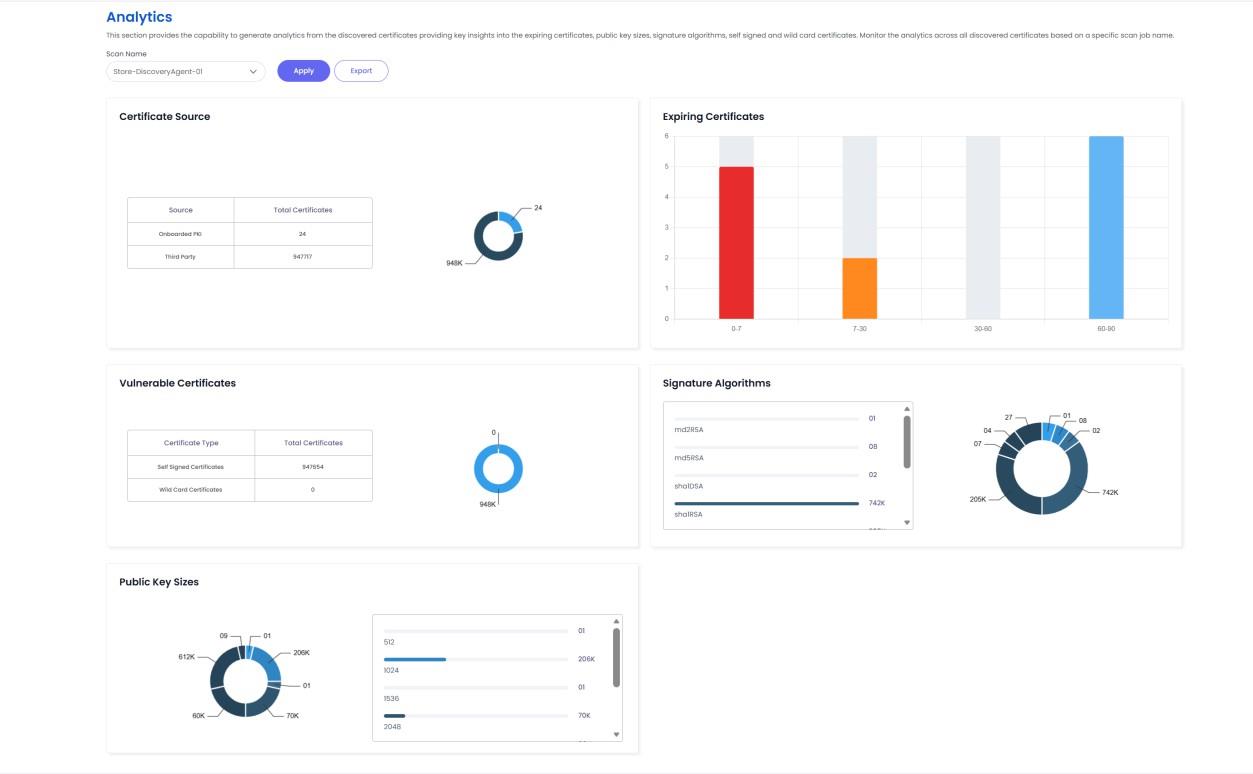
With the Analytics panel, you can:
Once the reports are generated, you can also export them for future use by clicking on the Export button.
This section displays the list of all scan tasks that have been executed under a particular scan configuration.
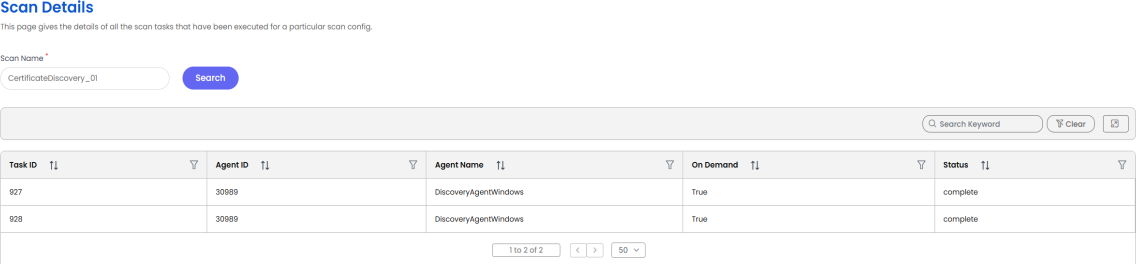
Below the search bar, each scan task entry includes the following information:
Filtering by Scan Status: The Scan Details page can be filtered by Scan Name and/or Scan Status. At least one filter must be supplied. Useful for quickly listing all tasks in each state (e.g., scheduled, pending, complete, failed).

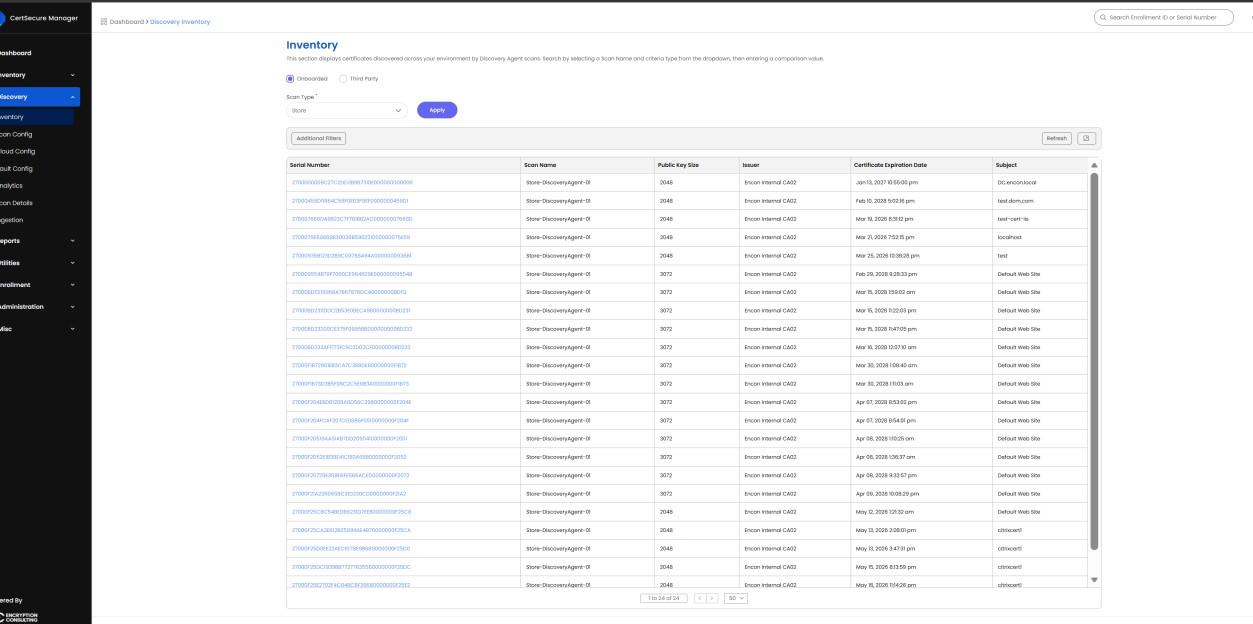
The Discovery Inventory page aggregates every certificate found by any Discovery Agent scan into a single searchable, filterable list. Reach it from the left pane via Discovery → Inventory.
Certificate Category tab: Onboarded PKI vs Third Party. Classification happens at ingest and is re-applied whenever the onboarded CA list changes.
Scan Type tab: Switch the listing between network, store, container, cloud, vault, and filesystem certificates.
Per-field filters: Host, Issuer, Subject, Port, Key Size, Key Algorithm, Signature Algorithm, Signature Hash Algorithm, Serial Number, and Owner. Each filter accepts a comma-separated list of values (OR within a filter, AND across filters). Host, Issuer, and Subject use case-insensitive substring match; the rest are exact match.
Ownership Assignment: Users can also assign owners to each discovered certificate. Right-click on the certificate → ownership. Select individual users or groups to add as owners.
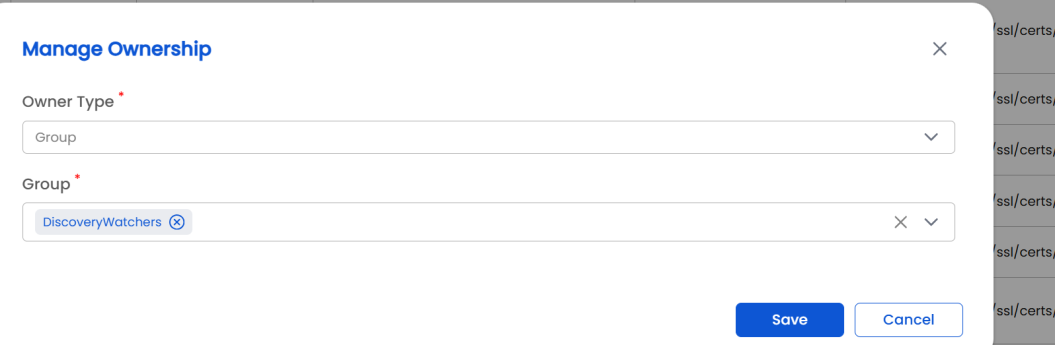
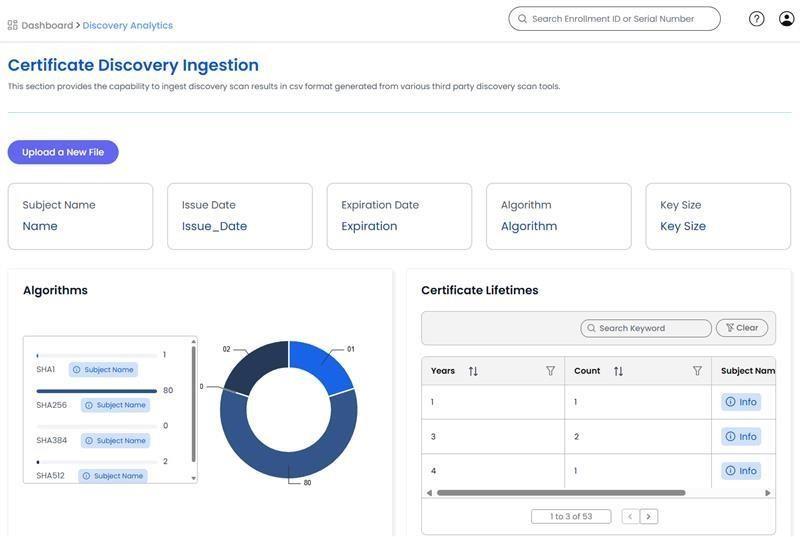
Ingest scan results from third-party tools.
Use Case: Useful for analyzing the scan results from a 3rd party tool for analytics such as key size, signature algorithms, subject name, issue date, self-signed and wild-card certificates etc.
WinRM must be configured via GPO to enable store scan.
To be performed on: Domain Controller using the Group Policy Management Console (GPMC).
Step 1: Enable WinRM Service
Log in to the Domain Controller.
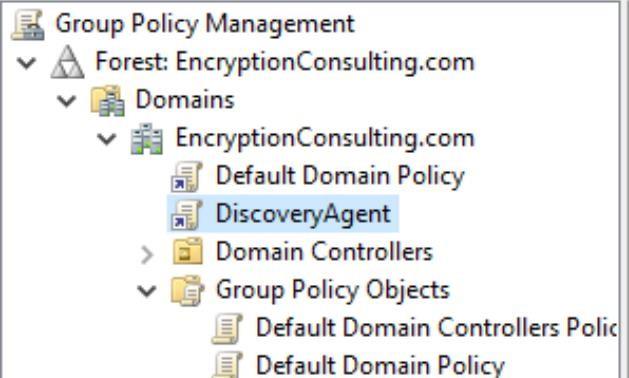
Open Group Policy Management Console (GPMC)
Create a new GPO under Domain > Group Policy Object
Edit GPO:
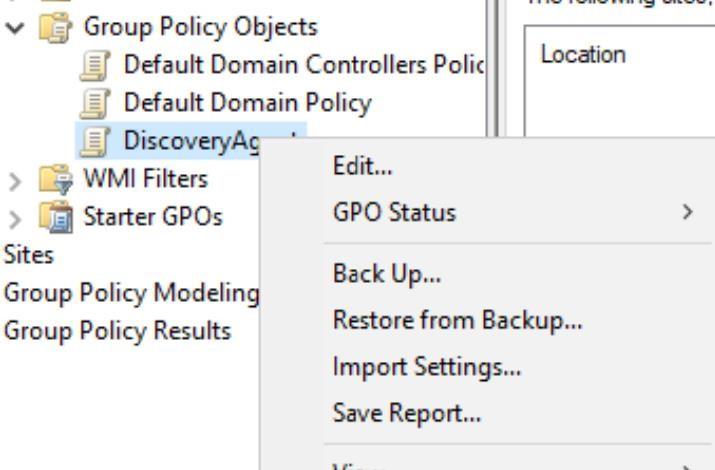
Go to: Computer Configuration > Policies > Windows Settings > Security Settings > System Services
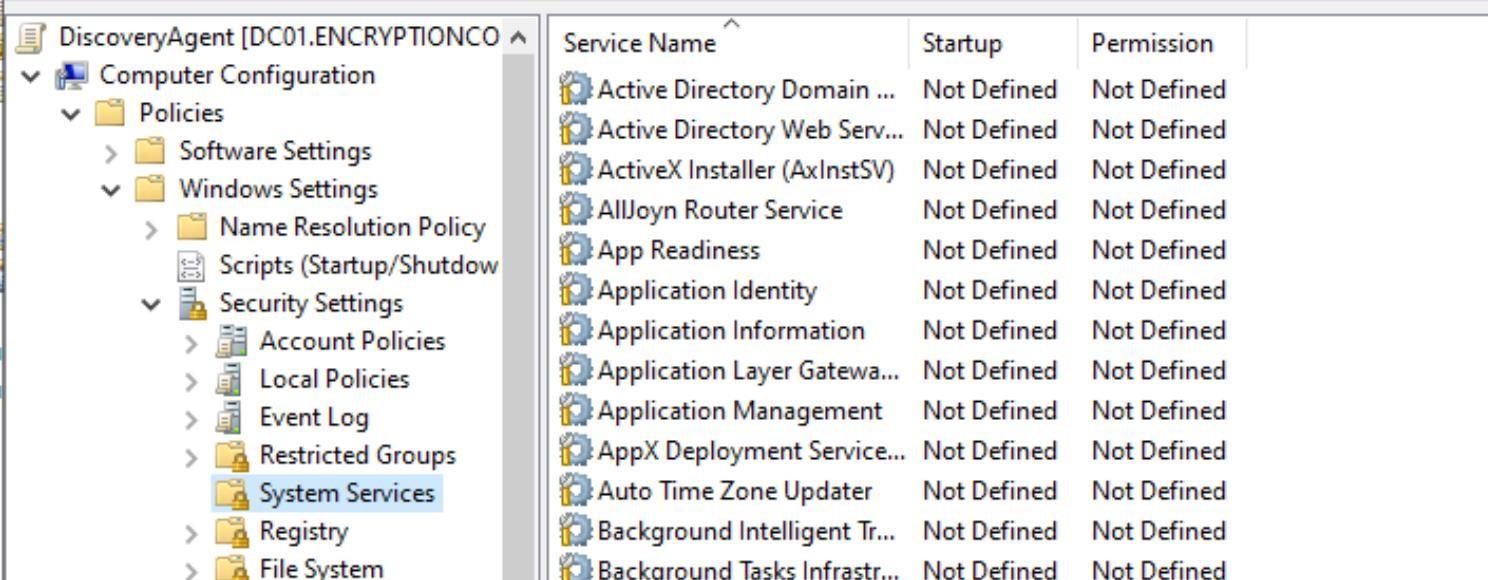
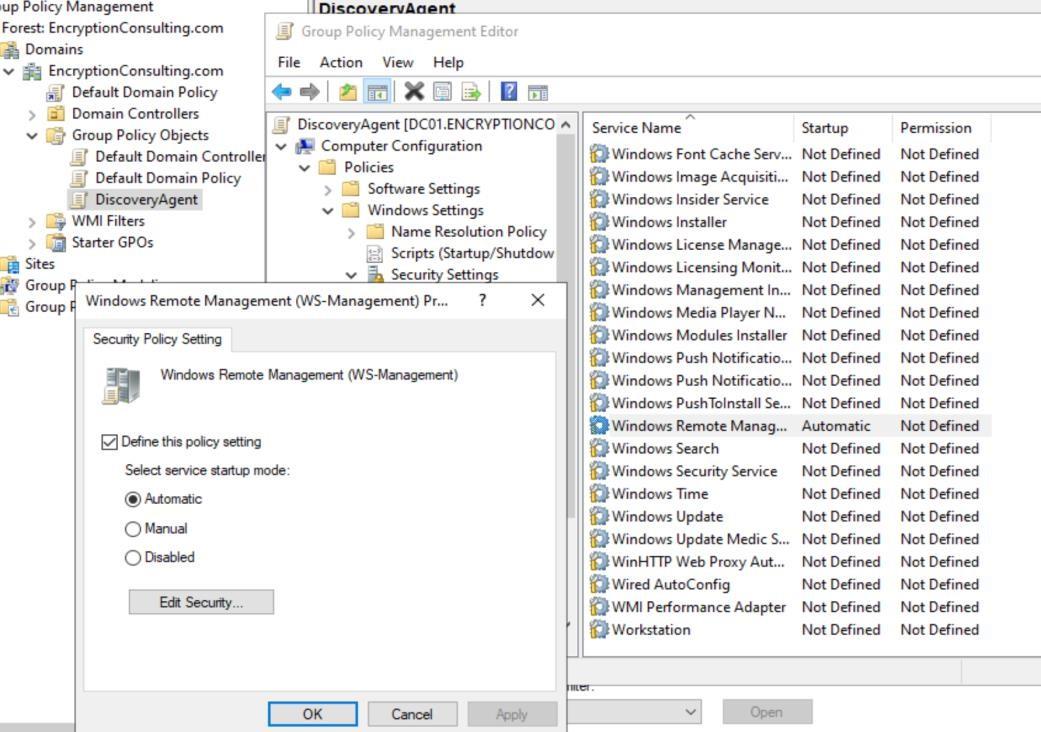
Step 2: Configure Firewall Rule
In GPO Editor:
Go to: Computer Configuration > Policies > Windows Settings > Security Settings > Windows Firewall > Inbound Rules
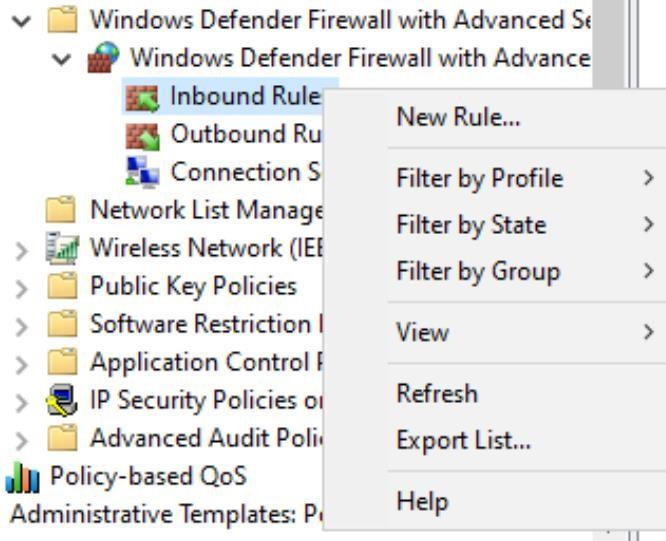
Create New Rule > Predefined > Select Windows Remote Management
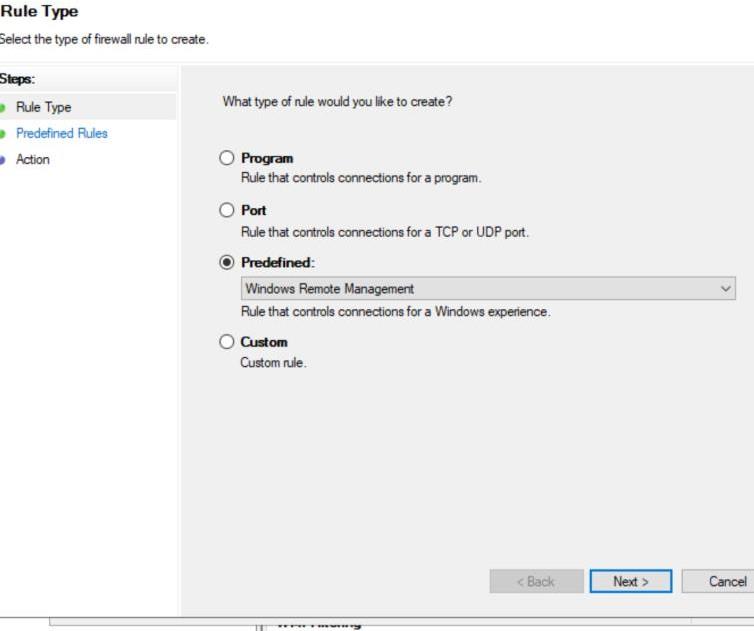
Allow domain profile.
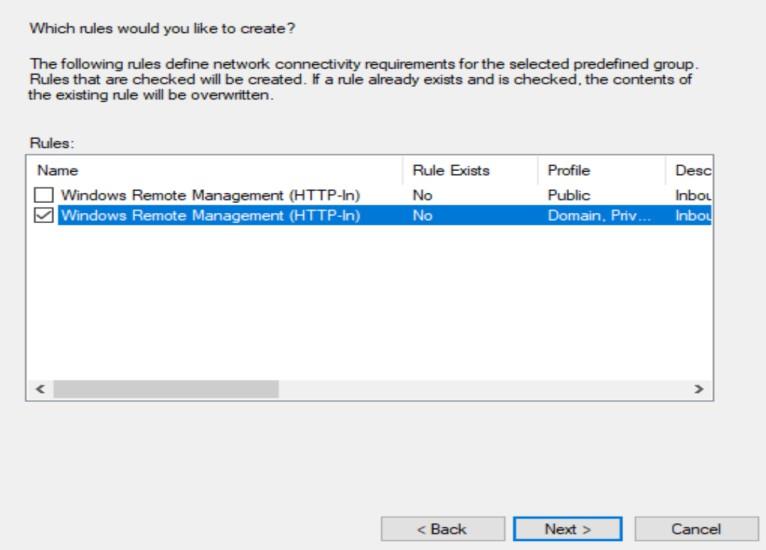
Step 3: Allow PowerShell Requests (Ports 5985 & 5986)
In GPO Editor:
Navigate to: Computer Configuration > Policies > Administrative Templates > Windows Components > Windows Remote Management > WinRM Service
Open Allow remote server management through WinRM
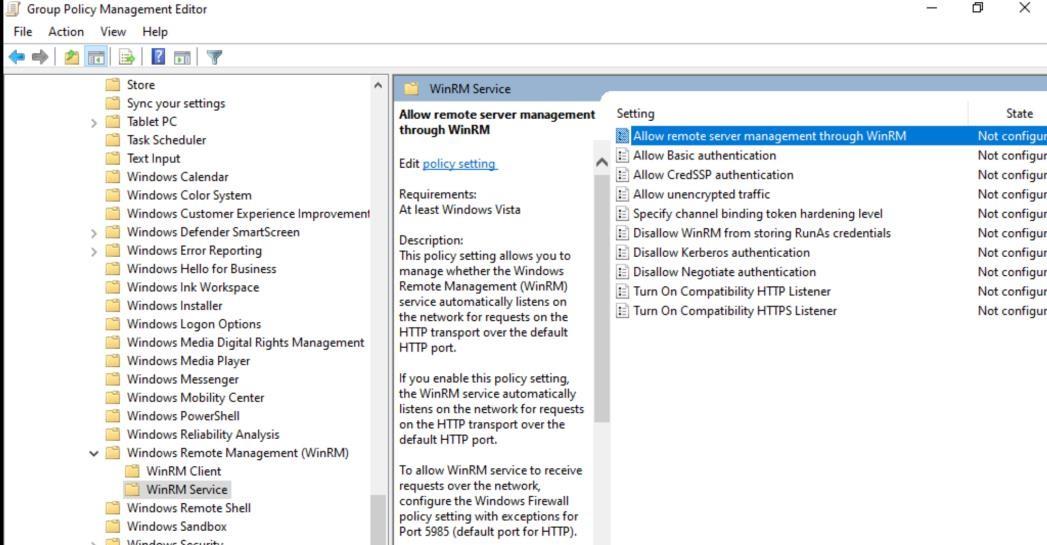
Enable policy
Add * in both IPv4 and IPv6 filters
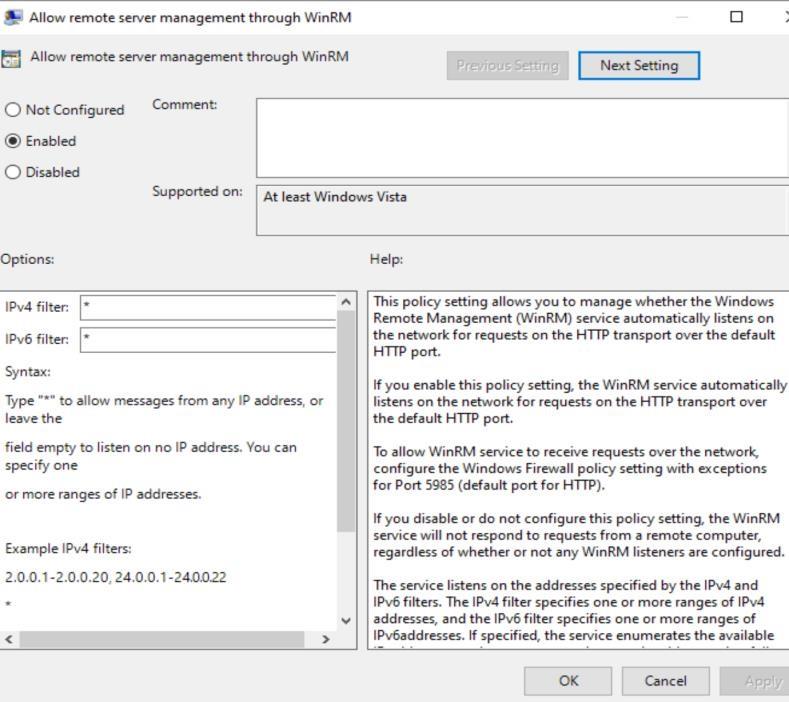
WinRM listens on TCP 5985 (HTTP) and TCP 5986 (HTTPS). Ports 80 and 443 are not used by WinRM. The predefined Windows Remote Management rule created in Step 2 allows inbound TCP 5985. If your organization requires WinRM over HTTPS, also allow inbound TCP 5986 and configure an HTTPS listener on the target machines.
Step 4: Deploy GPO
Drag the new GPO to the domain
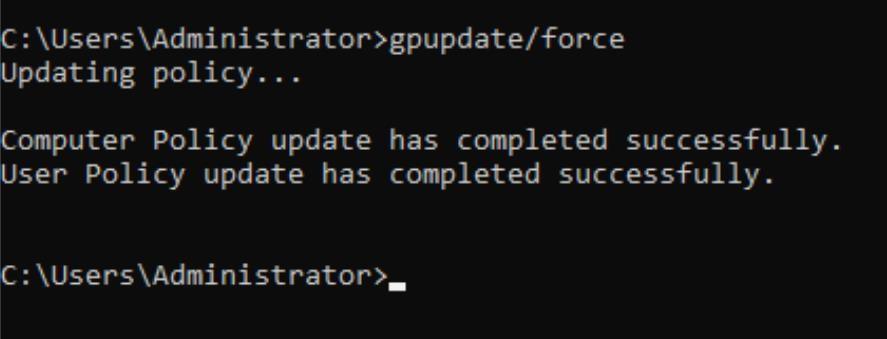
Run gpupdate /force on the Domain Controller
Step 5: Verify WinRM Access
Run these checks from the Discovery Agent machine, signed in as the account configured for the EC_DiscoveryAgent service, against the Domain Controller and at least one target machine:
Confirm WinRM responds:
Test-WSMan -ComputerName <FQDN>Confirm the port is reachable:
Test-NetConnection -ComputerName <FQDN> -Port 5985Run a remote command as the service account:
Invoke-Command -ComputerName <FQDN> -ScriptBlock { whoami } -Credential (Get-Credential)If the result is Access is denied, confirm the account is a member of Remote Management Users on that machine, then check the WinRM session configuration permissions on it:
Get-PSSessionConfiguration -Name Microsoft.PowerShell | Select-Object -ExpandProperty PermissionThis section describes how to configure the CertSecure discovery agent (Linux store scanner) to automatically discover Linux hosts across one or more AWS accounts by tag, rather than supplying host IPs manually. Once hosts are discovered, the agent connects to each over SSH to collect certificates from the certificate stores.
Discovery works in two phases:
Throughout this section, replace the following placeholders with real values:
Before enabling discovery, confirm all the following:
Discovery uses two IAM roles: a scanner role in the scanner account (attached to the agent instance), and a read-only discovery role in each target account.
1. Scanner role (scanner account)
Attached to the agent instance as an instance profile.
Permission policy — what it may do: assume the discovery role in the target account(s). For many accounts, use a wildcard on the account ID so this policy never changes as accounts are added or removed (see the note below).
{
  "Version": "2012-10-17",
  "Statement": [{
    "Sid": "AssumeDiscoveryRoles",
    "Effect": "Allow",
    "Action": "sts:AssumeRole",
    "Resource": "arn:aws:iam::<TARGET_ACCOUNT>:role/CertSecureDiscoveryRole"
  }]
}
To let the scanner role assume the discovery role in many accounts, replace <TARGET_ACCOUNT> in the Resource with *, for example arn:aws:iam::*:role/CertSecureDiscoveryRole. The policy then does not need to change when accounts are added or removed.
2. Discovery role (each target account)
Trust policy — who may assume it: the scanner role (written explicitly, since it is a cross-account principal).
{
  "Version": "2012-10-17",
  "Statement": [{
    "Sid": "AllowCertSecureScannerAssume",
    "Effect": "Allow",
    "Principal": { "AWS": "arn:aws:iam::<SCANNER_ACCOUNT>:role/CertSecureScannerRole" },
    "Action": "sts:AssumeRole"
  }]
}
Permission policy — what it may do: read-only listing of instances and tags. Nothing else.
{
  "Version": "2012-10-17",
  "Statement": [{
    "Sid": "CertSecureReadOnlyDiscovery",
    "Effect": "Allow",
    "Action": ["ec2:DescribeInstances", "ec2:DescribeTags"],
    "Resource": "*"
  }]
}
Important: the role must include ec2:DescribeInstances, not only ec2:DescribeTags. Discovery uses DescribeInstances with tag filters; a tags-only role returns zero hosts with no error. When reusing an existing “describe” role, verify it has both.
Note: the "Resource": "*" is required because the EC2 Describe* actions do not support resource-level permissions. This is a constraint of those API actions, not a broad grant; the actions are read-only.
Role names
The role names must match exactly across both policies (CertSecureScannerRole, CertSecureDiscoveryRole). A mismatch surfaces later as an AccessDenied at assume time. A custom name may be used as long as it is consistent across the trust policy, the scanner permission policy, and the agent configuration (ROLE_NAME).
Certificate discovery requires direct network reach to each host. Required:
The agent authenticates to each discovered host over SSH using a single service account, applied to every discovered host. The account must be able to log in over SSH and read the certificate store paths. (How the account is backed — local, LDAP, or a directory service such as AD/SSSD — does not matter to the agent, as long as it can log in with a password.) The credential can be provided two ways:
Using Secrets Manager
Store the service-account password in Secrets Manager in the scanner account. The value may be a plain string (the password) or JSON with a "password" key, e.g. {"password":"..."}.
Grant the scanner role permission to read that one secret (add to the scanner role; keep the trailing -* so it matches the random suffix Secrets Manager appends to the ARN):
{
  "Version": "2012-10-17",
  "Statement": [{
    "Sid": "ReadSSHSecret",
    "Effect": "Allow",
    "Action": "secretsmanager:GetSecretValue",
    "Resource": "arn:aws:secretsmanager:<SECRETS_REGION>:<SCANNER_ACCOUNT>:secret:<SECRET_NAME>-*"
  }]
}
Note: If the secret is encrypted with a customer-managed KMS key (rather than the default aws/secretsmanager key), the scanner role also needs kms:Decrypt on that key, or the fetch fails on a KMS error even with the permission above.
Region: the secret is read in the scanner account using the agent's instance-profile role, so no cross-account secret access is involved. SECRETS_REGION must match the region the secret was created in
When the scan is created with Discover Hosts enabled (the task carries no host list), the agent discovers its targets from the [AWS_DISCOVERY] section of the agent configuration file (conf.ini):
[AWS_DISCOVERY]
# Target AWS account IDs, comma-separated. The agent assumes ROLE_NAME in each.
ACCOUNTS=<TARGET_ACCOUNT>[,<TARGET_ACCOUNT_2>,...]

# AWS region(s) to search per account, comma-separated.
REGIONS=us-east-1

# Read-only cross-account role assumed in each account
# (arn:aws:iam::<ACCOUNT>:role/<ROLE_NAME>).
ROLE_NAME=CertSecureDiscoveryRole

# Tag filter: key=val1,val2 ; key2=val3  (OR within a key, AND across keys).
# e.g. environment=production,development; operating_system=ubuntu,centos
TAG_FILTERS=environment=production; operating_system=ubuntu

# SSH service-account username applied to every discovered host.
SSH_USERNAME=<service-account-username>

# Retrieve the SSH password from Secrets Manager. When SSH_PASSWORD_SECRET_ID
# is set, SSH_PASSWORD is ignored. SECRETS_REGION is required and names the
# region the secret lives in.
SSH_PASSWORD_SECRET_ID=<SECRET_NAME>
SECRETS_REGION=<SECRETS_REGION>

# Fallback only - used when SSH_PASSWORD_SECRET_ID is empty.
SSH_PASSWORD=This section lists problems commonly seen when onboarding the Discovery Agent and how to resolve them.
Agent log locations
| Platform | Location |
|---|---|
| Windows | C:\Certsecure\EC_Discovery_Agent.log |
| Linux | The directory set as LOGDIR in the [LOGGING] section of conf.ini. Service output is also available with journalctl -u discovery-agent.service. |
Log rotation is controlled by MAXSIZE_BYTES (default 100000000) and NUM_BACKUP (default 10), and verbosity by LOGLEVEL (default INFO), all in the [LOGGING] section of conf.ini. Log lines the backend cannot accept are held in insert_log_spool.jsonl in the log directory until the next successful contact, up to LOG_SPOOL_MAX_BYTES (default 5000000).
A healthy agent
An online agent with no work logs a poll of the backend DiscoveryAgent/agentTasks endpoint at every POLL_INTERVAL and receives an empty task list. When a scan is queued, the log shows the task, the scan configuration it runs with, and the outcome.
Common problems
| Symptom or log message | Likely cause | Resolution |
|---|---|---|
| WinRM cannot process the request ... Cannot find the computer <name> (NetworkPathNotFound, PSSessionStateBroken), followed by Error fetching machines from domain controller | The Domain Controller value is the domain name (for example, example.com) instead of a domain controller host name. | Set Domain Controller to the FQDN or IP address of a domain controller. nltest /dsgetdc:<domain> returns one. Update the value in the agent configuration and restart the EC_DiscoveryAgent service. |
| Connecting to remote server <host> failed ... Access is denied (AccessDenied, PSSessionStateBroken) | The service account is not authorized for WinRM on that machine. | Confirm the service runs as the intended account, that the account is in Remote Management Users on the Domain Controller and the target, and that the WinRM session configuration permits it. Use the checks in Step 5 of the WinRM section. |
| Scan stays in pending | The agent is offline, not registered, or has not polled yet. | Check that the agent shows as online under Agents, and look for polling messages in the agent log. The agent picks up tasks only every POLL_INTERVAL seconds. |
| Linux service fails with status=200/CHDIR and Start request repeated too quickly | The working directory in discovery-agent.service does not exist or is not accessible to the service user. | Edit WorkingDirectory and ExecStart to match the install location, then run daemon-reload, reset-failed, and start. |
| A folder with backslashes in its name appears in the agent directory, and no logs are written where expected | LOGDIR was written with backslashes on Linux. | Use forward slashes, create the directory, and restart the service. Remove the incorrectly named folder. |
| No certificates found, or authentication errors, on a Linux host | SSH password authentication is disabled, or the account cannot read or traverse the certificate path. | Sign in over SSH with the same credentials, and check permissions along the path with namei -l <path>. |
| Discover Hosts finds no hosts and reports no error | The discovery role has ec2:DescribeTags but not ec2:DescribeInstances, or TAG_FILTERS does not match the instance tags. | Add ec2:DescribeInstances (see IAM Setup) and compare TAG_FILTERS with the tags on the instances. |
Information to provide to support
The agent log, the scan configuration name, the task ID from Utilities > Task, the agent operating system, and the exact error text from the log.